• Home
  • Suggest A Craft
  • DIY Newsletter

Polymer Clay

Fimo and clay tips and tutorials

  • About CraftGossip
  • Our Network
    • Bath & Body Crafts
    • Candle Making Ideas
    • Crochet Ideas
    • Cross Stitch
    • Edible Crafts
    • Felting Patterns
    • Glass Art
    • Home & Garden Ideas
    • Indie Crafts
    • Jewelry Making
    • Kids Crafts
    • Knitting Patterns
    • Lesson Plans
    • Needlework
    • Party Ideas
    • Polymer Clay
    • Quilting Ideas
    • Recycled Crafts
    • Scrapbooking
    • Sewing Patterns
    • Card Making
    • DIY Weddings
    • Not Craft Ideas
  • Giveaways
  • Roundups
  • Store
  • Search

Glues and Polymer Clay

August 5, 2018 by Elaine Robitaille

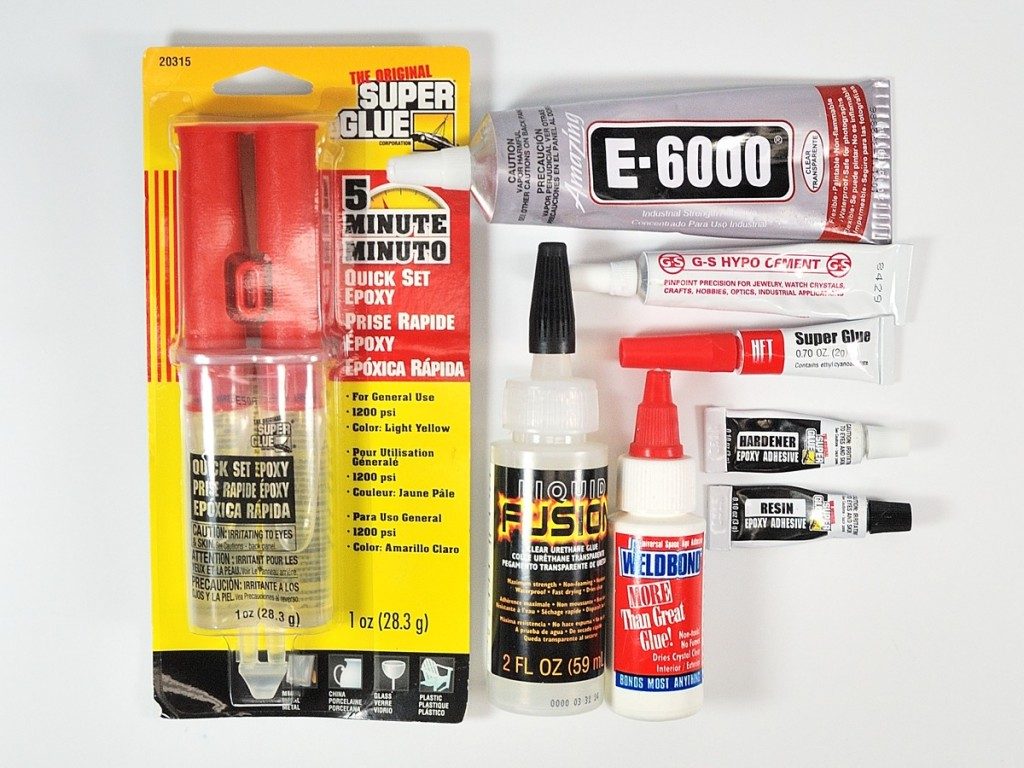
I’m currently building up inventory for fall shows which means, at least somewhat, I’m using glues here and there. And glue and polymer clay is a pain. Some glues just don’t work. For example, I’ve had embarrassing failures with hot glue in the distant past. Sometimes my fall back glue (E6000 on cleaned surfaces) just doesn’t work one apiece in a batch of dozens.

Ginger from the Blue Bottle Tree goes over her notes, compiled from others, in her post here and they seem to reflect what I’ve found as well. It can be basically summarized as: if possible, join clay to clay with liquid clay and a good baking. Join other sturdy items to clay by baking them INTO the clay if possible – I make pins this way – or using the strongest glue you can get.

Another thing I found out was that CA or cyanoacrylate glues (superglues) make a great polish for polymer clay. In fact, it’s a better polish than glue unless you’re doing just small repairs or additions. I use CA or Gorilla Glue to fix tiny cracks since they either glue instantly or fill space as they glue. I use E6000 or Goop, on alcohol cleaned surfaces for some pieces that won’t be handled too much. And I’m working on changing more of my work to clay and mechanical hold rather than depending on glues.

What kind of glue do you prefer to use on your projects? Any horrifying failures or really great glue tricks?

Next Polymer Clay Idea:

  • The Best Glue for Polymer Clay (And How to Use It…
«
»

Comments

  1. Gail says

    August 5, 2018 at 11:04 am

    I, too, have a love – hate relationship with glues! Everyone swears by E6000 but I don’t! I love a quick grab glue that dries quick and clear for my craft projects. I discovered DAP RapidFuse Multi-Purpose Adhesive that’s perfect for most of my bonding needs – except fabrics! My go-to fabric glue for that is Fabri-Tac – it’s the best!

  2. Penny says

    August 8, 2018 at 9:31 am

    one of the top clayers recommended J.B KwickWeld and it is undoubtedly strong and reliable on polymer clay. It is no longer available in the UK and the UK equivalent, equally as reliable is called ‘Power Maxed Epoxy Speed Bond

  3. Sally Moroney says

    April 28, 2020 at 12:25 am

    I find that Superglue works best on pc to pc, but only if its a smooth flat surface. I also use it to fix metal jewellery findings, such as brooch-backs, or magnets. to pc. My other favourite glue is Weldbond, made in Canada. It is similar to PVA, dries fast and clear, and is very strong, and waterproof. Much better than epoxies.

Have you read?

What is Silver Art Clay or Precious Metal Clay (PMC) and How Do You Work With It (and Fire It!)

If you’ve ever dreamed of making real silver jewelry at home—without the need for a silversmith’s workshop—silver art clay or precious metal clay (PMC)  might just be your new best friend. It looks like clay, feels like clay, and shapes like clay, but when you fire it, the binder burns away and what’s left is pure, solid silver. Magical, right?

This material has completely changed the way hobby jewelers and crafters approach metalwork. Instead of melting silver with a torch and hammering it into submission, you can roll, stamp, carve, and mold it just like pottery clay. Let’s walk through exactly what it is, how to use it, and the different ways you can fire it.

What is Silver Art Clay?

Silver art clay (also called precious metal clay or PMC) is a soft, moldable clay made of three parts:

  • Fine particles of pure silver 
  • A non-toxic organic binder 
  • A bit of water 

That mix gives you a squishy clay you can roll, cut, and sculpt into jewelry pieces, charms, pendants, or even small keepsakes. Once it’s dried and fired, you’re left with a piece that’s typically 99.9% pure fine silver—sometimes called “fine silver” or .999 silver.

Tools and Materials You’ll Need

Working with silver clay is much simpler than traditional silversmithing, but a few basic tools make it easier:

  • Clay roller (or a simple acrylic rolling pin) 
  • Textured stamps or mats for impressions 
  • Craft knife or clay cutters 
  • Sandpaper or files (for cleaning up edges) 
  • Water and small brush (to smooth cracks) 
  • Work surface like a Teflon or silicone mat 
  • Firing method (kiln, torch, or stovetop burner depending on the clay brand) 

How to Work with Silver Art Clay

  1. Condition the clay – Silver clay dries out fast, so keep it wrapped or sealed until you’re ready. If it feels stiff, a touch of water and kneading will soften it. 
  2. Shape and design – Roll it flat for pendants, cut out shapes with cutters, or press stamps into it for texture. You can even sculpt tiny figures or mold it around objects. 
  3. Dry it thoroughly – Before firing, your piece must be bone-dry. Air-dry it for at least 24 hours, or speed things up with a hair dryer or a special dehydrator. 
  4. Refine – Once dry, sand edges smooth, carve details, or patch cracks with a clay slip (a watery mix of clay). 

How to Fire Silver Art Clay

Here’s where the “magic” happens—turning clay into solid silver. There are three main ways to do it:

1. Kiln Firing

  • Best for larger or thicker pieces. 
  • Heats evenly and ensures maximum strength. 
  • Fire at around 1650°F (900°C) for 30–60 minutes depending on clay brand. 

2. Torch Firing

  • Perfect for small pendants, charms, or earrings. 
  • Place your piece on a fireproof brick and use a butane torch. 
  • Heat until it glows a peachy orange for 2–5 minutes. Once the binder burns off, you’re left with silver. 

3. Gas Stove Firing (for certain low-fire clays)

  • Place on a mesh screen over a gas hob. 
  • Heat until the binder burns away, usually 5–10 minutes. 
  • Not as strong as kiln firing but works for hobby pieces. 

After Firing: Polishing and Finishing

Once fired, your piece will look white and matte. That’s the silver particles fused together. From here, you can:

  • Brush with a brass or steel brush for a soft shine. 
  • Tumble-polish for a mirror finish. 
  • Patina with liver of sulfur for depth and contrast. 
  • Drill holes, attach jump rings, or add beads and stones. 

Tips for Beginners

  • Work in small sessions—silver clay dries quickly! 
  • Keep a little water pot handy to rehydrate edges. 
  • Practice on small charms before tackling a big statement pendant. 
  • Save scraps! You can rehydrate dried clay with a drop of water. 

Why Crafters Love It

Silver art clay lets you create heirloom-quality jewelry right at your kitchen table. It’s forgiving enough for beginners but versatile enough for serious jewelry makers. From textured pendants to dainty rings, the possibilities are endless—and every piece you fire feels like uncovering treasure.

RSS More Articles

  • Cross Stitch the National Parks in Tiny Form
  • DMC Punch Needle Wall Hanging – A Bold and Modern Statement Stitch
  • Turtle Memory Game – Crochet Pattern
  • How to Make a Fall Squirrel Birthday Card
  • Create a Giant Halloween Decoration That Will Leave Everyone Spooked – DIY Big Guy Tutorial
  • Combine Knit and Crochet with this Cute Checkers Set
  • Rosh Hashanah Coloring Sheets and Other Activities for Kids
  • Cassette Tape Shaped Mini Album
  • Free Crochet Pattern – Chunky Rib Tunisian Hat and Cowl
  • What is Silver Art Clay or Precious Metal Clay (PMC) and How Do You Work With It (and Fire It!)

Pick Your Blog

  • Sewing
  • Knitting
  • Quilting
  • Crochet
  • Home & Garden
  • Recycled Crafts
  • Scrapbooking
  • Card Making
  • Polymer Clay
  • Cross-Stitch
  • Edible Crafts
  • Felting
  • Glass Art
  • Indie Crafts
  • Kids Crafts
  • Jewelry Making
  • Lesson Plans
  • Needlework
  • Bath & Body
  • Party Ideas
  • Candle Making
  • DIY Weddings
  • Not Craft
  • Free Craft Projects

Copyright © 2025 · CraftGossip | Start Here | Contact Us | Link to Us | Your Editors | Privacy and affiliate policy