• Home
  • Suggest A DIY
  • DIY Newsletter

Polymer Clay

Fimo and clay tips and tutorials

  • About CraftGossip
  • Our Network
    • Bath & Body Crafts
    • Candle Making Ideas
    • Crochet Ideas
    • Cross Stitch
    • Edible Crafts
    • Felting Patterns
    • Glass Art
    • Home & Garden Ideas
    • Indie Crafts
    • Jewelry Making
    • Kids Crafts
    • Knitting Patterns
    • Lesson Plans
    • Needlework
    • Party Ideas
    • Polymer Clay
    • Quilting Ideas
    • Recycled Crafts
    • Scrapbooking
    • Sewing Patterns
    • Card Making
    • DIY Weddings
    • Not Craft Ideas
  • Giveaways
  • Roundups
  • Store
  • Search

Experiment with Base Colors

May 31, 2008 by heather powers

pinkurchin1.JPG

Color theory at work: when you place a color next to something, it will look different.  Simple, but helpful to know!  The next time you are creating beads or objects using molds and paint, try these nifty little tricks:

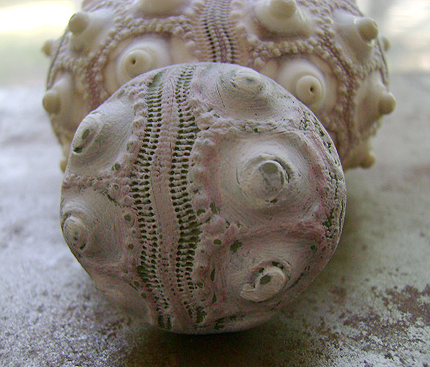
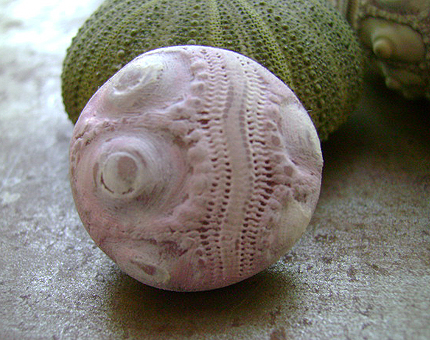
Compliments – to make a color appear duller or muted, paint it’s complimentary hue on top.  Like my green base with pink hues painted for this sea urchin.  It adds depth to the bead compared to the example below that is a pink base with pink paint.  Complimentary colors are opposite of each other on the color wheel, like red & green, teal & copper, purple & gold, etc.  Funny contradiction: If you paint these colors next to each or let more of the color below show through, the colors will appear more intense.

3pinkurchin2.JPG

Analogous Colors - These are colors right next to each other on a color wheel.  Try painting orange on top of red or yellow to brighten up the colors for a little extra pop.  A color wheel is a handy little tool to add to your clay supplies, you can pick one up at your local arts & crafts store.

You can completely change the look of your beads by experimenting with different base colors.  Remember to have fun and experiment.

[tags]polymer clay, arts & crafts, color theory, molds[/tags]

Next Polymer Clay Idea:

  • How To Make An Air Dry Clay Paint Palette With…
«
»

Comments

  1. Kim Cavender says

    June 3, 2008 at 4:01 pm

    Heather, I love your new beads. They look like “organic shabby chic” to me. Very cool!

  2. heather powers says

    June 3, 2008 at 9:01 pm

    Hmm, maybe I could start a new design movement! Thanks Kim, this is one of my favorite beads.

  3. Cindy Lietz, Polymer Clay Tutor says

    June 7, 2008 at 10:53 am

    I agree with Kim! These new beads are wonderful. I like that phrase… organic shabby chic. Catchy!

    Good advice on the base colors. A lot of people don’t realize what a big difference the background color has on the foreground color. I do it by instinct but I’ll start using my color wheel more often now!

Have you read?

How To Make A Milk Mache Molding Compound

There are some craft projects that feel like they belong on a rainy afternoon kitchen table, and this Milk Mache Molding Compound is exactly one of them. It is part craft, part science experiment, and part “wait… did we just turn milk into something solid?”

This clever little project from CraftBits shows you how to make a simple homemade molding compound using just milk and vinegar. The idea is wonderfully old-school: when the vinegar reacts with the milk, it separates into curds and liquid, leaving you with a soft mixture that can be pressed, shaped, and dried into a hard, stone-like material.

It’s a lovely one to try with kids, especially if you enjoy hands-on STEM-style crafts that do not require a trolley full of supplies. You can use the finished compound to make small charms, beads, ornaments, rustic tags, or simple molded shapes. Just keep the pieces small and thin, as this is not really the sort of compound you would use for large sculptures or anything that needs to be perfectly smooth.

What I like most about this project is how accessible it is. Most of us already have milk, vinegar, a bowl, and paper towel in the kitchen, which makes it a brilliant last-minute craft activity. It also has that slightly magical quality children love — one minute it is liquid, the next it is turning into a moldable material.

A couple of tips before you try it: use whole milk if you can, as it tends to give a better result than skim or semi-skimmed milk. White vinegar is also the best choice, as darker vinegars may affect the colour and texture. And don’t rush the draining stage. If the mixture is too wet, it will be soggy and hard to shape; if it is too dry, it may crumble.

This would be a fun companion activity for our other kids craft ideas, especially if you are looking for something simple, inexpensive, and a little bit educational. It also fits nicely with home crafts and handmade gift embellishments if you want to turn your dried shapes into tags or decorations.

Would I call this a polished, professional clay substitute? No. Would I call it a wonderfully curious, messy, memorable craft experiment? Absolutely.

If you enjoy homemade craft supplies, kitchen-table experiments, or easy projects that make children ask “how did that happen?”, this Milk Mache Molding Compound is well worth a try.

You can find the full project instructions here: Milk Mache Molding Compound

Categories

air dry clay animals Artist Spotlight Christmas Clay Canes Clay Charms Craft Inspirations DIY Clay Tutorials and Patterns earrings Freebies halloween Inspiration necklace Plates, Bowls & Platters Polymer Clay Polymer Clay - Techniques Polymer Clay - Tutorials Polymer Clay Community Tips/Tools valentine's day

RSS More Articles

  • Everything You Need to Know About Embroidery Hoops
  • Needle Felting Fairy Tutorial by Santa Meada
  • Printable Stickers for Journals and Planners – Self Care
  • Stitch Your Favorite Fruit on a Sweater
  • 12 Color Wheel Inspired Scrapbook Layouts
  • Crafts With Old Bricks: Creative Ways To Upcycle Leftover Bricks
  • How To Make A Milk Mache Molding Compound
  • The 5 Outlet Placement Mistakes You Don’t Want to Make
  • Celebrate the Spirit of the Southwest with These Stunning Indian Navajo Tribal Quilt Patterns
  • Pricing Handmade Sewing Items Without Undervaluing Yourself

Pick Your Blog

  • Sewing
  • Knitting
  • Quilting
  • Crochet
  • Home & Garden
  • Recycled Crafts
  • Scrapbooking
  • Card Making
  • Polymer Clay
  • Cross-Stitch
  • Edible Crafts
  • Felting
  • Glass Art
  • Indie Crafts
  • Kids Crafts
  • Jewelry Making
  • Lesson Plans
  • Needlework
  • Bath & Body
  • Party Ideas
  • Candle Making
  • DIY Weddings
  • Not Craft
  • Free Craft Projects

Copyright © 2026 · CraftGossip | Start Here | Contact Us | Link to Us | Your Editors | Privacy and affiliate policy