• Home
  • Suggest A DIY
  • DIY Newsletter

Polymer Clay

Fimo and clay tips and tutorials

  • About CraftGossip
  • Our Network
    • Bath & Body Crafts
    • Candle Making Ideas
    • Crochet Ideas
    • Cross Stitch
    • Edible Crafts
    • Felting Patterns
    • Glass Art
    • Home & Garden Ideas
    • Indie Crafts
    • Jewelry Making
    • Kids Crafts
    • Knitting Patterns
    • Lesson Plans
    • Needlework
    • Party Ideas
    • Polymer Clay
    • Quilting Ideas
    • Recycled Crafts
    • Scrapbooking
    • Sewing Patterns
    • Card Making
    • DIY Weddings
    • Not Craft Ideas
  • Giveaways
  • Roundups
  • Store
  • Search

Ornament Thursday

December 13, 2007 by heather powers

dragonflyorn2copy.JPGWelcome Ornament Thursday surfers!

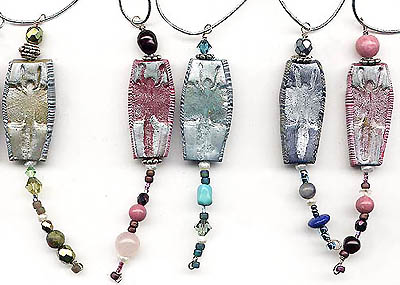
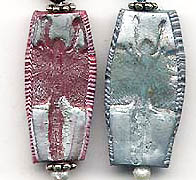
My contribution is a non-traditional ornament featuring a dragonfly stamp.  Perfect if your tree features a garden or floral theme.  This project is suitable for beginners.

dragonflyorndetail.JPGMaterials:

Polymer clay Bead (instructions for bead)

22 gauge silver wire

Pewter spacer

Seed beads in size 8 & 11

Accent beads – I used pearls, crystals and semi-precious stones in monochromatic colors.

Elastic cord – silver color

Instructions:

1. Wire-wrap a large loop.

2. String on a large bead, spacer, dragonfly bead.

3. Add beads in a random order for the tail, this is a great time to use up left over beads.

4. End with another wire-wrapped loop, slip on a larger seed bead before you finish wrapping the loop so that the end looks finished.

5. Tie elastic cording to the top loop, proudly hang from your tree!

Ornament Thursday is a collection of bloggers sharing ornament projects.  Visit the links below for a visual feast of holiday craftiness:

Sara Naumann http://blog.paperwishes.com/sara/

Lynn Kvigne  http://beading.consumerhelpweb.com/blog/

Candie Cooper  http://candiecooper.typepad.com/savvycrafter/

Katie Hacker http://www.katiehacker.com/index.htm 

Margot Potter http://margotpotter.blogspot.com/

Linda Augsburg 

http://cs.makeitminemag.com/mimcs/blogs/makeitmine/ 

Melanie Brooks Lukacs http://earthenwood-beads.blogspot.com/

Art Bead Scene  http://www.artbeadscene.blogspot.com/

Cindy Gimbrone http://lampworkdiva.blogspot.com 

Suzanne http://suzanne-catching-up.blogspot.com/

Humblebeads http://www.humblebeads.blogspot.com/

Polymer Clay Craft Gossip http://polymerclay.craftgossip.com/

Alexa Westerfield from http://swelldesigner.blogspot.com/

Debba Haupert http://www.girlfriendology.blogspot.com/

Elaine Luther http://www.CreativeTextureTools.com/news

Melissa Lee http://www.strandsofbeads.blogspot.com

Rebecca Peck http://vintagegirlmodernworld.wordpress.com/

Jean Yates http://prettykittydogmoonjewelry.blogspot.com

Michelle McGee http://fromichelle.blogspot.com/

Jenny Harada http://pomly.livejournal.com/ 

Jennifer Heynen http://jenniferjangles.blogspot.com/

Hali Chambers www.labyrinthgal.blogspot.com

Kriss Kramer www.art-interrupted.blogspot.com

Brandy Lung Gill http://accesstoexcess.blogspot.com/

[tags]polymer clay, christmas crafts, holiday projects, ornaments, ornaments thrusday[/tags]

Next Polymer Clay Idea:

  • What is Silver Art Clay or Precious Metal Clay (PMC)…
«
»

Comments

  1. Cindy Gimbrone says

    December 13, 2007 at 8:29 am

    A lovely twist on an ornament. Very clear directions! Thank you!

  2. Candie Cooper says

    December 13, 2007 at 9:02 am

    So cool! It really looks like metal. Amazing! Great job and thanks for joining in the fun!

  3. Katie Hacker says

    December 13, 2007 at 10:28 am

    This is awesome, too! You totally rocked the Ornament Thursday this week with THREE incredible ideas!

  4. Margotrgot says

    December 13, 2007 at 11:42 am

    This is great! You can use it as a pendant when you take the tree down. Who doesn’t love multitasking?!

    You’ve been busy!

    Cheers,
    Margot

  5. Margot says

    December 13, 2007 at 11:42 am

    Wow…I had a heck of a time leaving a comment…it’s just Margot…not Margotrgot…hee.

  6. Melissa says

    December 13, 2007 at 12:15 pm

    Wonderful idea! I love the use of the non-traditional image.

  7. Brandi says

    December 13, 2007 at 3:36 pm

    I love these ornaments! The beads make them look really feminine!

  8. Linda at Make It Mine Magazine says

    December 13, 2007 at 4:02 pm

    Non-traditional but very cool, none-the-less!

  9. Michelle says

    December 13, 2007 at 7:05 pm

    This is spendid!

  10. melanie says

    December 20, 2007 at 10:25 am

    Nice! I love dragonflies, and love the way the “tail” is little beadies. Great bead too, that metallic finish is awesome!

Have you read?

DIY Pottery Clay Doily Platter with Pink Speckled Glaze

There’s something special about combining old traditions with modern design. I’ve always adored the stack of vintage doilies handed down from my grandmother, but since lace doesn’t exactly suit my home aesthetic, I started experimenting with ways to repurpose their beautiful patterns in clay. That’s how I ended up creating this doily pottery platter—a simple slab of clay transformed into a textured serving dish with the help of lace, white clay, and a soft pink speckled glaze.

The result is a handmade ceramic platter that looks both timeless and contemporary, perfect for styling on a coffee table, serving treats, or simply displaying as a piece of art.

Materials You’ll Need

  • White pottery clay (stoneware or porcelain recommended)

  • Rolling pin

  • Crochet doily (cotton lace works best)

  • Sharp knife or clay cutter

  • Oval or rectangular template (a cutting board, tray, or paper template works well)

  • Sponge and water

  • Plastic wrap

  • Kiln access (or a local pottery studio firing service)

  • White glaze

  • Pink speckled glaze (or white glaze with pink oxide/pigment speckles)

Step-by-Step Tutorial

Step 1: Roll Out the Clay

Roll your clay slab to about 1/4 inch thick. Keep it even and wide enough to cut an oval platter shape.

Step 2: Press the Doily

Lay your crochet doily flat across the clay. Use the rolling pin to firmly press the pattern into the surface. Lift it carefully to reveal the intricate lace design imprinted into the clay.

Tip: Dust the doily lightly with cornstarch if it tends to stick.

Step 3: Cut the Platter Shape

Using your knife and a template, cut around the clay to form an oval platter shape. Smooth the edges with your fingers or a damp sponge.

Step 4: Lift and Shape the Platter

For a slightly raised platter, drape the clay gently over a shallow mold (like a plate or tray lined with plastic wrap). If you prefer a flat serving dish, leave it as-is on your board.

Step 5: Let It Dry

Allow the platter to dry until leather-hard. Refine the edges with a sponge, smoothing away any rough spots. Once it reaches bone dry, it’s ready for bisque firing.

Step 6: Glaze and Fire

After the first firing, apply a coat of white glaze over the entire platter. Then lightly layer on a pink speckled glaze (you can also achieve this by flicking pink oxide pigment into a clear glaze). The pink speckles add a playful, modern twist while still allowing the lace pattern to shine through. Fire again according to your glaze instructions.

Styling Your Finished Platter

This platter is both practical and beautiful. You can:

  • Use it as a serving dish for cakes, cookies, or fruit.

  • Style it on a coffee table with candles or trinkets.

  • Display it as wall art by adding a plate hanger.

  • Gift it as a keepsake—perfect for Mother’s Day, weddings, or housewarmings.

Every platter I make carries the memory of my grandmother’s doilies, but in a form that feels modern and at home with my style. The pink speckled glaze gives it a playful softness, while the lace impression keeps that touch of handmade tradition alive. It’s proof that old textiles can inspire something completely fresh when reimagined in clay.


Categories

air dry clay animals Artist Spotlight Christmas Clay Canes Clay Charms Craft Inspirations DIY Clay Tutorials and Patterns earrings Freebies halloween Inspiration necklace Plates, Bowls & Platters Polymer Clay Polymer Clay - Techniques Polymer Clay - Tutorials Polymer Clay Community Tips/Tools valentine's day

RSS More Articles

  • FIFA Soccer Crafts For Kids, Crochet Fans And Game-Day Makers
  • Cross Stitch Ice Cream and Frozen Treats
  • Sunflower Ribbon Embroidery Tutorials and Kits to Brighten Your Hoop
  • 15 Charity Sewing Projects That Let You Sew Something Useful For A Good Cause
  • Decorating Mistakes That Make Your Living Room Feel Cluttered
  • Remembering Jill Smokler, Founder Of Scary Mommy
  • In the Garden Layer Cake – A Bloom-Filled Fabric Collection for Spring Sewing
  • How To Do Kitchener Stitch: A Beginner-Friendly Guide To Grafting Knitting Seamlessly
  • Pattern Review: Georgie Granny Square Bucket Hat Crochet Pattern
  • Free Giant Squishy Octopus Crochet Pattern

Pick Your Blog

  • Sewing
  • Knitting
  • Quilting
  • Crochet
  • Home & Garden
  • Recycled Crafts
  • Scrapbooking
  • Card Making
  • Polymer Clay
  • Cross-Stitch
  • Edible Crafts
  • Felting
  • Glass Art
  • Indie Crafts
  • Kids Crafts
  • Jewelry Making
  • Lesson Plans
  • Needlework
  • Bath & Body
  • Party Ideas
  • Candle Making
  • DIY Weddings
  • Not Craft
  • Free Craft Projects

Copyright © 2026 · CraftGossip | Start Here | Contact Us | Link to Us | Your Editors | Privacy and affiliate policy