• Home
  • Suggest A DIY
  • DIY Newsletter

Polymer Clay

Fimo and clay tips and tutorials

  • About CraftGossip
  • Our Network
    • Bath & Body Crafts
    • Candle Making Ideas
    • Crochet Ideas
    • Cross Stitch
    • Edible Crafts
    • Felting Patterns
    • Glass Art
    • Home & Garden Ideas
    • Indie Crafts
    • Jewelry Making
    • Kids Crafts
    • Knitting Patterns
    • Lesson Plans
    • Needlework
    • Party Ideas
    • Polymer Clay
    • Quilting Ideas
    • Recycled Crafts
    • Scrapbooking
    • Sewing Patterns
    • Card Making
    • DIY Weddings
    • Not Craft Ideas
  • Giveaways
  • Roundups
  • Store
  • Search

Ornament Thursday

December 20, 2007 by heather powers

o1.JPG
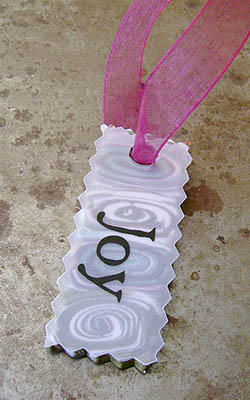
Today’s project is a simple ornament that can do double duty as a gift tag.  I love embellishing gifts with a little something extra!

Materials:

polymer clay (I used scrap colors in red, olive, teal and white)

vellum paper

ribbon

wet/dry sandpaper (optional)

tools: pasta machine, cutting blade, scrapbooking scissors, paper punch

1. Layer the scrap clays together to form a rectangle, put contrasting colors next to each other.  Warm the clay between your hands, compressing it and compacting the edges of the scraps.

2. Roll the clay through the pasta machine on the thickest setting. 

3. With the cutting blade, trim to form a long rectangle. Starting at one end, roll up the clay to form a spiral.  Trim edges.

4. Roll out a sheet of green clay on the thickest setting of the pasta machine.  Slice off thin layers of the spiral and stick it on the green clay.  Run the sheet of green clay through the pasta machine on the thickest setting one more time. 

o2.JPG
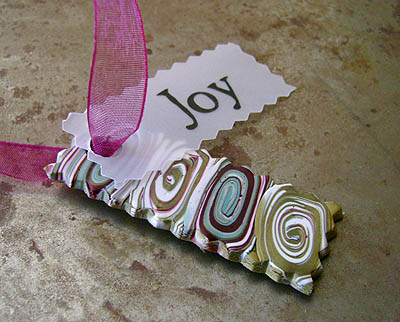
5. Trim with scrapbooking scissors. Bake, sand if desired.

6. Print out holiday greetings on vellum with your home printer.  Trim and punch a hole with with the paper punch.  Punch a hole in the top of the polymer clay tag.  Add vellum to clay tag/ornaments with ribbon. 

o3.JPG

See what other crafty goodness those Ornament Thursday designers have come up with this week:

Christmas cookie – Jennifer Heynen

Christmas tree finger labyrinth – Hali Chambers

Ring in the New Year – Kriss Cramer

Quilty pieced snowman – Linda Augsburg
Simply striking sparkling spheres – Margot Potter

Beaded memory wire – Elaine Luther

Wire & beaded tree – Lynn Kvigne

 Beaded sun catcher – Debba Haupert

Jolly and yummy ceramic candy – Melanie Brooks Lukacs 

 Polymer snowflake embedded in resin – Melissa Lee

Beaded candy canes – Candie Cooper

Polymer clay gift tag/ornament – Heather Powers

Twisted blues – Lampwork Diva aka Cindy Gimbrone  

Holiday spiral tree & party pixie – Art Bead Scene  

Wire bird’s nest – Rebecca Peck

Plush gingerbread doggie – Jenny Harada

Swell ornament – Alexa Westerfield

Holiday paper crafting – Brandy Lung Gill

Shaving cream & chipboard ornament – Michelle McGee

Easy needle-felted orb – Katie Hacker

Lisa Liddy’s Lovely Ornament

[tags]polymer clay, holiday crafts, christmas projects, ornament Thursday[/tags]

Next Polymer Clay Idea:

  • How To Make An Air Dry Clay Paint Palette With…
«
»

Comments

  1. Margot says

    December 20, 2007 at 10:36 am

    Heather

    What a fabulous idea! I love it!

    Thanks so much for joining in the fun.

    Cheers,
    margot

  2. Katie Hacker says

    December 20, 2007 at 10:42 am

    This is great! I love ornaments that do double duty. And your color choices are fab, as always.

  3. Melissa says

    December 20, 2007 at 11:01 am

    I love this – I will definitely try it! Hope you have a wonderful Christmas!

  4. Lisa Liddy says

    December 20, 2007 at 12:03 pm

    Wow…what a lovely keepsake idea!

    Merry Christmas!

  5. Linda at Make It Mine Magazine says

    December 20, 2007 at 12:59 pm

    SO pretty. I’ll be lucky if my presents get ribbons this year, but maybe I’ll try this for next year (or for just regular year-round presents).

    Thanks Heather!

  6. Jennifer Heynen says

    December 20, 2007 at 2:26 pm

    Wow, That’s super cool!
    Jennifer
    Jangles

  7. Cindy Gimbrone says

    December 20, 2007 at 3:37 pm

    What a clever and beautiful use of scrap clay! I love it!

  8. Hali Chambers says

    December 20, 2007 at 3:47 pm

    This is AWESOME! I wouldn’t even know you were using up scraps–and the vellum gives it an elegant finish! 🙂 H.

  9. Michelle says

    December 22, 2007 at 11:34 pm

    Heather… these are SO pretty! I have got to try polymer clay!

Have you read?

How To Make A Milk Mache Molding Compound

There are some craft projects that feel like they belong on a rainy afternoon kitchen table, and this Milk Mache Molding Compound is exactly one of them. It is part craft, part science experiment, and part “wait… did we just turn milk into something solid?”

This clever little project from CraftBits shows you how to make a simple homemade molding compound using just milk and vinegar. The idea is wonderfully old-school: when the vinegar reacts with the milk, it separates into curds and liquid, leaving you with a soft mixture that can be pressed, shaped, and dried into a hard, stone-like material.

It’s a lovely one to try with kids, especially if you enjoy hands-on STEM-style crafts that do not require a trolley full of supplies. You can use the finished compound to make small charms, beads, ornaments, rustic tags, or simple molded shapes. Just keep the pieces small and thin, as this is not really the sort of compound you would use for large sculptures or anything that needs to be perfectly smooth.

What I like most about this project is how accessible it is. Most of us already have milk, vinegar, a bowl, and paper towel in the kitchen, which makes it a brilliant last-minute craft activity. It also has that slightly magical quality children love — one minute it is liquid, the next it is turning into a moldable material.

A couple of tips before you try it: use whole milk if you can, as it tends to give a better result than skim or semi-skimmed milk. White vinegar is also the best choice, as darker vinegars may affect the colour and texture. And don’t rush the draining stage. If the mixture is too wet, it will be soggy and hard to shape; if it is too dry, it may crumble.

This would be a fun companion activity for our other kids craft ideas, especially if you are looking for something simple, inexpensive, and a little bit educational. It also fits nicely with home crafts and handmade gift embellishments if you want to turn your dried shapes into tags or decorations.

Would I call this a polished, professional clay substitute? No. Would I call it a wonderfully curious, messy, memorable craft experiment? Absolutely.

If you enjoy homemade craft supplies, kitchen-table experiments, or easy projects that make children ask “how did that happen?”, this Milk Mache Molding Compound is well worth a try.

You can find the full project instructions here: Milk Mache Molding Compound

Categories

air dry clay animals Artist Spotlight Christmas Clay Canes Clay Charms Craft Inspirations DIY Clay Tutorials and Patterns earrings Freebies halloween Inspiration necklace Plates, Bowls & Platters Polymer Clay Polymer Clay - Techniques Polymer Clay - Tutorials Polymer Clay Community Tips/Tools valentine's day

RSS More Articles

  • Everything You Need to Know About Embroidery Hoops
  • Needle Felting Fairy Tutorial by Santa Meada
  • Printable Stickers for Journals and Planners – Self Care
  • Stitch Your Favorite Fruit on a Sweater
  • 12 Color Wheel Inspired Scrapbook Layouts
  • Crafts With Old Bricks: Creative Ways To Upcycle Leftover Bricks
  • How To Make A Milk Mache Molding Compound
  • The 5 Outlet Placement Mistakes You Don’t Want to Make
  • Celebrate the Spirit of the Southwest with These Stunning Indian Navajo Tribal Quilt Patterns
  • Pricing Handmade Sewing Items Without Undervaluing Yourself

Pick Your Blog

  • Sewing
  • Knitting
  • Quilting
  • Crochet
  • Home & Garden
  • Recycled Crafts
  • Scrapbooking
  • Card Making
  • Polymer Clay
  • Cross-Stitch
  • Edible Crafts
  • Felting
  • Glass Art
  • Indie Crafts
  • Kids Crafts
  • Jewelry Making
  • Lesson Plans
  • Needlework
  • Bath & Body
  • Party Ideas
  • Candle Making
  • DIY Weddings
  • Not Craft
  • Free Craft Projects

Copyright © 2026 · CraftGossip | Start Here | Contact Us | Link to Us | Your Editors | Privacy and affiliate policy