• Home
  • Suggest A DIY
  • DIY Newsletter

Polymer Clay

Fimo and clay tips and tutorials

  • About CraftGossip
  • Our Network
    • Bath & Body Crafts
    • Candle Making Ideas
    • Crochet Ideas
    • Cross Stitch
    • Edible Crafts
    • Felting Patterns
    • Glass Art
    • Home & Garden Ideas
    • Indie Crafts
    • Jewelry Making
    • Kids Crafts
    • Knitting Patterns
    • Lesson Plans
    • Needlework
    • Party Ideas
    • Polymer Clay
    • Quilting Ideas
    • Recycled Crafts
    • Scrapbooking
    • Sewing Patterns
    • Card Making
    • DIY Weddings
    • Not Craft Ideas
  • Giveaways
  • Roundups
  • Store
  • Search

Mokume gane – tutorials, plus a show and tell

August 26, 2008 by Wendy

Copper and mokume gane Mokume gane is a technique of layering thin sheets of contrasting clay into a stack, then distorting the stack and shaving off the resulting patterned clay with a tissue blade. There are many, many variations on this technique. Some use objects and press them in the clay. Others use the clay itself and push balls of clay into holes poked into the stack. The poking and pushing can be random, or planned, which isn’t that clear when you’re a newbie to working with polymer clay.

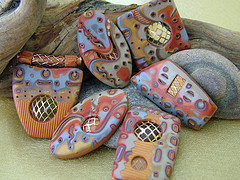
I’ve tried the mokume gane technique/method before. Once. It wasn’t pretty, of course this is back when I first started out with polymer clay. I had only seen a couple of tutorials on it, and I was rather confused as to why they were poking this and that this way and that way . I knew there had to be something I was missing. I really couldn’t understand what was so great about what was basically “marbled” clay. Yeah, it was pretty and all, but nothing special in my book. Until, I happened upon a one Ms. Julie Picarello’s photos of her work on Flickr.

Then, I was flabbergasted, astounded, and most of all, bewildered! How in the world did she get her things to look so awesome? It actually looked planned, not random like the tutorials had shown. HA! Little did I know that you COULD plan your poking and pushing. Go ahead, laugh so hard that you fall out of your chair. I would too if I were you, now that I’m looking back, I see how stupidly simple it actually is, lol.

Now, I’m not saying it’s so simple that Julie hasn’t worked for a long while perfecting her technique for mokume gane, because rest assured with work as gorgeous as her’s, it’s all about work by the way of practice, practice, and even more practice until you can do it with your eyes closed. Then it’s perfect. Boy, do I have a long way to go. Hey, you do too, so you can quit laughing now and go check out the tutorials that are listed below.

The first 3 are from HGTV

 Bead Embroidered Heart brooch

 Face pendant and necklace

Puff bead bracelet

Here’s the link to GlassAttic’s mokume gane information – really good stuff here 🙂

Lindley Haunani’s version of mokume gane

Lazy woman’s mokume gane

and  one on Deviant-Art

I’ll be back tomorrow with the show and tell of the pendants I made today using the mokume gane way , they turned out rather nice even if I do say so myself 🙂

[tags]polymer clay, tutorial, mokume gane, Julie Picarello, Flickr[/tags]

Next Polymer Clay Idea:

  • How to Stop Polymer Clay from Sticking to Your Work…
«
»

Comments

  1. Lunes - Kylee says

    August 27, 2008 at 7:38 am

    Thank you for sharing this. I am a big fan of Mokume Gane and especially the work of Julie Picarello. I have been fortunate enough to secure Julie’s presence next year at the Euro Clay Carnival France! I can’t wait to meet her and take her Dimensional Mokume Gane Workshop!
    Kylee

  2. Carlie says

    August 27, 2008 at 3:42 pm

    Did you go to a class taught by her? I’d love to see how she does it.

  3. Wendy says

    August 28, 2008 at 4:45 am

    Nope, I haven’t been fortunate enough to have classes with her, although I would love to be able to.

    I’m a big fan of Julie’s also, I am always awed by her work.

    I’m so glad you enjoyed the post.

  4. Sheri says

    August 28, 2008 at 6:12 pm

    I love Julie’s work – a pair of her earrings are among my most-worn PC jewelry pieces. She achieves a wonderful depth with layers of “normal” and mica-based clays, and her shapes, color combinations, and mixed-media accents are so creative. I haven’t gotten brave enough to try mokume gane on my own, but I’d jump at the chance to take a Picarello workshop (not in France, though).

  5. lynn watts says

    April 21, 2009 at 3:45 pm

    I love Picarello’s work. I am just sad that she has not done any DVD’s so people that can not travel can still be blessed with her techniques and awesome work examples.I would definitely BUY the DVD if one was available.

  6. Anja Shaw says

    January 15, 2011 at 7:15 am

    I know this was an older “Craft Gossip” article, but it’s 2011 now and good news! Julie has written her first book and it will be out this June. You can pre-order from Amazon. I’ve already ordered mine. Her work is stunning. I took her “Lizard Tails” workshop at Clay Carnival 2010. She was very generous with sharing her techniques. I’m sure her book will have the same clear instructions and beautiful photos of her work.

Have you read?

DIY Pottery Clay Doily Platter with Pink Speckled Glaze

There’s something special about combining old traditions with modern design. I’ve always adored the stack of vintage doilies handed down from my grandmother, but since lace doesn’t exactly suit my home aesthetic, I started experimenting with ways to repurpose their beautiful patterns in clay. That’s how I ended up creating this doily pottery platter—a simple slab of clay transformed into a textured serving dish with the help of lace, white clay, and a soft pink speckled glaze.

The result is a handmade ceramic platter that looks both timeless and contemporary, perfect for styling on a coffee table, serving treats, or simply displaying as a piece of art.

Materials You’ll Need

  • White pottery clay (stoneware or porcelain recommended)

  • Rolling pin

  • Crochet doily (cotton lace works best)

  • Sharp knife or clay cutter

  • Oval or rectangular template (a cutting board, tray, or paper template works well)

  • Sponge and water

  • Plastic wrap

  • Kiln access (or a local pottery studio firing service)

  • White glaze

  • Pink speckled glaze (or white glaze with pink oxide/pigment speckles)

Step-by-Step Tutorial

Step 1: Roll Out the Clay

Roll your clay slab to about 1/4 inch thick. Keep it even and wide enough to cut an oval platter shape.

Step 2: Press the Doily

Lay your crochet doily flat across the clay. Use the rolling pin to firmly press the pattern into the surface. Lift it carefully to reveal the intricate lace design imprinted into the clay.

Tip: Dust the doily lightly with cornstarch if it tends to stick.

Step 3: Cut the Platter Shape

Using your knife and a template, cut around the clay to form an oval platter shape. Smooth the edges with your fingers or a damp sponge.

Step 4: Lift and Shape the Platter

For a slightly raised platter, drape the clay gently over a shallow mold (like a plate or tray lined with plastic wrap). If you prefer a flat serving dish, leave it as-is on your board.

Step 5: Let It Dry

Allow the platter to dry until leather-hard. Refine the edges with a sponge, smoothing away any rough spots. Once it reaches bone dry, it’s ready for bisque firing.

Step 6: Glaze and Fire

After the first firing, apply a coat of white glaze over the entire platter. Then lightly layer on a pink speckled glaze (you can also achieve this by flicking pink oxide pigment into a clear glaze). The pink speckles add a playful, modern twist while still allowing the lace pattern to shine through. Fire again according to your glaze instructions.

Styling Your Finished Platter

This platter is both practical and beautiful. You can:

  • Use it as a serving dish for cakes, cookies, or fruit.

  • Style it on a coffee table with candles or trinkets.

  • Display it as wall art by adding a plate hanger.

  • Gift it as a keepsake—perfect for Mother’s Day, weddings, or housewarmings.

Every platter I make carries the memory of my grandmother’s doilies, but in a form that feels modern and at home with my style. The pink speckled glaze gives it a playful softness, while the lace impression keeps that touch of handmade tradition alive. It’s proof that old textiles can inspire something completely fresh when reimagined in clay.


Categories

air dry clay animals Artist Spotlight Christmas Clay Canes Clay Charms Craft Inspirations DIY Clay Tutorials and Patterns earrings Freebies halloween Inspiration necklace Plates, Bowls & Platters Polymer Clay Polymer Clay - Techniques Polymer Clay - Tutorials Polymer Clay Community Tips/Tools valentine's day

RSS More Articles

  • Cross Stitch Ice Cream and Frozen Treats
  • 15 Charity Sewing Projects That Let You Sew Something Useful For A Good Cause
  • Sunflower Ribbon Embroidery Tutorials and Kits to Brighten Your Hoop
  • Decorating Mistakes That Make Your Living Room Feel Cluttered
  • Remembering Jill Smokler, Founder Of Scary Mommy
  • In the Garden Layer Cake – A Bloom-Filled Fabric Collection for Spring Sewing
  • How To Do Kitchener Stitch: A Beginner-Friendly Guide To Grafting Knitting Seamlessly
  • Pattern Review: Georgie Granny Square Bucket Hat Crochet Pattern
  • 12 Handmade Patriotic 4th of July Card Ideas
  • Shark Week Learning for Kids

Pick Your Blog

  • Sewing
  • Knitting
  • Quilting
  • Crochet
  • Home & Garden
  • Recycled Crafts
  • Scrapbooking
  • Card Making
  • Polymer Clay
  • Cross-Stitch
  • Edible Crafts
  • Felting
  • Glass Art
  • Indie Crafts
  • Kids Crafts
  • Jewelry Making
  • Lesson Plans
  • Needlework
  • Bath & Body
  • Party Ideas
  • Candle Making
  • DIY Weddings
  • Not Craft
  • Free Craft Projects

Copyright © 2026 · CraftGossip | Start Here | Contact Us | Link to Us | Your Editors | Privacy and affiliate policy