There are certain sights and smells that instantly transport us to Christmas—cinnamon-scented candles, pine needles on the floor, the rustle of wrapping paper… and of course, the humble plum pudding. But if you’re like me, the pudding is more about tradition than taste. I’ll happily light one on fire for the spectacle, but eating it? That’s another story.
This year, instead of baking, I turned my love for plum puddings into a pottery project. These ceramic mini plum puddings are just as charming, calorie-free, and they’ll last for years to come. Whether you use them as ornaments, table décor, or little handmade gifts, they’re guaranteed to bring festive cheer.
Why Make Ceramic Plum Puddings?
- Festive Keepsakes: They make sweet heirloom pieces you can pull out every Christmas.
- Beginner Friendly: The round shapes and simple holly details are easy, even if you’re new to clay.
- Personalized Décor: Add initials, dates, or even a splash of glitter glaze to make them uniquely yours.
- Gift-Worthy: Pop one in a small box or tie to the top of a wrapped present—it’s like two gifts in one.
Materials You’ll Need
- Clay: Stoneware or earthenware (white or buff clay works best).
- Rolling pin or slab roller to flatten clay.
- Round cutter or small bowl for the pudding base.
- Clay tools or butter knife for cutting and smoothing.
- Slip (clay + water mix) for attaching pieces.
- Underglazes or glazes in brown, white, green, and red.
- Paintbrushes for detail work.
- Kiln for bisque and glaze firings.
Optional:
- Holly leaf cutter or small stamp for uniform leaves.
- Ribbon or wire if you’d like to make hanging ornaments.

Step-by-Step Tutorial
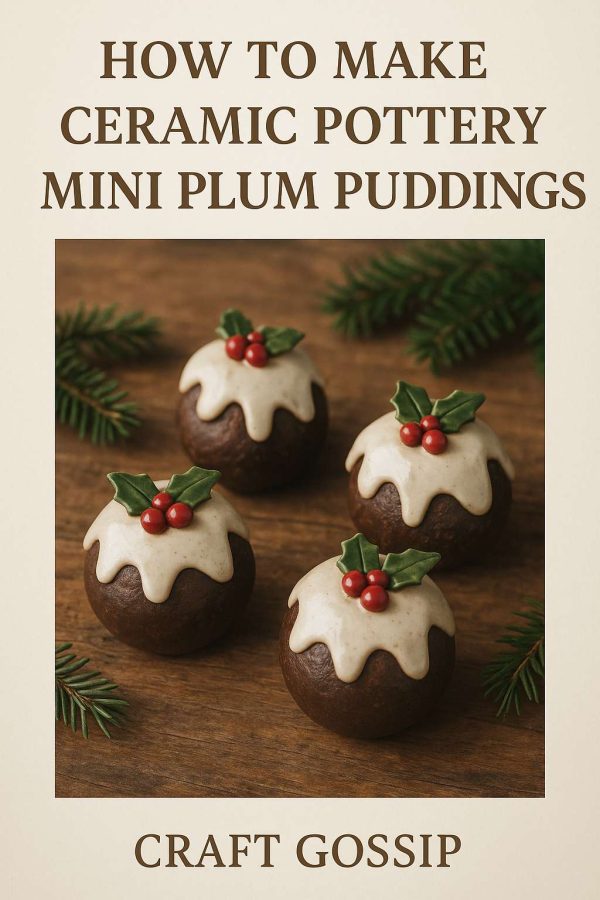
Step 1: Shape the Base
Roll out your clay to about 1 cm thickness. Use a round cutter to create a circle for the pudding base. If you want a larger pudding, go bigger; for ornaments, keep them golf-ball sized.
Step 2: Build the Dome
Form a pinch pot or coil and place it on top of your clay disc. Blend the edges with slip so it looks like one solid dome. Smooth it gently with your fingers or a damp sponge.
Step 3: Add the Icing
Roll a thin slab of clay and cut a wavy, organic shape that resembles dripping icing. Drape it over the top of your dome, letting it fall naturally. Score and slip the edges so it’s secure.
Step 4: Holly and Berries
Roll three tiny clay balls for berries and press gently on top of the icing. For leaves, either cut freehand or use a small cutter. Add a central vein with a sculpting tool or the edge of a knife. Attach with slip.
Step 5: Dry and Bisque Fire
Allow your puddings to dry slowly, covered lightly with plastic for a day to prevent cracks. Once bone dry, bisque fire in the kiln (cone 06–04 depending on your clay).
Step 6: Glaze with Festive Colors
- Brown glaze for the pudding body.
- White glaze for the icing—glossy works beautifully.
- Green glaze for holly leaves.
- Red glaze or underglaze for berries.
Tip: Layering underglaze and clear gloss on top gives a delicious, shiny finish.
Step 7: Glaze Fire
Fire again to the correct cone for your glaze. Once cooled, your puddings will look glossy, vibrant, and good enough to eat (though please don’t).
Creative Variations
- Ornaments: Poke a small hole before drying, thread ribbon after firing.
- Name Place Settings: Carve or stamp names into the base—perfect for a holiday dinner table.
- Mini Sets: Create clusters of three different sizes for a display piece.
- Metallic Touch: Use gold luster on the berries or rim for a luxe twist.
How to Style Them
- Scatter across your Christmas table like edible décor.
- Hang on your tree for a nostalgic touch.
- Nestle a few in greenery on a mantelpiece.
- Add one to the top of a wrapped gift as a surprise keepsake.
There’s something magical about combining pottery with holiday traditions—it’s like capturing a memory in clay. And unlike the real pudding, these little creations won’t dry out or go soggy. They’ll be ready to bring joy year after year, and maybe even become part of your family’s Christmas tradition.


