• Home
  • Suggest A DIY
  • DIY Newsletter

Polymer Clay

Fimo and clay tips and tutorials

  • About CraftGossip
  • Our Network
    • Bath & Body Crafts
    • Candle Making Ideas
    • Crochet Ideas
    • Cross Stitch
    • Edible Crafts
    • Felting Patterns
    • Glass Art
    • Home & Garden Ideas
    • Indie Crafts
    • Jewelry Making
    • Kids Crafts
    • Knitting Patterns
    • Lesson Plans
    • Needlework
    • Party Ideas
    • Polymer Clay
    • Quilting Ideas
    • Recycled Crafts
    • Scrapbooking
    • Sewing Patterns
    • Card Making
    • DIY Weddings
    • Not Craft Ideas
  • Giveaways
  • Roundups
  • Store
  • Search

Handmade Christmas Star Ornaments – Easy Cookie Cutter Clay Craft

November 10, 2025 by Shellie Wilson

There’s something magical about Christmas decorations that are handmade. They carry stories, memories, and a touch of personality you simply won’t find in store-bought baubles. These handmade Christmas star ornaments are a perfect example—simple to make, yet beautiful enough to hang proudly on your tree or gift to loved ones.

The best part? You don’t need fancy tools. Just a cookie cutter, some clay, and a bit of imagination.

Materials You’ll Need:

  • White clay (air dry, polymer, or ceramic clay if you have access to a kiln) 
  • Star-shaped cookie cutter 
  • Rolling pin 
  • Textured tools (lace, fabric, leaves, stamps, or anything from around the house) 
  • Skewer or straw (to poke a hole for hanging) 
  • Twine, jute, or ribbon for hanging 
  • Optional: Acrylic paint, metallic accents, or glaze 

Step-by-Step Tutorial

1. Roll Out Your Clay

Start by rolling out your clay on a flat surface. Aim for about ¼ inch thick—sturdy enough to hang, but not too heavy for your tree branches.

2. Cut Out the Stars

Use your cookie cutter to stamp out star shapes from the clay. This is where it starts to feel a bit like holiday baking, minus the calories.
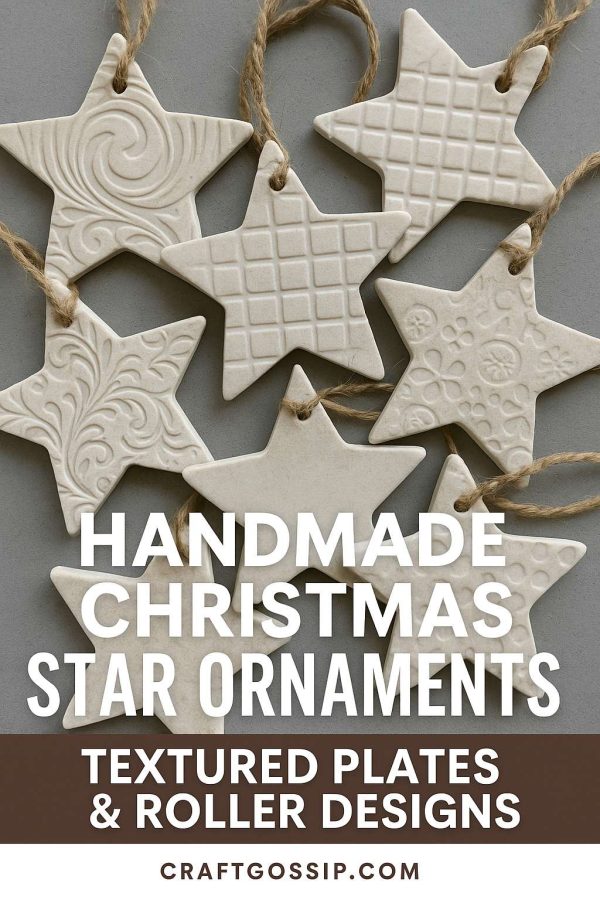
3. Add Texture

Here’s the fun part. Press textured items into the clay—try lace doilies for a vintage look, honeycomb netting for a modern touch, or even the edge of a fork for simple stripes. No two stars will look alike, and that’s the charm.

4. Make the Hanging Hole

Use a skewer or straw to poke a neat hole near the top of each star. This is where your twine or ribbon will go later.

5. Dry or Fire

  • If you’re using air-dry clay, let the stars dry completely for 24–48 hours, flipping occasionally. 
  • For ceramic clay, bisque fire and glaze fire if desired. 
  • Polymer clay fans can bake theirs right in the oven following package instructions. 

6. String & Hang

Thread a piece of jute, twine, or ribbon through the hole. Tie securely and your handmade Christmas star ornaments are ready to shine.

Creative Variations

  • Painted Stars: Add a wash of watercolor paint or dab with metallic gold for a rustic luxe finish. 
  • Essential Oil Diffusers: Leave unglazed and add a drop of essential oil before hanging for a scented ornament. 
  • Gift Tags: Stamp names or holiday wishes into the clay before drying—double duty as ornaments and gift tags! 
  • Keepsakes: Have children press their fingerprints or initials into the clay for sentimental family treasures. 

These DIY Christmas star ornaments are inexpensive, beginner-friendly, and endlessly customizable. They make lovely handmade gifts for neighbors, teachers, or anyone who appreciates a thoughtful touch during the holidays. And once you start, don’t be surprised if you end up with a whole constellation of stars to scatter across your tree, wreaths, or even tied onto gift wrap.


Next Polymer Clay Idea:

  • DIY Watercolor Air Dry Clay Christmas Ornaments:…
«
»

Have you read?

Clay Too Sticky? Too Crumbly? Try These Fool-Proof Polymer Clay Fixes

If you’ve ever cracked open a fresh block of Fimo or Sculpey, only to have it glue itself to your hands—or worse, crumble apart when you try to roll it—you know how frustrating polymer clay can be. The good news? These problems are normal and super easy to fix once you know the tricks.

I’ve been making polymer clay jewelry and little trinkets for years, and trust me—sticky clay and crumbly clay are just part of the learning curve. Let’s dive into why it happens and how to get your clay back to that perfect, workable consistency.

Why Is My Polymer Clay Too Sticky?

Polymer clay gets sticky when:

  • It’s too warm – Your hands or the room temperature can soften clay fast.

  • It’s over-conditioned – Kneading for too long breaks the clay down.

  • It’s a soft brand or fresh batch – Some formulas, like Fimo Soft or Sculpey III, naturally feel tackier than others.

Fool-Proof Fixes for Sticky Polymer Clay

  1. Chill it: Pop your clay in the fridge for 10–15 minutes. A quick cool-down makes it firmer and easier to handle.

  2. Work on glass, ceramic, or tile: These stay cooler than wood or plastic surfaces, helping clay keep its shape.

  3. Use parchment or wax paper: Sandwich clay between sheets when rolling to prevent sticking.

  4. Powder trick: Dust your hands or tools with a tiny bit of cornstarch. Wipe excess off before baking.

  5. Take breaks: If your hands heat the clay too much, set it aside for a few minutes.

Why Is My Polymer Clay Too Crumbly?

Crumbly clay is usually dried out or under-conditioned. It can happen with older clay, clay that’s been stored badly, or some firmer brands like Fimo Professional.

Fool-Proof Fixes for Crumbly Polymer Clay

  1. Condition properly: Run clay through a pasta machine or roll/knead until it starts to warm and smooth out.

  2. Add softener: Use a drop of clay softener (like Sculpey Clay Softener or Fimo Mix Quick) and knead it in.

  3. Mix with softer clay: Blend a crumbly block with a softer polymer clay to balance the texture.

  4. Warm it up: Place clay in a zip bag and tuck it in your pocket for a few minutes before conditioning.

  5. Avoid water: Unlike air dry clay, polymer clay should never be “rehydrated” with water—it weakens the formula.

Preventing Polymer Clay Problems

Keeping your clay at the right consistency means less fixing and more creating. Here’s how to prevent issues in the first place:

  • Store clay in airtight containers away from direct sunlight and heat.

  • Wrap leftovers tightly in plastic wrap before storing in the original package.

  • Keep a pasta machine handy for quick, even conditioning.

  • Try clay storage by brand – separate Fimo Soft, Premo, and Sculpey to keep textures predictable.

  • Test your clay before a big project so you can soften or chill it as needed.

Polymer clay can be fussy, but it’s never a lost cause. If your clay is sticky, cool it down and keep your work surface non-stick. If it’s crumbly, condition it properly and add a little softener. These fixes take just a few minutes and can save you from tossing out perfectly good clay.

I always keep a little stash of “rescue tools”: cornstarch, clay softener, and some glass tiles to work on. With those on hand, I can take any block of polymer clay—whether it’s Fimo, Premo, or Sculpey—and make it project-ready in no time.

So the next time your polymer clay feels like a disaster, remember: sticky or crumbly, it’s fixable!

Categories

air dry clay animals Artist Spotlight Christmas Clay Canes Clay Charms Craft Inspirations DIY Clay Tutorials and Patterns earrings Freebies halloween Inspiration necklace Plates, Bowls & Platters Polymer Clay Polymer Clay - Techniques Polymer Clay - Tutorials Polymer Clay Community Tips/Tools valentine's day

RSS More Articles

  • Book Review: Better Homes and Gardens Flea Market Decorating
  • DIY Backyard Water Play Ideas To Keep Kids Cool All Summer
  • Book Review Wednesday: The Complete Guide to Trinket Dishes for Beginners
  • How to Embroider on Canvas Shoes for a Custom Look
  • 12 Unique Borders for Scrapbook Layouts
  • Book Review: Wild Your World
  • Knit a Stunning Bestiary Scarf
  • Quick Quilting Projects for the 4th of July
  • Samplers to Cross Stitch for the Fourth of July
  • DIY Flag Banner for 4th of July Decorating

Pick Your Blog

  • Sewing
  • Knitting
  • Quilting
  • Crochet
  • Home & Garden
  • Recycled Crafts
  • Scrapbooking
  • Card Making
  • Polymer Clay
  • Cross-Stitch
  • Edible Crafts
  • Felting
  • Glass Art
  • Indie Crafts
  • Kids Crafts
  • Jewelry Making
  • Lesson Plans
  • Needlework
  • Bath & Body
  • Party Ideas
  • Candle Making
  • DIY Weddings
  • Not Craft
  • Free Craft Projects

Copyright © 2026 · CraftGossip | Start Here | Contact Us | Link to Us | Your Editors | Privacy and affiliate policy