These are a few of the clay flower treasures I found today:
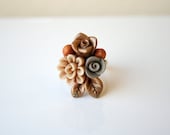 | 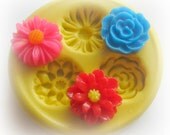 |
| Flower Ring by FloraJewelryShop | Flower Mold by WhysperFairy |
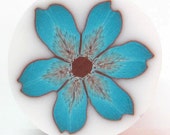 |  |
| Flower Cane by sigalsart | Floral Beads by ClayHappy |
Check out this book on how to make polymer clay flowers.
Fimo and clay tips and tutorials
These are a few of the clay flower treasures I found today:
| |
| Flower Ring by FloraJewelryShop | Flower Mold by WhysperFairy |
| |
| Flower Cane by sigalsart | Floral Beads by ClayHappy |
Check out this book on how to make polymer clay flowers.

There’s something about sunflowers that just makes a house feel happier. Maybe it’s the colour, maybe it’s the fact they’re never trying to be perfect, or maybe it’s just that they remind me of slower afternoons when the kids were little and craft projects actually stayed on the table instead of migrating all over the house. Either way, this air-dry clay sunflower trinket dish has become one of my favourite “gentle crafts” – the kind you make with a cup of tea nearby and no pressure to rush.
This is not a precision project. In fact, the slightly uneven petals and hand-shaped edges are what make it lovely. If you’ve ever avoided clay because you thought it had to look professional or kiln-fired to be worth making, this project might just change your mind. It’s simple, forgiving, and genuinely useful once it’s finished.
This sunflower bowl works beautifully as a ring dish, bedside catch-all, or even a small decorative bowl on a hall table. It also makes a gorgeous handmade gift – especially for someone who appreciates things that look handmade rather than factory-perfect.
Start by kneading your air-dry clay until it’s soft and pliable. Roll it out on a smooth surface to around 5–6 mm thick. You want it thick enough to hold its shape, but not chunky.
Cut a rough circle for the base of your bowl. Don’t worry about perfect edges – you won’t see them once the petals are added.
Using your simple sunflower petal template, cut out enough petals to go around the edge of your base circle. Slight variations actually help the finished bowl look more natural, so don’t stress if they’re not identical.
Lightly smooth the edges with your fingers and gently pinch the tip of each petal to give it that sunflower shape.
Lightly score the edge of your clay base and the bottom of each petal with a toothpick. Press the petals around the edge, overlapping them slightly. Use your fingers to blend the joins so everything feels connected.
This part is quite therapeutic – I usually lose track of time here.
Using a toothpick or skewer, gently press fine lines into each petal to create natural-looking veins. Keep the pressure light and irregular.
For the centre of the sunflower, press small dots all over the middle area to mimic sunflower seeds. This texture really comes to life once painted.
Place the entire sunflower over an upside-down bowl to give it a gentle curve. Adjust the petals so they sit naturally and don’t fold in awkwardly.
Leave it to air-dry completely. This usually takes 24–48 hours depending on humidity. Turn it carefully halfway through drying so the base dries evenly.
Once fully dry, paint the petals with yellow acrylic paint. I like to add a touch of white to the edges for highlights and a slightly darker yellow near the base of each petal.
Paint the centre brown, then dry-brush a little lighter brown or white over the top to bring out the texture.
Let the paint dry thoroughly.
If you want a bit of extra durability, seal your trinket dish with a matte or satin sealer. This is especially useful if it’s going to live near a sink or get daily use.
Air-dry clay isn’t food-safe, so keep it for trinkets rather than snacks.
This is one of those crafts that looks impressive but doesn’t require special tools, expensive materials, or artistic confidence. It’s approachable, calming, and genuinely satisfying to finish in an afternoon. The end result feels personal and warm – exactly the kind of craft I keep coming back to.
If you’re looking for an easy air-dry clay project that feels cheerful and handmade in the best way, this sunflower trinket dish is a lovely place to start.

So sweet, I really like the butterfly beads.
Its so funny that you’re posting this. I thought for some reason you were talking about my post since mine is called Flower Power. I created a chocolate flower on top of cupcakes. Your ideas here are darling though.
he he Vicki! I forgot to title it so had to come up with something quick!
Allison, I love the little beads too! She’s such a talented beadmaker – I’ve worked with her in the past.
Wow, this is so great! I love the butterfly beads and flower cane! 😀
The flower cane by Sigal has wow appeal!