• Home
  • Suggest A DIY
  • DIY Newsletter

Polymer Clay

Fimo and clay tips and tutorials

  • About CraftGossip
  • Our Network
    • Bath & Body Crafts
    • Candle Making Ideas
    • Crochet Ideas
    • Cross Stitch
    • Edible Crafts
    • Felting Patterns
    • Glass Art
    • Home & Garden Ideas
    • Indie Crafts
    • Jewelry Making
    • Kids Crafts
    • Knitting Patterns
    • Lesson Plans
    • Needlework
    • Party Ideas
    • Polymer Clay
    • Quilting Ideas
    • Recycled Crafts
    • Scrapbooking
    • Sewing Patterns
    • Card Making
    • DIY Weddings
    • Not Craft Ideas
  • Giveaways
  • Roundups
  • Store
  • Search

Etsy Feature – Spooky Round Mug Template – Halloween Pottery Project

August 31, 2025 by Shellie Wilson

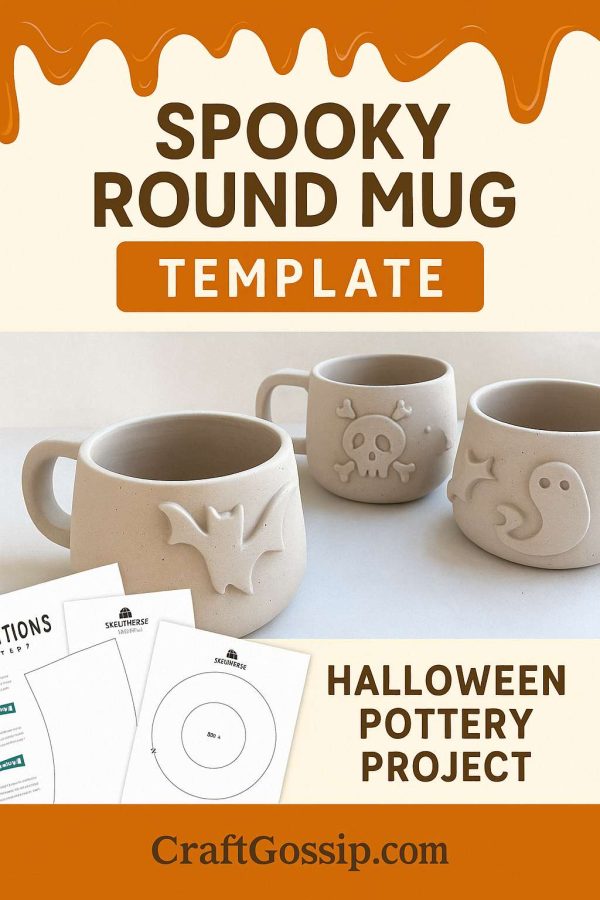
Halloween pottery projects don’t have to be complicated — sometimes all it takes is the right template to unlock your creativity. This Spooky Round Mug Template is a digital download that allows ceramic and pottery lovers to make their very own Halloween-themed mugs at home or in the studio.

Printable templates are a game-changer for both beginner and experienced potters. Instead of spending hours sketching and adjusting freehand, you can simply print, cut, and trace onto your slab of clay. The result? Clean, professional shapes that can be customized with your own spooky details like bats, ghosts, pumpkins, or skull motifs.

For seasonal projects like these mugs, templates ensure uniformity, which is especially useful if you’re planning to create a full set or sell them at craft markets.

Features of the Halloween Mug Template

  • Instant Digital Download – Print at home and get started right away. 
  • Rounded Mug Form – Designed for comfortable holding and classic cozy vibes. 
  • Customizable Surface – Perfect for carving, stamping, or adding clay appliqués like spooky faces or eerie textures. 
  • Reusable – Simply print as many times as you’d like for seasonal or year-round creations. 

Ideas for Using Your Spooky Mug Template

  1. Haunted Hot Cocoa Mugs – Create matching mugs for Halloween movie nights. 
  2. Trick-or-Treat Candy Cups – Use them as small treat holders on your table. 
  3. Giftable Pottery – Handmade mugs with creepy-cute details make thoughtful gifts. 
  4. Studio Projects – Great for pottery classes, workshops, or creative family crafting sessions. 

Pro Tip for Potters

If you’re working with clay slabs, make sure to let them firm up slightly before cutting with the template. This helps prevent warping and ensures cleaner edges. Once assembled, attach handles securely and decorate with underglazes or carve out spooky details before firing.

The Spooky Round Mug Template is a fun and functional way to bring a touch of Halloween spirit into your pottery. Whether you want to make a single mug for your morning brew or a whole haunted set, this printable makes it simple to create professional-looking pieces with a festive twist.

 Check out the Spooky Mug Template on Etsy here

Next Polymer Clay Idea:

  • Can I Use Air Dry Clay to Make a Mug? A Complete…
«
»

Have you read?

DIY Pottery Clay Doily Platter with Pink Speckled Glaze

There’s something special about combining old traditions with modern design. I’ve always adored the stack of vintage doilies handed down from my grandmother, but since lace doesn’t exactly suit my home aesthetic, I started experimenting with ways to repurpose their beautiful patterns in clay. That’s how I ended up creating this doily pottery platter—a simple slab of clay transformed into a textured serving dish with the help of lace, white clay, and a soft pink speckled glaze.

The result is a handmade ceramic platter that looks both timeless and contemporary, perfect for styling on a coffee table, serving treats, or simply displaying as a piece of art.

Materials You’ll Need

  • White pottery clay (stoneware or porcelain recommended)

  • Rolling pin

  • Crochet doily (cotton lace works best)

  • Sharp knife or clay cutter

  • Oval or rectangular template (a cutting board, tray, or paper template works well)

  • Sponge and water

  • Plastic wrap

  • Kiln access (or a local pottery studio firing service)

  • White glaze

  • Pink speckled glaze (or white glaze with pink oxide/pigment speckles)

Step-by-Step Tutorial

Step 1: Roll Out the Clay

Roll your clay slab to about 1/4 inch thick. Keep it even and wide enough to cut an oval platter shape.

Step 2: Press the Doily

Lay your crochet doily flat across the clay. Use the rolling pin to firmly press the pattern into the surface. Lift it carefully to reveal the intricate lace design imprinted into the clay.

Tip: Dust the doily lightly with cornstarch if it tends to stick.

Step 3: Cut the Platter Shape

Using your knife and a template, cut around the clay to form an oval platter shape. Smooth the edges with your fingers or a damp sponge.

Step 4: Lift and Shape the Platter

For a slightly raised platter, drape the clay gently over a shallow mold (like a plate or tray lined with plastic wrap). If you prefer a flat serving dish, leave it as-is on your board.

Step 5: Let It Dry

Allow the platter to dry until leather-hard. Refine the edges with a sponge, smoothing away any rough spots. Once it reaches bone dry, it’s ready for bisque firing.

Step 6: Glaze and Fire

After the first firing, apply a coat of white glaze over the entire platter. Then lightly layer on a pink speckled glaze (you can also achieve this by flicking pink oxide pigment into a clear glaze). The pink speckles add a playful, modern twist while still allowing the lace pattern to shine through. Fire again according to your glaze instructions.

Styling Your Finished Platter

This platter is both practical and beautiful. You can:

  • Use it as a serving dish for cakes, cookies, or fruit.

  • Style it on a coffee table with candles or trinkets.

  • Display it as wall art by adding a plate hanger.

  • Gift it as a keepsake—perfect for Mother’s Day, weddings, or housewarmings.

Every platter I make carries the memory of my grandmother’s doilies, but in a form that feels modern and at home with my style. The pink speckled glaze gives it a playful softness, while the lace impression keeps that touch of handmade tradition alive. It’s proof that old textiles can inspire something completely fresh when reimagined in clay.


Categories

air dry clay animals Artist Spotlight Christmas Clay Canes Clay Charms Craft Inspirations DIY Clay Tutorials and Patterns earrings Freebies halloween Inspiration necklace Plates, Bowls & Platters Polymer Clay Polymer Clay - Techniques Polymer Clay - Tutorials Polymer Clay Community Tips/Tools valentine's day

RSS More Articles

  • Cross Stitch Ice Cream and Frozen Treats
  • 15 Charity Sewing Projects That Let You Sew Something Useful For A Good Cause
  • Sunflower Ribbon Embroidery Tutorials and Kits to Brighten Your Hoop
  • Decorating Mistakes That Make Your Living Room Feel Cluttered
  • Remembering Jill Smokler, Founder Of Scary Mommy
  • In the Garden Layer Cake – A Bloom-Filled Fabric Collection for Spring Sewing
  • How To Do Kitchener Stitch: A Beginner-Friendly Guide To Grafting Knitting Seamlessly
  • Pattern Review: Georgie Granny Square Bucket Hat Crochet Pattern
  • 12 Handmade Patriotic 4th of July Card Ideas
  • Shark Week Learning for Kids

Pick Your Blog

  • Sewing
  • Knitting
  • Quilting
  • Crochet
  • Home & Garden
  • Recycled Crafts
  • Scrapbooking
  • Card Making
  • Polymer Clay
  • Cross-Stitch
  • Edible Crafts
  • Felting
  • Glass Art
  • Indie Crafts
  • Kids Crafts
  • Jewelry Making
  • Lesson Plans
  • Needlework
  • Bath & Body
  • Party Ideas
  • Candle Making
  • DIY Weddings
  • Not Craft
  • Free Craft Projects

Copyright © 2026 · CraftGossip | Start Here | Contact Us | Link to Us | Your Editors | Privacy and affiliate policy