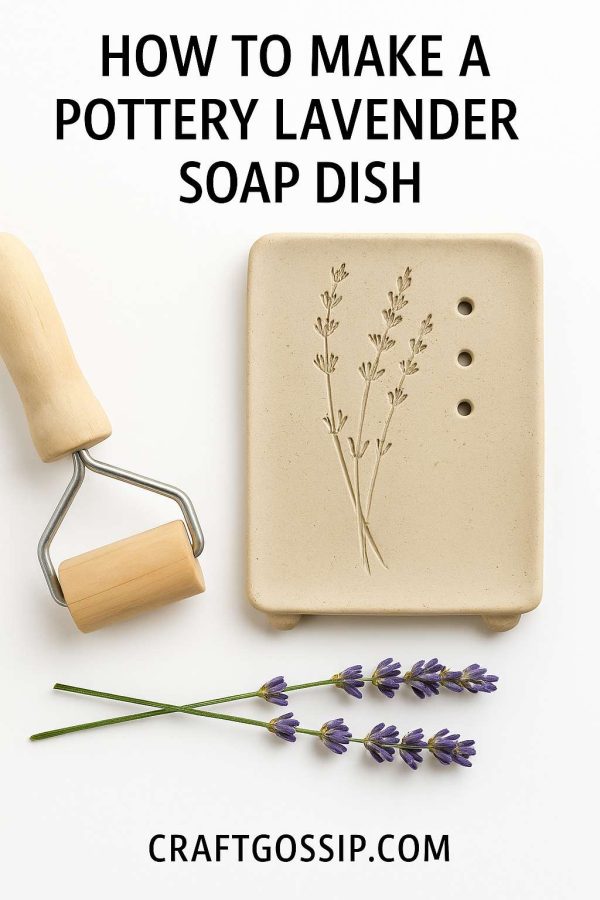
There’s nothing quite like a handmade soap dish. Not only is it practical (goodbye soggy bars of soap!), but it also doubles as a little work of art in your bathroom or kitchen. And when you add botanical imprints—like lavender sprigs—the result is a timeless piece that feels organic, rustic, and a little bit luxurious.
In this tutorial, we’ll be making a pottery lavender soap dish with little round footers on the bottom. The lavender is pressed directly into the clay, leaving behind delicate imprints that can be highlighted with color or left in their natural state. You can fire this dish in a kiln for a glossy, food-safe finish, or create a decorative version using air-dry clay if a kiln isn’t an option.
Either way, you’ll end up with a unique piece that makes your bathroom feel like a handmade spa retreat.
Why Lavender?
Lavender isn’t just a pretty flower—it’s a herb that carries centuries of meaning. Symbolizing calm, purity, and serenity, lavender is often used in aromatherapy to relax the body and mind. When pressed into clay, its slender stems and delicate flower buds create an elegant pattern, perfect for a soap dish.
This technique also works beautifully with other herbs like thyme, dill, or rosemary, but lavender has a special charm that feels instantly soothing and spa-worthy.
Materials You’ll Need
- Clay slab (pottery clay for kiln-firing, or air-dry clay for a no-kiln option)
- Fresh lavender sprigs (washed and dried)
- Rolling pin or clay roller
- Wooden board or canvas cloth (to roll clay on)
- Knife or clay cutter
- Bowl of water and a sponge (for smoothing edges)
- Wooden dowel or clay stamps for drainage holes
- Small clay balls for footers (about marble size)
- Underglaze or acrylic paint (optional, for highlighting the imprint)
- Clear glaze (for kiln clay) or sealant (for air-dry clay)
Step-by-Step Instructions
Step 1: Roll Out the Clay
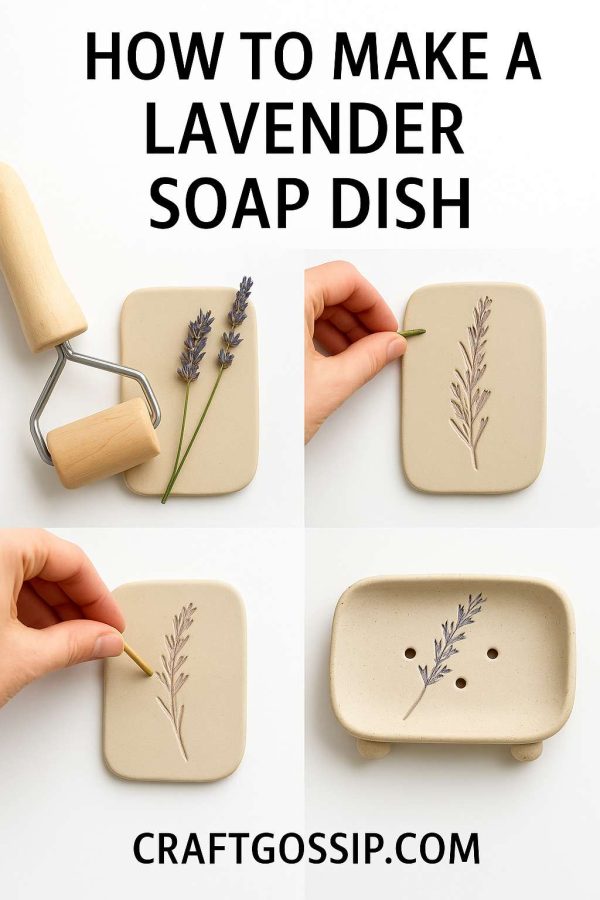
Place your clay on a canvas or burlap surface to prevent sticking. Roll it into a slab about 1 cm thick. For this soap dish, cut the clay into a rectangle with softly rounded corners—this gives it a more finished look while keeping that handmade charm.
Step 2: Press in the Lavender
Lay your lavender sprigs across the clay in a pleasing arrangement. You might want one tall sprig off to the side, or two crossing over each other. Gently roll your pin over the top, pressing the lavender into the clay to capture every bud and stem. Carefully peel the sprigs away to reveal your botanical imprint.
Step 3: Add Drainage Holes
A functional soap dish needs to drain water, so use a dowel, straw, or clay tool to poke two or three holes in the center of the dish. This keeps soap dry and lasting longer.
Step 4: Shape the Dish
To give the dish its gentle curve, place the slab over an upside-down bowl or drape it across a small mold. Let it firm up slightly in this shape. Smooth the edges with damp fingers or a sponge.
Step 5: Attach the Footers
Roll out three or four small clay balls about the size of marbles. Score and slip the bottom of the dish where the footers will go, then attach them securely. These little feet lift the dish, making it more practical and elegant.
Step 6: Drying and Firing
If using pottery clay with a kiln:
- Let the piece dry slowly until bone dry.
- Bisque fire in the kiln.
- Highlight the lavender imprint with underglaze or oxide wash (brushed into the lines, then wiped back).
- Apply a clear glaze and glaze fire for a glossy, waterproof finish.
If using air-dry clay:
- Let the dish dry for 24–48 hours, flipping occasionally.
- Paint the lavender imprint with acrylics or a watercolor wash effect.
- Seal with a clear varnish to add durability and a light sheen.
Variation Ideas
- Herbal Series: Make a matching set with lavender, rosemary, and thyme dishes. Perfect for gifts or to sell at craft fairs.
- Rustic Finish: Use burlap underneath the clay while rolling for a textured background.
- Colored Wash: Add a soft lavender or sage green wash to the whole dish for a dreamy, botanical vibe.
Air-Dry Clay Option
If you don’t have access to a kiln, air-dry clay makes this project approachable for anyone. While it won’t be waterproof enough for everyday wet use, it’s perfect for decorative soap holders, jewelry trays, or trinket dishes. Just remember to seal the surface with varnish to protect your design.
This DIY Lavender Soap Dish is more than just a craft—it’s a little piece of nature preserved in clay. Each time you use it, you’ll see the delicate lavender sprigs and be reminded of the calming, handmade beauty you brought into your home.
Whether you keep it for yourself or give it as a gift, this botanical clay project is the kind of simple, satisfying craft that makes everyday life feel a little more special.


