• Home
  • Suggest A DIY
  • DIY Newsletter

Polymer Clay

Fimo and clay tips and tutorials

  • About CraftGossip
  • Our Network
    • Bath & Body Crafts
    • Candle Making Ideas
    • Crochet Ideas
    • Cross Stitch
    • Edible Crafts
    • Felting Patterns
    • Glass Art
    • Home & Garden Ideas
    • Indie Crafts
    • Jewelry Making
    • Kids Crafts
    • Knitting Patterns
    • Lesson Plans
    • Needlework
    • Party Ideas
    • Polymer Clay
    • Quilting Ideas
    • Recycled Crafts
    • Scrapbooking
    • Sewing Patterns
    • Card Making
    • DIY Weddings
    • Not Craft Ideas
  • Giveaways
  • Roundups
  • Store
  • Search

Tutorial: Simple Flower Cane and Beads

August 4, 2014 by Elaine Robitaille

2

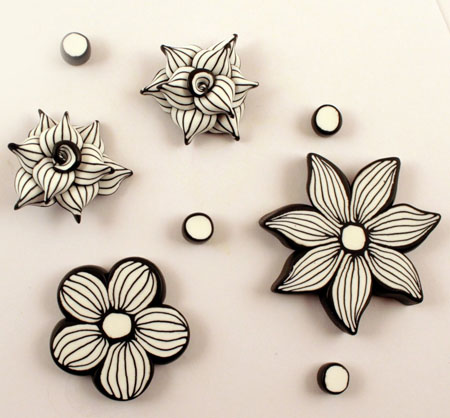
The charm of this type of cane and bead or applique is that you could use a skinner blend instead of the simple black and white bullseye for the full colour effect. Or you could use solid colours or varying ones.

The flowers themselves make good beads and great brooches or earrings. Just pop a post earring finding on the back of a couple or a pin finding and voila.

The writing for the tutorial is in French – translation here – but the pictures are so clear you don’t even need it.

Check out this book on how to make polymer clay flowers.

Next Polymer Clay Idea:

  • How To Make An Air Dry Clay Paint Palette With…
«
»

Comments

  1. Laura Lang says

    August 4, 2014 at 3:06 pm

    Thanks so much Elaine. Is there a trick to translating blog posts to English? The link you provided worked like a charm. However, on other foreign blog posts, I can’t quite figure out the steps to get a translation. I use an iPad with an app called itranslate.

  2. Elaine Robitaille says

    August 5, 2014 at 12:21 am

    ah! If you go to http://translate.google.com and either put the text or just the webpage (as I did here) into the box on the left and click translate… magic!

  3. Linsey says

    August 26, 2014 at 1:33 am

    This is beautiful and SO inspiring!!! Thank you for providing the wonderful tutorial and sharing your fabulous talent!!! I love these flowers!!! 🙂

Have you read?

How To Make A Milk Mache Molding Compound

There are some craft projects that feel like they belong on a rainy afternoon kitchen table, and this Milk Mache Molding Compound is exactly one of them. It is part craft, part science experiment, and part “wait… did we just turn milk into something solid?”

This clever little project from CraftBits shows you how to make a simple homemade molding compound using just milk and vinegar. The idea is wonderfully old-school: when the vinegar reacts with the milk, it separates into curds and liquid, leaving you with a soft mixture that can be pressed, shaped, and dried into a hard, stone-like material.

It’s a lovely one to try with kids, especially if you enjoy hands-on STEM-style crafts that do not require a trolley full of supplies. You can use the finished compound to make small charms, beads, ornaments, rustic tags, or simple molded shapes. Just keep the pieces small and thin, as this is not really the sort of compound you would use for large sculptures or anything that needs to be perfectly smooth.

What I like most about this project is how accessible it is. Most of us already have milk, vinegar, a bowl, and paper towel in the kitchen, which makes it a brilliant last-minute craft activity. It also has that slightly magical quality children love — one minute it is liquid, the next it is turning into a moldable material.

A couple of tips before you try it: use whole milk if you can, as it tends to give a better result than skim or semi-skimmed milk. White vinegar is also the best choice, as darker vinegars may affect the colour and texture. And don’t rush the draining stage. If the mixture is too wet, it will be soggy and hard to shape; if it is too dry, it may crumble.

This would be a fun companion activity for our other kids craft ideas, especially if you are looking for something simple, inexpensive, and a little bit educational. It also fits nicely with home crafts and handmade gift embellishments if you want to turn your dried shapes into tags or decorations.

Would I call this a polished, professional clay substitute? No. Would I call it a wonderfully curious, messy, memorable craft experiment? Absolutely.

If you enjoy homemade craft supplies, kitchen-table experiments, or easy projects that make children ask “how did that happen?”, this Milk Mache Molding Compound is well worth a try.

You can find the full project instructions here: Milk Mache Molding Compound

Categories

air dry clay animals Artist Spotlight Christmas Clay Canes Clay Charms Craft Inspirations DIY Clay Tutorials and Patterns earrings Freebies halloween Inspiration necklace Plates, Bowls & Platters Polymer Clay Polymer Clay - Techniques Polymer Clay - Tutorials Polymer Clay Community Tips/Tools valentine's day

RSS More Articles

  • Book Review: The Royal School of Needlework Book of Embroidery
  • Learning about Finland for Kids
  • How Craft Bloggers Can Use AI Without Losing Their Handmade Voice
  • How To Start Selling Crochet From Home Without Turning Your Hobby Into A Headache
  • Vintage Doily Jar Lanterns: A Pretty Recycled Jar Craft For Weddings, Tables & Cozy Corners
  • 4 FREE Downloadable Sentiments for Dad
  • Everything You Need to Know About Embroidery Hoops
  • Printable Stickers for Journals and Planners – Self Care
  • Needle Felting Fairy Tutorial by Santa Meada
  • Stitch Your Favorite Fruit on a Sweater

Pick Your Blog

  • Sewing
  • Knitting
  • Quilting
  • Crochet
  • Home & Garden
  • Recycled Crafts
  • Scrapbooking
  • Card Making
  • Polymer Clay
  • Cross-Stitch
  • Edible Crafts
  • Felting
  • Glass Art
  • Indie Crafts
  • Kids Crafts
  • Jewelry Making
  • Lesson Plans
  • Needlework
  • Bath & Body
  • Party Ideas
  • Candle Making
  • DIY Weddings
  • Not Craft
  • Free Craft Projects

Copyright © 2026 · CraftGossip | Start Here | Contact Us | Link to Us | Your Editors | Privacy and affiliate policy