• Home
  • Suggest A DIY
  • DIY Newsletter

Polymer Clay

Fimo and clay tips and tutorials

  • About CraftGossip
  • Our Network
    • Bath & Body Crafts
    • Candle Making Ideas
    • Crochet Ideas
    • Cross Stitch
    • Edible Crafts
    • Felting Patterns
    • Glass Art
    • Home & Garden Ideas
    • Indie Crafts
    • Jewelry Making
    • Kids Crafts
    • Knitting Patterns
    • Lesson Plans
    • Needlework
    • Party Ideas
    • Polymer Clay
    • Quilting Ideas
    • Recycled Crafts
    • Scrapbooking
    • Sewing Patterns
    • Card Making
    • DIY Weddings
    • Not Craft Ideas
  • Giveaways
  • Roundups
  • Store
  • Search

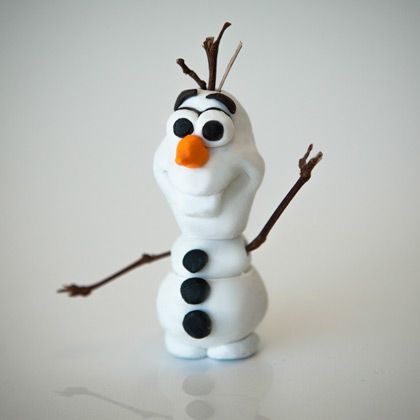
Tutorial: Polymer Clay Olaf

August 20, 2014 by Elaine Robitaille

disney-frozen-olaf-polymer-clay-photo-420x420-IMG_9821-2

Disney’s Family site has all sorts of crafts and goodies on it. Including a tutorial on how to make a polymer clay Olaf figure. The cute snowman is from the insanely popular movie Frozen. You could embed a decent sized jump ring in the clay before baking and turn your Olaf figure into an ornament for your Christmas tree.

You may also want to check out these helpful Frozen party tips:

* 12 Easy DIY Frozen Party Favors
* 50 Frozen Party Ideas
* Frozen Cake

Hosting a Frozen party? Check out these amazing supplies we found, including a Frozen Pinata, Pin the nose on Olaf, Frozen party favors and ready to hang Frozen Party Backdrop for taking amazing photos of your party guests.

You can see all our Frozen articles here. 

«
»

Comments

  1. Kelsey says

    February 15, 2016 at 3:26 pm

    How do you make the head and how do you make the body parts stay together.

  2. Elaine Robitaille says

    February 16, 2016 at 3:38 pm

    Hi Kelsey! The instructions for the head are in the second step. I noticed there isn’t a direction for how to put the parts together but polymer clay sticks to itself just fine so press your pieces together firmly, without squishing all the details out.

Have you read?

DIY Sushi Bowls and Ceramic Chopsticks with Koi Wave Pottery Transfer Paper

If you’ve ever wanted to bring a touch of Japanese artistry to your tableware, this project is the perfect place to start. Using koi wave pottery transfer paper, you can transform plain clay pieces into elegant sushi bowls and matching ceramic chopsticks—handmade, functional, and beautiful.

This beginner-friendly guide will show you how to apply ceramic transfer sheets to create a set that looks store-bought but carries the warmth of handmade craftsmanship.

Materials You’ll Need

  • White stoneware or porcelain clay (cone 5–6 recommended) 
  • Koi wave ceramic pottery transfer paper (as shown above) 
  • Rolling pin or slab roller 
  • Bowl molds (small curved molds or slump molds for sushi bowls) 
  • Wooden chopstick dowels or ceramic chopstick molds 
  • Scissors 
  • Sponge or damp cloth 
  • Rib tool or rubber kidney 
  • Clear glaze 
  • Kiln

Step 1: Prepare Your Clay

  1. For the bowls – Roll out clay slabs about ¼ inch thick. Drape over a bowl mold or press into a slump mold to create your sushi bowl shape. Smooth edges with a damp sponge. 
  2. For the chopsticks – Roll clay into long, even strips (or press into chopstick molds if you have them). Aim for a slim, uniform thickness so they feel comfortable to hold. 

Let all pieces firm up to leather-hard stage—firm but still damp enough to accept transfers.

Step 2: Cut Out the Transfer Designs

Trim sections of the koi wave transfer paper to fit your pieces. For bowls, you can cut circular panels or strips depending on whether you want the design inside, outside, or both. For chopsticks, cut narrow strips of transfer paper that can wrap around each stick.

Tip: Think about placement—the flowing wave design looks especially striking when it wraps around curved surfaces.

Step 3: Apply the Transfer Paper

  1. Place the transfer sheet design-side down on the leather-hard clay. 
  2. Lightly dampen the back of the paper with a sponge until it darkens and sticks. 
  3. Smooth gently with a rib tool to ensure full contact. 
  4. Carefully peel back the paper to reveal the koi wave design. 

Repeat until all bowls and chopsticks are decorated.

Step 4: Dry and Bisque Fire

Allow all pieces to dry completely. Bisque fire according to your clay’s temperature guidelines (usually cone 04 for bisque). This firing will lock in the koi wave design.

Step 5: Glaze and Final Fire

Brush or dip in a clear glaze to seal the transfers, bringing out the rich blue detail while keeping the white clay background crisp. Fire to your glaze cone temperature (typically cone 5–6).

The Finished Set

You’ll have a handmade sushi set featuring:

  • Mini sushi bowls – perfect for soy sauce, dipping, or small side dishes. 
  • Matching ceramic chopsticks – elegant and reusable, finished with koi wave patterns. 

Tips

  • Keep chopsticks uniform in thickness so they balance well in use. 
  • Test the transfer on a scrap piece first to gauge how much water is needed. 
  • Try mixing placement—inside bowl only vs. outside vs. full wrap—for variety. 
  • Consider making a full set: 4 bowls + 4 pairs of chopsticks for a complete handmade sushi dining experience. 

This koi wave pattern brings both serenity and elegance to your handmade ceramics. The deep blue waves paired with koi fish designs make each piece feel timeless—perfect for special meals, gifting, or even selling as artisan tableware.

Creating your own sushi set allows you to blend functionality with artistry—every bite of sushi becomes part of a beautiful, handmade ritual.


Categories

air dry clay animals Artist Spotlight Christmas Clay Canes Clay Charms Craft Inspirations DIY Clay Tutorials and Patterns earrings Freebies halloween Inspiration necklace Plates, Bowls & Platters Polymer Clay Polymer Clay - Techniques Polymer Clay - Tutorials Polymer Clay Community Tips/Tools valentine's day

RSS feed: More Articles More Articles

  • Mini Mending Mondays: Patch a Child’s Leggings Knee Without Using a Sewing Machine
  • Crafts to Celebrate Hispanic Heritage Month
  • Crochet Colourful Doily Pillow – Bright, Easy, and a Great Scrap Yarn Project
  • Free Printable Food Gift Tags for Homemade Treats
  • DIY Sushi Bowls and Ceramic Chopsticks with Koi Wave Pottery Transfer Paper
  • Free Crochet Diwali Lantern Wind Spinner Pattern – Bright Festival of Lights Decoration
  • Cross Stitch on Anything with Waste Canvas
  • Halloween Hand Embroidery Pattern Bundle – Etsy Review
  • 20 FREE Rustic and Rural Landscape Printables
  • How to Make String Quilt Blocks (Turn Fabric Scraps Into a Beautiful String Quilt)

Pick Your Blog

  • Sewing
  • Knitting
  • Quilting
  • Crochet
  • Home & Garden
  • Recycled Crafts
  • Scrapbooking
  • Card Making
  • Polymer Clay
  • Cross-Stitch
  • Edible Crafts
  • Felting
  • Glass Art
  • Indie Crafts
  • Kids Crafts
  • Jewelry Making
  • Lesson Plans
  • Needlework
  • Bath & Body
  • Party Ideas
  • Candle Making
  • DIY Weddings
  • Not Craft
  • Free Craft Projects

Copyright © 2026 · CraftGossip | Start Here | Contact Us | Link to Us | Your Editors | Privacy and affiliate policy