• Home
  • Suggest A Craft
  • DIY Newsletter

Polymer Clay

Fimo and clay tips and tutorials

  • About CraftGossip
  • Our Network
    • Bath & Body Crafts
    • Candle Making Ideas
    • Crochet Ideas
    • Cross Stitch
    • Edible Crafts
    • Felting Patterns
    • Glass Art
    • Home & Garden Ideas
    • Indie Crafts
    • Jewelry Making
    • Kids Crafts
    • Knitting Patterns
    • Lesson Plans
    • Needlework
    • Party Ideas
    • Polymer Clay
    • Quilting Ideas
    • Recycled Crafts
    • Scrapbooking
    • Sewing Patterns
    • Card Making
    • DIY Weddings
    • Not Craft Ideas
  • Giveaways
  • Roundups
  • Store
  • Search

Tutorial: DIY Clay Bowl Vessel

July 11, 2014 by Elaine Robitaille

FimoBowl_HeatherLighton_3

This one’s simple and adaptable. you can add designs and paint and textures. And while I don’t recommend using Fimo clay for food you could finish it with food-safe resin and it would probably be safer to use to hold foods.

Welcome to my tutorial on how to make your own polymer clay bowl! This project is a great way to use polymer clay to create a functional and decorative object that can be used to hold trinkets, jewelry, or other small items. You can also use it as a pinch bowl, which is a small bowl that’s perfect for holding a pinch of herbs or spices while cooking.

Polymer clay is a fun and versatile medium that can be molded, shaped, and baked to create all sorts of objects. It’s available in a wide range of colors, so you can choose the ones that best suit your style.

Before you start working with the clay, it’s a good idea to knead it to make it soft and pliable. This will make it easier to shape and mold. You can also use a clay conditioning machine or roll it out with a rolling pin to make the clay even softer and easier to work with.

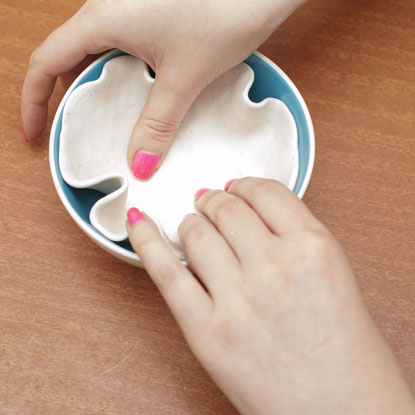
When it comes to shaping and molding the clay, you can use a variety of tools, including your hands, clay sculpting tools, and cookie cutters. Just remember that the clay will harden when it’s baked, so it’s important to work quickly and get the shape you want before it becomes too stiff.

Once you’ve shaped your clay into the desired form, it’s time to bake it in the oven. Follow the instructions on the clay package for the correct baking temperature and time. After the clay has cooled, you can sand it, drill holes in it, or paint it to finish your project. You can also use a sealant to protect the clay and give it a glossy finish.

I hope these tips are helpful as you get started on your polymer clay bowl. Happy crafting!


And remember you can use any shape that the clay will come off of as an innie or outie mold: bowls of all sizes but also the bases of vases, bulbs, wadded up tin foil, trays… anything that won’t melt at 275F.

Clay bowls are trending right now and we have featured lots of different designs, including these pinch bowls which are tiny and perfect for making as gifts.  If you do not want to use Polymer clay for making your bowl you could use an Air drying clay. We highly recommended Das Airdrying clay that we have been using for over 20 + years.


Next Polymer Clay Idea:

  • Kawaii Cat Pancakes Polymer Clay Tutorial
«
»

Have you read?

POP! – Perspectives on Polymer

POP! – Perspectives on Polymer

Contemporary Craft is thrilled to be hosting POP! – Perspectives on Polymer June 25-29, 2022.  A five-day celebration of contemporary work in polymer, the event will have something for everyone who loves polymer clay.  POP! will feature four workshops along with virtual talks by some of the best polymer artists in the country, an exhibition of small works in polymer, and a curated feature in the Store. The opening reception will be held on Saturday, June 25, 6-8 PM, and will be free and open to the public.

POP!’s focus on workshops and the materiality of polymer makes this boutique event more than just a conference. Each participating artist was selected for their unique perspectives on polymer and the exciting ways they are moving the medium forward. The featured instructor for the event is Jeffrey Lloyd Dever, whose pioneering techniques in polymer have made him one of the most respected artists in the field. His jewelry and sculptural objects have been shown in many national invitational exhibitions, and his works are represented in numerous private collections, galleries and museums.

Read more here 

RSS More Articles

  • Designer Spotlight: Natalka Studio
  • Paw Print Shaped Dog Mini Album
  • Another Great Shawl to Use Your Leftovers
  • How to Fix a Missed Crochet Stitch (No Frogging Needed!)
  • Mother’s Day Gift Guide 2025: My Top Amazon Picks She’ll Actually Love
  • The Quilter’s Fabric Dictionary: 57 Terms You Need to Know
  • Best Sewing Machine for Quilting Beginners: Your No-Stress Buying Guide
  • McCall’s Half-Price Pattern Sale – Starts Friday!
  • Learning about Chad for Kids – Lesson Plan
  • Peacock Stitch Crochet Cardigan in Sirdar Country Classic

Pick Your Blog

  • Sewing
  • Knitting
  • Quilting
  • Crochet
  • Home & Garden
  • Recycled Crafts
  • Scrapbooking
  • Card Making
  • Polymer Clay
  • Cross-Stitch
  • Edible Crafts
  • Felting
  • Glass Art
  • Indie Crafts
  • Kids Crafts
  • Jewelry Making
  • Lesson Plans
  • Needlework
  • Bath & Body
  • Party Ideas
  • Candle Making
  • DIY Weddings
  • Not Craft
  • Free Craft Projects

Copyright © 2025 · CraftGossip | Start Here | Contact Us | Link to Us | Your Editors | Privacy and affiliate policy

Copyright © 2025 · Sprinkle Theme on Genesis Framework · WordPress · Log in