• Home
  • Suggest A DIY
  • DIY Newsletter

Polymer Clay

Fimo and clay tips and tutorials

  • About CraftGossip
  • Our Network
    • Bath & Body Crafts
    • Candle Making Ideas
    • Crochet Ideas
    • Cross Stitch
    • Edible Crafts
    • Felting Patterns
    • Glass Art
    • Home & Garden Ideas
    • Indie Crafts
    • Jewelry Making
    • Kids Crafts
    • Knitting Patterns
    • Lesson Plans
    • Needlework
    • Party Ideas
    • Polymer Clay
    • Quilting Ideas
    • Recycled Crafts
    • Scrapbooking
    • Sewing Patterns
    • Card Making
    • DIY Weddings
    • Not Craft Ideas
  • Giveaways
  • Roundups
  • Store
  • Search

Studio by Sculpey Review

April 15, 2008 by heather powers

Studio by Sculpey

is the new formula of clay that has been on the market for a few months now.

It’s received some mixed reviews. Depending on what projects you are working on or what brand of clay you use, it may or may not work for you. I would say Studio is ideal for stamping, decorative crafts and using with molds, just as the projects on their website suggest.

With that said, I love this new clay.  While it won’t take the place of my precious Premo, I have been having fun experimenting with the stash that I purchased.  (I ordered every color after I tried out a few samples.)

*Color: Love the colors, the sophisticated color palette reduces the color mixing time.  Although I still found myself adjust the colors to fit me. If you like deep saturated colors, you may want to adjust Studio using a different brand of clay.

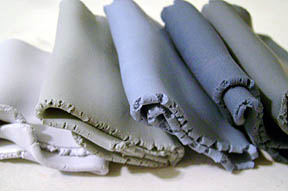
*Texture:  Studio has a soft, suede like feel both before and after it’s baked.  It’s lightweight marshmallow feel is fun to play with and conditioning is a breeze.  The clay doesn’t hold it’s shape for beads as well as Premo and I found myself mixing 1/2 Premo & Studio to get a firmer clay for the base beads.

*Caning: Yep, you can cane with it.  I cane with the softer blocks of Premo, a firmer clay is probably better for beginners.  You may want to condition and mix your colors and then let them set overnight. I like the clay better on day two.  Make sure you use a sharp blade!

*Finishing: I’m a matte finish girl, so I’m happy with a quick sanding to get rid of any fingerprints.  The beads feel almost like fabric or paper, love it!

I’m looking forward to getting to know this new product better during over the next few months.  Here are some of my first experiences with Studio.

studiosculpey.JPG

My first few blocks of clay were demin, pomegranate, whipped cream and after midnight.  I mixed up a soft color palette in blues and purples.

blueflower2.JPG

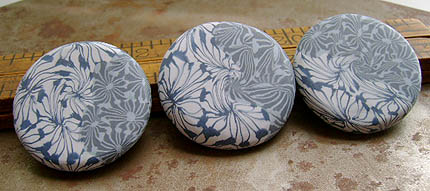
The demin shades were used in my Aloha Blue beads.

purple2.JPG

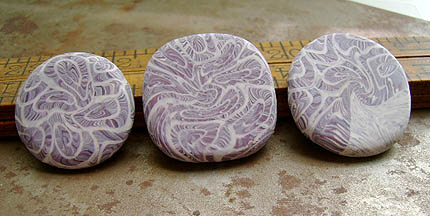
Studio used with my seashell cane.

swisstropical1.JPG

swissmiss.JPG

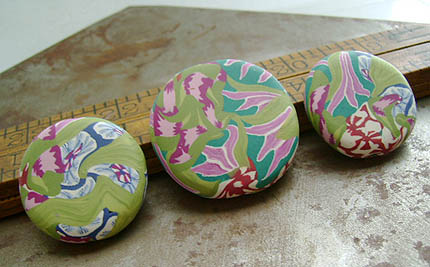
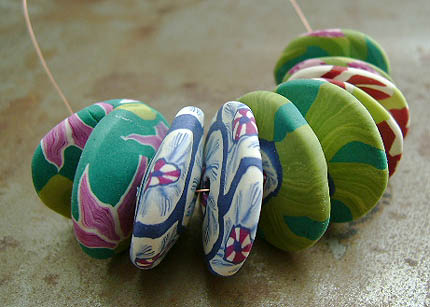
Stepping out of my comfort zone with a brighter palette and bold, graphic canes.

What do you think of Studio?  I’d love to hear from you and see your projects.


Next Polymer Clay Idea:

  • How To Make An Air Dry Clay Paint Palette With…
«
»

Comments

  1. Louise says

    April 15, 2008 at 3:12 am

    I heave the same comments as you have. One more info.
    I tied sanding and buffing like with premo and it still stays mat even though there is a bit of shine.

    Loved mixing it with fimo or premo.

  2. Buxi says

    April 15, 2008 at 5:36 am

    Really beautiful beads. I have to try make some disks.
    Good work:)

  3. Sharen Jantz says

    May 1, 2008 at 7:07 pm

    Would not touch this product with a 10′ pole — it is marketed by Donna Dewberry who knows “zip” about polymer clay. It is just a marketing gimmick to sell her Polymer Clay Certification course. Polyform’s lost their credibility with me.

  4. Aileen says

    December 14, 2008 at 7:45 pm

    What a beautiful mix of colors, gorgeous job!!

  5. Sharon Haggerty says

    June 29, 2009 at 11:37 am

    Your work is absolutely beautiful! I am inspired to try some new things…

    Thanks for the review. We are going to give the Studio by Sculpey clay a try.

  6. Laura says

    September 26, 2012 at 11:23 am

    Love it. Great for beads – l am doing a clay experiment with PC beads at the moment. Got cernit, fimo classic, premo, sculpey iii, Kato and studio. Studio doesn’t crack and l don’t get hairline cracks either. Color stays pretty much the same and after quenching the beads are dead hard. l think this stuff would be great if you wanted to do a faux fabric effect (i.e tassles) or thinner pieces as it is so bendy and plastic like in cured state. A winner for me.

  7. Barbara says

    August 25, 2021 at 9:22 pm

    This sounds a lot like the “Ultra Light” Sculpey that I wish I had not bought. It was all I could find in white and felt like working with marshmallows. I am now using it like I would scrap clay to build up miniature designs.

Have you read?

DIY Pottery Clay Doily Platter with Pink Speckled Glaze

There’s something special about combining old traditions with modern design. I’ve always adored the stack of vintage doilies handed down from my grandmother, but since lace doesn’t exactly suit my home aesthetic, I started experimenting with ways to repurpose their beautiful patterns in clay. That’s how I ended up creating this doily pottery platter—a simple slab of clay transformed into a textured serving dish with the help of lace, white clay, and a soft pink speckled glaze.

The result is a handmade ceramic platter that looks both timeless and contemporary, perfect for styling on a coffee table, serving treats, or simply displaying as a piece of art.

Materials You’ll Need

  • White pottery clay (stoneware or porcelain recommended)

  • Rolling pin

  • Crochet doily (cotton lace works best)

  • Sharp knife or clay cutter

  • Oval or rectangular template (a cutting board, tray, or paper template works well)

  • Sponge and water

  • Plastic wrap

  • Kiln access (or a local pottery studio firing service)

  • White glaze

  • Pink speckled glaze (or white glaze with pink oxide/pigment speckles)

Step-by-Step Tutorial

Step 1: Roll Out the Clay

Roll your clay slab to about 1/4 inch thick. Keep it even and wide enough to cut an oval platter shape.

Step 2: Press the Doily

Lay your crochet doily flat across the clay. Use the rolling pin to firmly press the pattern into the surface. Lift it carefully to reveal the intricate lace design imprinted into the clay.

Tip: Dust the doily lightly with cornstarch if it tends to stick.

Step 3: Cut the Platter Shape

Using your knife and a template, cut around the clay to form an oval platter shape. Smooth the edges with your fingers or a damp sponge.

Step 4: Lift and Shape the Platter

For a slightly raised platter, drape the clay gently over a shallow mold (like a plate or tray lined with plastic wrap). If you prefer a flat serving dish, leave it as-is on your board.

Step 5: Let It Dry

Allow the platter to dry until leather-hard. Refine the edges with a sponge, smoothing away any rough spots. Once it reaches bone dry, it’s ready for bisque firing.

Step 6: Glaze and Fire

After the first firing, apply a coat of white glaze over the entire platter. Then lightly layer on a pink speckled glaze (you can also achieve this by flicking pink oxide pigment into a clear glaze). The pink speckles add a playful, modern twist while still allowing the lace pattern to shine through. Fire again according to your glaze instructions.

Styling Your Finished Platter

This platter is both practical and beautiful. You can:

  • Use it as a serving dish for cakes, cookies, or fruit.

  • Style it on a coffee table with candles or trinkets.

  • Display it as wall art by adding a plate hanger.

  • Gift it as a keepsake—perfect for Mother’s Day, weddings, or housewarmings.

Every platter I make carries the memory of my grandmother’s doilies, but in a form that feels modern and at home with my style. The pink speckled glaze gives it a playful softness, while the lace impression keeps that touch of handmade tradition alive. It’s proof that old textiles can inspire something completely fresh when reimagined in clay.


Categories

air dry clay animals Artist Spotlight Christmas Clay Canes Clay Charms Craft Inspirations DIY Clay Tutorials and Patterns earrings Freebies halloween Inspiration necklace Plates, Bowls & Platters Polymer Clay Polymer Clay - Techniques Polymer Clay - Tutorials Polymer Clay Community Tips/Tools valentine's day

RSS More Articles

  • FIFA Soccer Crafts For Kids, Crochet Fans And Game-Day Makers
  • Cross Stitch Ice Cream and Frozen Treats
  • Sunflower Ribbon Embroidery Tutorials and Kits to Brighten Your Hoop
  • 15 Charity Sewing Projects That Let You Sew Something Useful For A Good Cause
  • Decorating Mistakes That Make Your Living Room Feel Cluttered
  • Remembering Jill Smokler, Founder Of Scary Mommy
  • In the Garden Layer Cake – A Bloom-Filled Fabric Collection for Spring Sewing
  • How To Do Kitchener Stitch: A Beginner-Friendly Guide To Grafting Knitting Seamlessly
  • Pattern Review: Georgie Granny Square Bucket Hat Crochet Pattern
  • Free Giant Squishy Octopus Crochet Pattern

Pick Your Blog

  • Sewing
  • Knitting
  • Quilting
  • Crochet
  • Home & Garden
  • Recycled Crafts
  • Scrapbooking
  • Card Making
  • Polymer Clay
  • Cross-Stitch
  • Edible Crafts
  • Felting
  • Glass Art
  • Indie Crafts
  • Kids Crafts
  • Jewelry Making
  • Lesson Plans
  • Needlework
  • Bath & Body
  • Party Ideas
  • Candle Making
  • DIY Weddings
  • Not Craft
  • Free Craft Projects

Copyright © 2026 · CraftGossip | Start Here | Contact Us | Link to Us | Your Editors | Privacy and affiliate policy