• Home
  • Suggest A DIY
  • DIY Newsletter

Polymer Clay

Fimo and clay tips and tutorials

  • About CraftGossip
  • Our Network
    • Bath & Body Crafts
    • Candle Making Ideas
    • Crochet Ideas
    • Cross Stitch
    • Edible Crafts
    • Felting Patterns
    • Glass Art
    • Home & Garden Ideas
    • Indie Crafts
    • Jewelry Making
    • Kids Crafts
    • Knitting Patterns
    • Lesson Plans
    • Needlework
    • Party Ideas
    • Polymer Clay
    • Quilting Ideas
    • Recycled Crafts
    • Scrapbooking
    • Sewing Patterns
    • Card Making
    • DIY Weddings
    • Not Craft Ideas
  • Giveaways
  • Roundups
  • Store
  • Search

Stacker bead tutorial

August 6, 2008 by Vikram Goyal

Ovenfried Beads
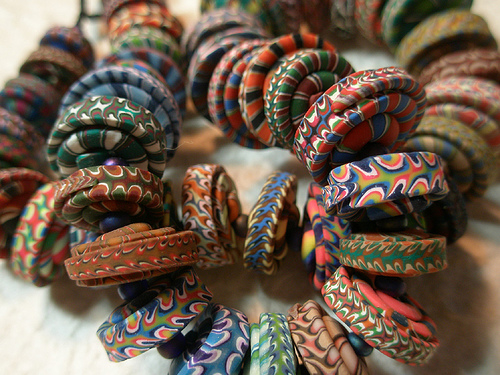
Amy of Ovenfried Beads has made a tutorial for her famous Stacker Beads. And it’s free! How’s that for generous? Here are her exact words –

” Hey folks…….

Ok I just can’t keep it to myself any longer.  In the event I should croak before I’m an old old lady, I want people to keep making them. All I ask is that credit is given where it’s due.  I could have gone the marketing/selling/making money route, but every time I use a technique I learned from someone who gave it away, I think of the Stacker bead and how many folks can learn it.  I hope that someone can use the technique for other items, and have it evolve into something better.

Enjoy: http://www.ovenfriedbeads.com

Amy – Ovenfried Beads “

Don’t forget to give her credit if you use her tutorial to make and/or sell you own beads from it – it’s the proper thing to do 🙂

Happy Claying !!!

editor: The site and the tutorial are no longer available. Amy has since published a version for sale in her Etsy shop: http://www.etsy.com/shop/ovenfriedbeads


[tags]beads, Ovenfried Beads, polymer clay, Stacker Beads, tutorials[/tags]

Next Polymer Clay Idea:

  • How To Make An Air Dry Clay Paint Palette With…
«
»

Comments

  1. Cynthia Clayworth says

    August 7, 2010 at 4:12 pm

    Love your stacker beads. I recently bought a ripple blade and have been going crazy with it. I’ve tried to make a cane (after going through what I have left) but I just can’t get it right! Will take a look at your tutorial.

  2. Brenda roberts says

    August 11, 2010 at 9:25 am

    Love, love, your Stacker Beads. Every time I click on the link for the technique I get nothing. Would you send me a good link. Thank you. Brenda

  3. Brenda roberts says

    September 12, 2010 at 1:02 pm

    I’ve contacted Amy concerning her Stacker Beads instructions. She never got back with me at all. I do know that she took her website down. Are my chances of getting the info dead? Please help.
    Brenda

  4. sharon gowryluk says

    March 26, 2011 at 11:09 pm

    yes, please tell us if there is a way to get the pattern. the link you gave no loner works.

    thanks

  5. Elaine says

    March 27, 2011 at 9:17 am

    Hi Sharon! Amy took down the tutorial some time ago. She does sell it now on Etsy – her Etsy shop is: http://www.etsy.com/shop/ovenfriedbeads

Have you read?

DIY Pottery Clay Doily Platter with Pink Speckled Glaze

There’s something special about combining old traditions with modern design. I’ve always adored the stack of vintage doilies handed down from my grandmother, but since lace doesn’t exactly suit my home aesthetic, I started experimenting with ways to repurpose their beautiful patterns in clay. That’s how I ended up creating this doily pottery platter—a simple slab of clay transformed into a textured serving dish with the help of lace, white clay, and a soft pink speckled glaze.

The result is a handmade ceramic platter that looks both timeless and contemporary, perfect for styling on a coffee table, serving treats, or simply displaying as a piece of art.

Materials You’ll Need

  • White pottery clay (stoneware or porcelain recommended)

  • Rolling pin

  • Crochet doily (cotton lace works best)

  • Sharp knife or clay cutter

  • Oval or rectangular template (a cutting board, tray, or paper template works well)

  • Sponge and water

  • Plastic wrap

  • Kiln access (or a local pottery studio firing service)

  • White glaze

  • Pink speckled glaze (or white glaze with pink oxide/pigment speckles)

Step-by-Step Tutorial

Step 1: Roll Out the Clay

Roll your clay slab to about 1/4 inch thick. Keep it even and wide enough to cut an oval platter shape.

Step 2: Press the Doily

Lay your crochet doily flat across the clay. Use the rolling pin to firmly press the pattern into the surface. Lift it carefully to reveal the intricate lace design imprinted into the clay.

Tip: Dust the doily lightly with cornstarch if it tends to stick.

Step 3: Cut the Platter Shape

Using your knife and a template, cut around the clay to form an oval platter shape. Smooth the edges with your fingers or a damp sponge.

Step 4: Lift and Shape the Platter

For a slightly raised platter, drape the clay gently over a shallow mold (like a plate or tray lined with plastic wrap). If you prefer a flat serving dish, leave it as-is on your board.

Step 5: Let It Dry

Allow the platter to dry until leather-hard. Refine the edges with a sponge, smoothing away any rough spots. Once it reaches bone dry, it’s ready for bisque firing.

Step 6: Glaze and Fire

After the first firing, apply a coat of white glaze over the entire platter. Then lightly layer on a pink speckled glaze (you can also achieve this by flicking pink oxide pigment into a clear glaze). The pink speckles add a playful, modern twist while still allowing the lace pattern to shine through. Fire again according to your glaze instructions.

Styling Your Finished Platter

This platter is both practical and beautiful. You can:

  • Use it as a serving dish for cakes, cookies, or fruit.

  • Style it on a coffee table with candles or trinkets.

  • Display it as wall art by adding a plate hanger.

  • Gift it as a keepsake—perfect for Mother’s Day, weddings, or housewarmings.

Every platter I make carries the memory of my grandmother’s doilies, but in a form that feels modern and at home with my style. The pink speckled glaze gives it a playful softness, while the lace impression keeps that touch of handmade tradition alive. It’s proof that old textiles can inspire something completely fresh when reimagined in clay.


Categories

air dry clay animals Artist Spotlight Christmas Clay Canes Clay Charms Craft Inspirations DIY Clay Tutorials and Patterns earrings Freebies halloween Inspiration necklace Plates, Bowls & Platters Polymer Clay Polymer Clay - Techniques Polymer Clay - Tutorials Polymer Clay Community Tips/Tools valentine's day

RSS More Articles

  • 12 Handmade Patriotic 4th of July Card Ideas
  • Shark Week Learning for Kids
  • Book Review – Needle Felting Art: Mixed Media Woodland Creatures
  • Knit Summer Tops with Fun Necklines
  • DIY Pottery Clay Doily Platter with Pink Speckled Glaze
  • How to Make Thick Yoghurt Smoothie Bowls in the Ninja Slushie Maker
  • FREE 4×6 Printable Backgrounds – 4th of July Collection (Red, White and Blue Craft Papers)
  • Turtle Crochet Patterns That Are Slow, Sweet, And Totally Worth Making
  • Heirloom Keepsake Crafts: Pretty Ways To Upcycle Grandma’s Vintage Teaspoons
  • Book Review: The Book Book of Beginner Amigurumi

Pick Your Blog

  • Sewing
  • Knitting
  • Quilting
  • Crochet
  • Home & Garden
  • Recycled Crafts
  • Scrapbooking
  • Card Making
  • Polymer Clay
  • Cross-Stitch
  • Edible Crafts
  • Felting
  • Glass Art
  • Indie Crafts
  • Kids Crafts
  • Jewelry Making
  • Lesson Plans
  • Needlework
  • Bath & Body
  • Party Ideas
  • Candle Making
  • DIY Weddings
  • Not Craft
  • Free Craft Projects

Copyright © 2026 · CraftGossip | Start Here | Contact Us | Link to Us | Your Editors | Privacy and affiliate policy