• Home
  • Suggest A Craft
  • DIY Newsletter

Polymer Clay

Fimo and clay tips and tutorials

  • About CraftGossip
  • Our Network
    • Bath & Body Crafts
    • Candle Making Ideas
    • Crochet Ideas
    • Cross Stitch
    • Edible Crafts
    • Felting Patterns
    • Glass Art
    • Home & Garden Ideas
    • Indie Crafts
    • Jewelry Making
    • Kids Crafts
    • Knitting Patterns
    • Lesson Plans
    • Needlework
    • Party Ideas
    • Polymer Clay
    • Quilting Ideas
    • Recycled Crafts
    • Scrapbooking
    • Sewing Patterns
    • Card Making
    • DIY Weddings
    • Not Craft Ideas
  • Giveaways
  • Roundups
  • Store
  • Search

Simply Textured Beads

January 14, 2012 by Elaine Robitaille

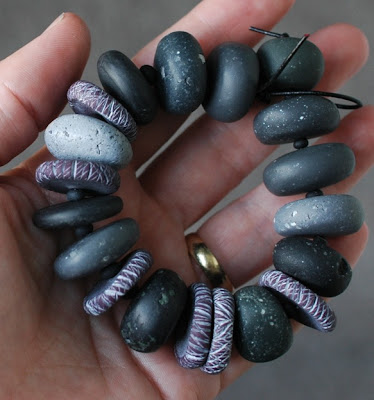
JibbyandJuna shares her method for making her simple but striking textured beads. Along the same lines you can use regular table salt (rinse out after baking), the edge from your bone folder, an old comb and so on to make textured accent beads. A little acrylic paint – try white for very dark colours or browns for lighter colours – rubbed on after baking then either wiped off or sanded off makes the textures stand out.

JibbyandJuna also has an Etsy shop filled with lovely, textured pieces that need admiring.

«
»

Comments

  1. Myra says

    January 19, 2012 at 12:12 pm

    They say chunky jewelry is in — and I can see why! Love the idea of using salt for texture!

  2. Elaine says

    January 19, 2012 at 9:14 pm

    Yeah, I’ve been making faux “concrete” key fobs with simple stamped messages in for the men using salt and some fake granite mixes. So far, so good!

Have you read?

The Best Glue for Polymer Clay (And How to Use It Without Messy Mistakes)

If you’ve ever spent hours sculpting the perfect polymer clay earrings only to have the posts pop off, you’ll know the heartbreak of choosing the wrong glue. Polymer clay doesn’t play nicely with every adhesive, and what works for paper or wood can end up brittle, tacky, or just plain useless on clay.

After twenty years of crafting with polymer clay—jewelry, buttons, magnets, and more—I’ve tested my fair share of glues. Below is a no-fuss guide to the best glues for polymer clay, when to use them, and a few tricks that will save you from sticky disasters.

Do You Really Need Glue for Polymer Clay?

Here’s the secret: clay itself bonds better to clay than any glue can. So, if you can bake pieces together, that’s always the strongest option. But for jewelry findings, mixed-media projects, or attaching polymer clay to metal, glass, or ceramics—yes, glue becomes your best friend.

The Best Glues for Polymer Clay

1. Super Glue (Cyanoacrylate)

  • Best for: Quick fixes, small attachments like jewelry posts or jump rings. 
  • Pros: Dries in seconds, clear finish. 
  • Cons: Brittle over time, not ideal for stress points. 
  • Tip: Use a tiny drop. Too much will bloom white residue onto your clay. 

2. E6000

  • Best for: Heavy-duty bonds, especially clay to metal (think bails, barrettes, and keychains). 
  • Pros: Industrial strength, flexible once cured. 
  • Cons: Strong fumes, needs 24 hours to fully cure. 
  • Tip: Work in a ventilated space and clamp your piece while drying. 

3. Two-Part Epoxy

  • Best for: Jewelry and repairs that need to last a lifetime. 
  • Pros: Rock-solid bond, water-resistant. 
  • Cons: Messy to mix, limited working time. 
  • Tip: Mix on a scrap surface and apply with a toothpick for precision. 

4. Polymer Clay–Friendly Liquid Clay (Like Sculpey Bake & Bond)

  • Best for: Attaching raw clay to baked clay before re-baking. 
  • Pros: Fuses clay layers when baked, invisible bond. 
  • Cons: Won’t work as a cold glue. Needs baking. 
  • Tip: Great for mosaics or adding small details that need extra security. 

5. PVA or White Craft Glue

  • Best for: Porous surfaces like paper, cardboard, or fabric accents. 
  • Pros: Cheap, easy to find. 
  • Cons: Weak bond on non-porous surfaces. 
  • Tip: Use only for mixed-media projects where polymer clay is decorative, not structural. 

Common Gluing Mistakes (And How to Avoid Them)

  • Using too much glue: More isn’t stronger. A thin layer bonds better. 
  • Not roughing up surfaces: Lightly sand shiny metal or glass so glue has something to grip. 
  • Skipping the clean-up: Oils from your fingers weaken adhesion—wipe surfaces with rubbing alcohol first. 
  • Expecting miracles: Some things just won’t bond forever. Reinforce with wire, eye pins, or bake-in hardware whenever possible. 

My Go-To Recommendation

If you’re attaching metal jewelry findings, go for two-part epoxy or E6000. For clay-to-clay details, stick with liquid polymer clay and rebake. Super glue? Only for quick fixes when I’m too impatient (we’ve all been there).

Choosing the right glue for polymer clay isn’t just about brand—it’s about matching the adhesive to the project. Once you understand when to use each type, your clay creations will hold up beautifully for years.


RSS More Articles

  • Soccer Boots Bag: A Handy Drawstring Bag Sewing Tutorial
  • 25 Crochet Patterns For Frogs
  • The Best Glue for Polymer Clay (And How to Use It Without Messy Mistakes)
  • Cold Porcelain Clay: What It Is, How to Make It and Crafting Tips
  • DIY Homemade Clay with Cornstarch – The Best Recipe for Crafts, Ornaments and Keepsakes
  • Fun Owl Crafts for Kids of All Ages
  • Bookmark Knitting Patterns
  • 20 Quilted Pillow/Cushion Patterns to Transform Your Home
  • Turn Your Home into a Solar Powerhouse with These Easy DIY Projects – No Experience Needed
  • Magical Winter Crafts for Kids: Easy Indoor Activities

Pick Your Blog

  • Sewing
  • Knitting
  • Quilting
  • Crochet
  • Home & Garden
  • Recycled Crafts
  • Scrapbooking
  • Card Making
  • Polymer Clay
  • Cross-Stitch
  • Edible Crafts
  • Felting
  • Glass Art
  • Indie Crafts
  • Kids Crafts
  • Jewelry Making
  • Lesson Plans
  • Needlework
  • Bath & Body
  • Party Ideas
  • Candle Making
  • DIY Weddings
  • Not Craft
  • Free Craft Projects

Copyright © 2025 · CraftGossip | Start Here | Contact Us | Link to Us | Your Editors | Privacy and affiliate policy