 I finished up my mokume gane pendants a couple nights ago by hand sanding and buffing them. I hate to hand sand my work. It causes my hands and wrists to cramp, my neck to spasm from the tension in my arm, and not to forget, my fingertips were almost raw! I ended up having to cut my fingernails because I only had one side of them left. They weren’t the type you have to pay for, thank goodness! My pendants turned out pretty good this time. My previous attempts at hand sanding failed miserably, due to the fact that I quit halfway through the process. It’s not an easy job.
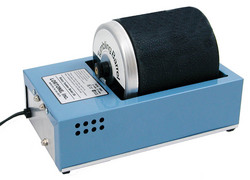
So that’s why I’ve ordered a Lortone tumbler. It’s the smallest one they make, but that’s all I need for no more than what I do. Besides, I’ve put it off as long as I could. I just didn’t want to fork out that much money on something to do the job when there wasn’t anything stopping me from doing it. Well, something finally stopped me, paaain.
I have been on the hunt for a Lortone (rock) tumbler for a few days now. I’ve scoured the web for the cheapest price I could find. I’ve been up and down the aisles of Ebay a hundred times these past few days. I didn’t really want to buy from there, some of the sellers try to make major bucks on the shipping charges and that burns my buns. I compared many sellers from there and not to mention all the rockhound stores on the web that carry the tumblers also. Just when I thought I had my choice weeded out, I’d find something else I needed more info on, sizes, models, warranty’s, shipping charges, do I really need this, yes I really need this, no you don’t……..You get the idea, right?
Alright, I’ll get to the point already. I finally made my decision this afternoon and ordered a Lortone 3A single barrel tumbler. It includes a molded 3 lb. rubber barrel with quick-seal closure and a continuous-duty fan cooled motor. (Fan-cooled, that’s good right ?) The barrel is: 4 1/8″ deep and 3 7/8″ in diameter, the capacity is 2 3/4 cups. Brand new, instruction book and warranty card are included . ( Okay, that sounds like a winner to me.) I plan on having plenty of beads for it to sand for me when it gets here next week.
The seller sent me a small how-to email that I’m going to re-read this weekend. Along with the letter and all of the great info that one of our dear mad scientists of polymer clay, Desiree McCrory, has spent countless hours to develop through trial and error, I will become a mad scientist of sorts myself next week. Don’t worry, I won’t leave you out in the cold. I’ll post about it here, you’ll just have to come back to see me if you want to know how I did.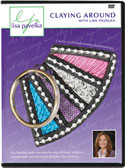
Until then, if you have any pointers for a tumbler newbie, please leave them here in the comments for me 🙂 I have a Lisa Pavelka DVD that I’ve planned on giving away to one lucky reader. All you have to do is leave me a tip on sanding polymer clay by posting a comment. I’ll have my grandson to randomly pick one commenter on September 10th that I’ll send the DVD to.
[tags]polymer clay, sanding, Lortone tumbler, tumble sanding polymer clay, jewelery[/tags]



Here’s the best sanding tip that I have for you: DON’T DO IT! Make everything as smooth as you can before baking and then use a finish of some sort to bring out the shine or patina or whatever you want. There are many finishing choices that do not include sandpaper. Those are the ones for me (and my fingers, arms, neck, muscles in general).
I use a Lortone for sanding polymer clay. I actually use the rubber barrel it came with for my steel shot and metal clay pieces but I’ve found an empty plastic peanut butter jar about the same size that does the job for my polymer clay. I like to keep my mediums separate and didn’t want to fork out for a spare barrel. So long as it’s heavy with beads and has a couple of elastic bands around the circumference to assit the rollers to grap and turn the thing around, it works like a charm. I roll some wet/dry sandpaper up (cut to size) and unfurl it in my jar/barrel, then throw my round, oval and lentil beads in that. It needs at least 12-16 hours on each grit but does a great job! I sand dry (ie without water/detergent) and wash and dry beads afterwards.
You’re going to love letting it do the sanding for you! Enjoy!
Mel
My best tip is for beads. I put on gloves that have a slight texture for when I am piercing the holes. eliminates fingerprints and gives them a nice finish. For pieces that are flat I don’t mind sanding too much. I sit myself in front of the TV with a great pile. and a glass pie dish with water and a peice of that kids foam in the bottom. I pile the different grits in order and just flip the next one down off the stack as I go. I do not bother to change the water between grits, don’t find it makes any difference. There you have it my method.
My best tip is don’t let things build up until you have a week or more worth of sanding to do. I’m on day 4 of tumbler sanding. I have at least 5 more days left with all the stuff I’ve made and not finished. I’m using 2 kiddie tumblers from Hob Lob. I HAVE a Lortone but haven’t modified it yet. But now that I read Mel’s tip, I’m going to find myself a plastic jar and some rubber bands! Mel, you’re a GENIUS!
You’ll really love having the tumbler, Wendy. Your stuff will come out smoother than hand sanding, it won’t leave you scarred and be sure to rinse your beads really well after you take them out of the tumbler – as long as you put some JetDry in there and then rinse, you should have no sanding debris stuck to your beads (something that never happens with hand sanding, at least not for me).
I am using a plastic rock tumbler that is made with kids in mind (I also do not want to mix with my metal clay stuff). It was reaaaaally cheap and does a great job! I do sand by hand at first if I find there is something about the form I want to change. I do wash the beads and the tumbler in between grits. Hope that helps 😉
I don’t have a tumbler so I can’t give you any tips on using one. But I have really enjoyed reading what others have to say. If I start to make more beads which is something I have been thinking about I will get me a tumbler. Until then I just do a few at a time. And like you my hands and wrist hurt and my neck gets so sore I can hardly stand it. May that is wa\hy I don’t make to many beads. Ya think? Have fun with your new tumbler sounds like you made a good deal.
Thanks so much for all the comments , they have given me ideas aplenty ! I will be announcing the winner of the DVD later on today. 🙂
What great information I just read. I am a newbie to PC and I am going to the Clay
Carnival and just sanded about 80ish poker chips. Thought I was going to lose my right hand. And I just did the edges.
I am not sure a tumbler would work for them but I am anxious to hear about your experiences.
And I am definitely thinking about a tumbler.
Thanks to all the others for the great tips.
Marianne
I want you all to know that after reading Mel’s post about using plastic jars with her tumbler, I spent a whole day looking for plastic jars. Couldn’t find any but did find inexpensive glass jars at Hobby Lobby ($2.63 each) that were the EXACT size as the double barrels on my tumbler, which has been sitting on a table for 2 months while I tried to get my husband to help me do the alterations described on Desiree’s Help Desk.
I bought the two glass jars and have been a tumbling fool for 3 days! I’ve got 400 grit going in the two kiddie tumblers and 600 in the double barrel and I’m actually catching up! Today, I BUFF!
Thanks, Mel, for the great idea!
There was an article about using a tumbler in Polymer Cafe. The author suggested cutting the sandpaper to a certain size. I cannot find the specific issue, but I’ll keep looking.
Or if you subscribe, I’m sure it was sometime in 2007.
I’ve been using those plastic containers you buy frosting in, inside my rubber barrel to keep the beads from getting black. But I like Mel’s idea for using a plastic peanut butter jar way better! Since the volume is greater I’ll be able to do way more beads!
For those of you that don’t sand smooth beads, you’re really doing your beads a disservice. Make fewer beads if you must, but never sacrifice the quality.
I need to say make everything as smooth as you can before baking =)
Here is my tip for 2009:
I discovered that if you take the clay out of the oven and still is a little hot, you may spray your beads with Future floor wax, the liquid one -carefull because you may get your fingers burnt-
Let it dry and there you go: as shiny as glass!