• Home
  • Suggest A DIY
  • DIY Newsletter

Polymer Clay

Fimo and clay tips and tutorials

  • About CraftGossip
  • Our Network
    • Bath & Body Crafts
    • Candle Making Ideas
    • Crochet Ideas
    • Cross Stitch
    • Edible Crafts
    • Felting Patterns
    • Glass Art
    • Home & Garden Ideas
    • Indie Crafts
    • Jewelry Making
    • Kids Crafts
    • Knitting Patterns
    • Lesson Plans
    • Needlework
    • Party Ideas
    • Polymer Clay
    • Quilting Ideas
    • Recycled Crafts
    • Scrapbooking
    • Sewing Patterns
    • Card Making
    • DIY Weddings
    • Not Craft Ideas
  • Giveaways
  • Roundups
  • Store
  • Search

Really Simple Picture Canes

February 2, 2017 by Elaine Robitaille

When I cane picture canes I tend to doodle them out first. The benefit is you see where all the lines go. If your doodles are similar in size to the face of the cane you’ll make, they’re even good at helping to estimate how much clay you’ll need. And a really good spot to start with picture canes, particularly given how popular they’ve been lately, is with colouring book pictures.

Like the last time, I did this cane with just black and white. Premo!’s Spanish Olive green and gold are another great combination for this cane. White and translucent make good overlay or “ghost” canes. Block colours with enough contrast, basically.

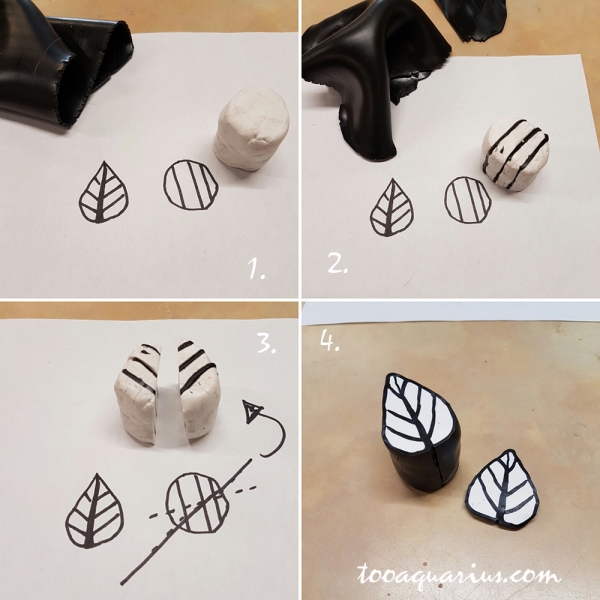
The steps, from the photo:

  1. A sheet of black, a plug of white
  2. Cut the white plug into 3 parts and line the space with some of that black sheet. Trim excess black.
  3. Slice the striped plug almost diagonally, slightly offset. Flip one of the two pieces upside down so that the lines go the opposite way, forming a V when placed against the other part.
  4. Add some of the black sheet to the centre of the cane and then attach the two pieces back together. Wrap the whole cane in black and trim. Pinch the top end to make the point of the leaf.

Next Polymer Clay Idea:

  • 25 Essential Air Dry Clay Tips & Tricks Every…
«
»

Have you read?

Etsy Feature – City Street Pottery Roller with Handle

There’s something magical about pottery tools that tell a story, and this City Street Pottery Roller does just that. Instead of a simple repeating texture, this roller creates a charming row of houses, windows, and rooftops—instantly transforming a slab of clay into a whimsical little street scene.

What It Is

This Etsy listing features a large wooden roller with a sturdy handle, designed to press detailed cityscape patterns into clay. The impression is wide enough to create a continuous border, so you can roll across a slab and build an entire “town” in just a few passes.

It works beautifully on:

  • Pottery clay and ceramic slabs. 
  • Polymer clay for smaller-scale projects. 
  • Fondant and cookie dough for bakers who love edible art. 

Why It’s Special

  • Detailed & Unique: Each building has character, with intricate windows, doors, and trees in between. 
  • Storytelling Through Clay: Adds instant personality to mugs, trays, or tiles. 
  • Easy to Use: The handle gives you good pressure and control, so your impressions stay crisp. 
  • Versatile Applications: Perfect for both functional pottery and decorative art. 

Inspiration Ideas

  • Roll across a slab to make storybook-inspired trays or platters. 
  • Use as a border on mugs or vases for a cozy, handmade vibe. 
  • Cut sections into tiles to create a miniature clay city. 
  • Highlight the details with underglaze washes or oxide stains so the windows and rooftops pop. 

Why Makers Will Love It

Tools like this City Street Roller encourage playfulness in the studio. Instead of just adding texture, you’re adding narrative—each impression looks like a scene from a quaint European street. It’s perfect for potters who want their work to feel warm, nostalgic, and one-of-a-kind.

You can find it here: City Street Pottery Roller with Handle on Etsy.

This post is part of my Etsy Feature series, where I highlight tools and treasures that spark creativity for clay and pottery lovers. And honestly? This roller might just be the most charming one yet—it makes every project feel like it belongs in a little handmade village.

Categories

air dry clay animals Artist Spotlight Christmas Clay Canes Clay Charms Craft Inspirations DIY Clay Tutorials and Patterns earrings Freebies halloween Inspiration necklace Plates, Bowls & Platters Polymer Clay Polymer Clay - Techniques Polymer Clay - Tutorials Polymer Clay Community Tips/Tools valentine's day

RSS More Articles

  • Designer Spotlight: Silverberry Designs
  • Sewing Pattern Saturday Review: The Juniper Dress PDF Sewing Pattern
  • Crochet Siamese Cat – Emotional Support Kitty
  • Easy Fourth of July Ribbon Wreath – No-Sew Patriotic Door Decor
  • Book Review: 200 Sanity-Saving Tips, Tricks, and Hacks for Quilters
  • How to Make a Shirt Shaped Card for Father’s Day
  • Free Felting Tutorial Friday: Needle Felted Bear Face
  • Freebie Friday – Free Printable 4th of July Junk Journal Images
  • How to Make A Wedding Tag Mini Scrapbook Album
  • Try This Fun Bake Off Drawing Challenge with a Group of Kids

Pick Your Blog

  • Sewing
  • Knitting
  • Quilting
  • Crochet
  • Home & Garden
  • Recycled Crafts
  • Scrapbooking
  • Card Making
  • Polymer Clay
  • Cross-Stitch
  • Edible Crafts
  • Felting
  • Glass Art
  • Indie Crafts
  • Kids Crafts
  • Jewelry Making
  • Lesson Plans
  • Needlework
  • Bath & Body
  • Party Ideas
  • Candle Making
  • DIY Weddings
  • Not Craft
  • Free Craft Projects

Copyright © 2026 · CraftGossip | Start Here | Contact Us | Link to Us | Your Editors | Privacy and affiliate policy