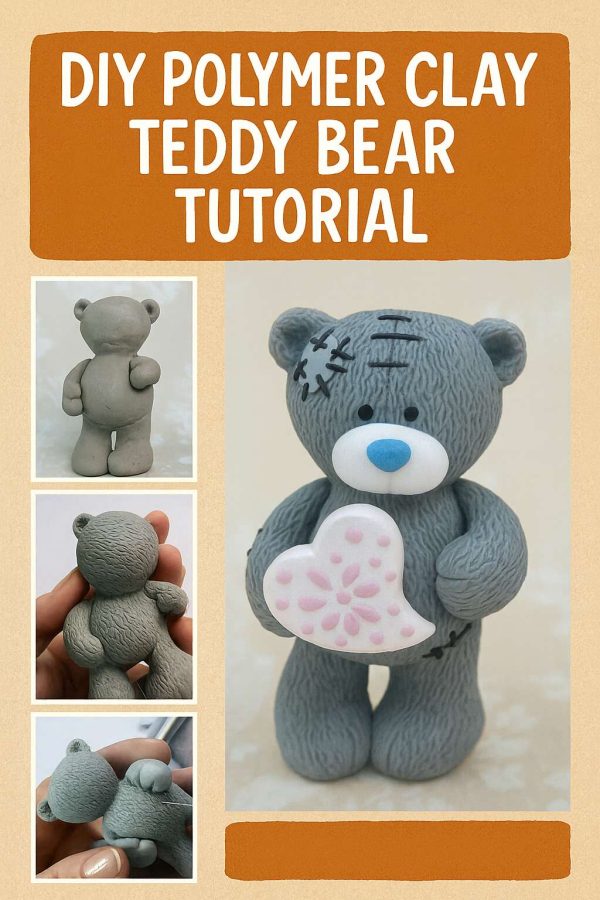
While this tutorial by Sasha Vihareva is for a teddy-like bear sculpture… it shows the basic for how to turn any drawing or photograph into a decent sculpture.
Polymer clay sculpting is one of those wonderfully nostalgic crafts that always sparks joy. There’s something about shaping a simple lump of clay into a character with personality that makes the process feel a little bit magical.
This sweet teddy bear tutorial by Sasha Vihareva is a perfect example. While her design focuses on a teddy-like bear sculpture, the techniques shown here can actually be applied to just about any animal or figurine you’d like to create. With a few basic tools, a bit of wire, and some foil, you can turn any drawing, sketch, or even a photograph into a polymer clay sculpture that comes to life in your hands.
Why Use Wire and Foil for Polymer Clay Sculptures?
Almost all of my clay sculptures start with an armature made of wire and foil. Think of it as the skeleton of your piece. This hidden structure gives your clay figure strength and stability while also cutting down on how much clay you’ll need to use.
Here’s why I recommend it:
- Saves material – less clay is needed, which means your blocks stretch further.
- Lighter weight – perfect if you’re creating larger figures that would otherwise feel heavy.
- Shorter baking time – solid chunks of polymer clay take ages to cure properly. A foil core speeds things up and ensures the clay bakes evenly.
- Better balance – wire inside helps keep delicate parts like arms, ears, or tails in place.
So before you even open your pack of clay, grab some craft wire, aluminum foil, and pliers—you’ll thank yourself later!
Step-by-Step Basics for a Polymer Clay Teddy Bear
- Build the armature – Twist wire into the shape of a little teddy frame: body, head, arms, and legs. Bulk it out with scrunched-up foil until it’s roughly teddy-shaped.
- Add your clay – Cover the foil with a layer of polymer clay, smoothing as you go. Don’t worry about perfection—sculpting is forgiving.
- Shape the features – Use your fingers and a sculpting tool to define the head, round tummy, and ears. Add little details like paws or a tiny snout.
- Personalize the bear – This is where your bear gets its character! Maybe it’s smiling, maybe it has droopy ears, or perhaps it’s holding something special.
- Bake and finish – Cure the bear according to your clay’s instructions. Once cooled, you can sand gently, paint on rosy cheeks, or even glaze for a shiny finish.
Ideas for Using a Handmade Polymer Clay Bear
A clay teddy bear isn’t just a fun project—it can also become a keepsake. Here are a few ways to use your finished sculpture:
- Valentine’s Day gift – Give your bear a quirky little heart and present it as a handmade love token.
- Cake topper – Add a bow tie, party hat, or tutu and perch it on top of a child’s birthday cake. Absolutely adorable.
- Miniature décor – Make a set of seasonal bears (think: Santa hat, bunny ears, scarf) to display on a shelf.
- Jewelry charm – Scale it down and turn your bear into a pendant or keychain.
Sculpting Beyond the Teddy
The beauty of this tutorial is that once you’ve mastered the basics of building with wire and foil, you can create any polymer clay character you dream up. Cats, dogs, bunnies, even little gnomes—it all starts the same way. A simple frame, a bit of foil, and the freedom to play.
If you’ve ever wanted to try polymer clay sculpting for beginners, this teddy bear is a gentle introduction. You’ll learn how to balance structure, detail, and personality, all in one small project.
So grab your tools, make yourself a cuppa, and start sculpting. Who knows? Your first bear might just lead to a whole family of clay creatures.


