• Home
  • Suggest A DIY
  • DIY Newsletter

Polymer Clay

Fimo and clay tips and tutorials

  • About CraftGossip
  • Our Network
    • Bath & Body Crafts
    • Candle Making Ideas
    • Crochet Ideas
    • Cross Stitch
    • Edible Crafts
    • Felting Patterns
    • Glass Art
    • Home & Garden Ideas
    • Indie Crafts
    • Jewelry Making
    • Kids Crafts
    • Knitting Patterns
    • Lesson Plans
    • Needlework
    • Party Ideas
    • Polymer Clay
    • Quilting Ideas
    • Recycled Crafts
    • Scrapbooking
    • Sewing Patterns
    • Card Making
    • DIY Weddings
    • Not Craft Ideas
  • Giveaways
  • Roundups
  • Store
  • Search

Meet Dragonsglass

December 22, 2010 by Elaine Robitaille

Kathi Gose Polymer Clay Chanukkah

1. So, introduce yourself!

I am Kathi Briefer-Gose and I live in Bakersfield, California with my wife. I found polymer clay after I was disabled at work and couldn’t work any more.

2. Why do you work with polymer clay?

Because it is so dang versatile and you can always mush it up and start over if you don’t like what you have. When we moved to our new house I was told I couldn’t have my glass studio inside the new house so it got moved to a small studio building. Well, there were days I couldn’t physically go out there and really needed something to do with my hands. And then…I found polymer clay and the rest is history.

3. Do you have a favourite technique?

My favorite technique is to shut off my head and let my creative muse take over. Sometimes the most amazing insane things happen when I do that. One that I like to share is my duck Channukiah(pic above)

You can see more of Kathi’s work on:
  • On Flickr
  • www.dragonsglass.com
  • On Facebook
«
»

Comments

  1. ColtPixy says

    December 22, 2010 at 12:28 pm

    I love Kathi’s work!

Have you read?

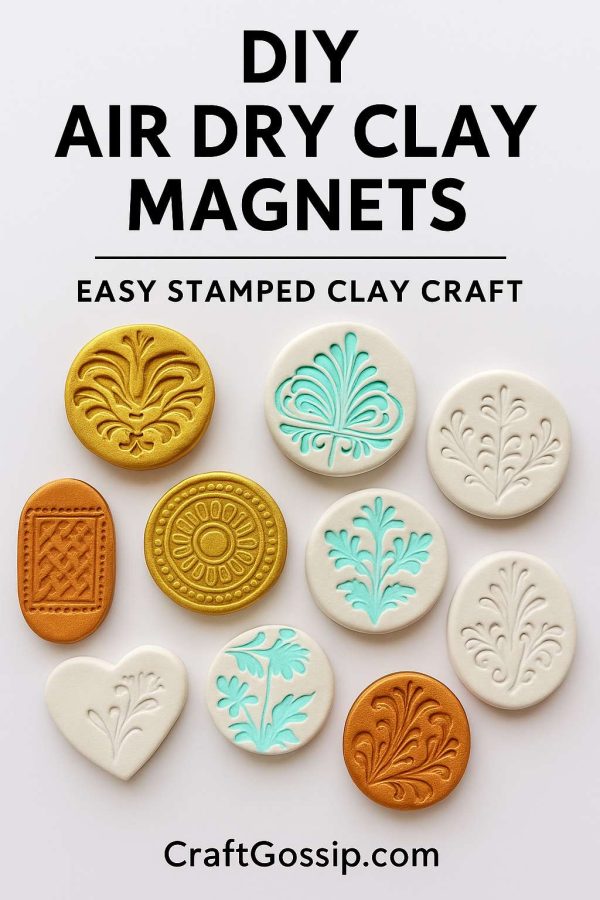
DIY Air Dry Clay Magnets – Easy Stamped Clay Craft

There’s something wonderfully nostalgic about clay crafts, isn’t there? The cool, smooth texture in your hands, the way it slowly transforms with just a little pressure and imagination—it’s both soothing and creative. Today, we’re making DIY air dry clay magnets that are stamped, painted, and perfect for adding a handmade touch to your fridge or craft room.

This project is simple, relaxing, and looks far more “designer” than it really is. Think of it as pottery without the kiln—no fancy equipment needed!

Why You’ll Love This Project

  • Uses air dry clay – no oven or kiln.

  • Great for leftover clay scraps.

  • Endless possibilities with different stamps, textures, and paints.

  • Makes thoughtful handmade gifts (great for teachers, neighbors, or stocking stuffers).

  • Works as a fun craft session with teens or grandkids.

Supplies You’ll Need

  • Air dry clay (white works best for stamping)

  • Rubber stamps or textured items (lace, doilies, leaves, even buttons!)

  • Acrylic paint or ink pads

  • Rolling pin (or just grab a glass bottle)

  • Circle cookie cutter (or jar lid)

  • Magnets (strong flat-backed ones work best)

  • Strong craft glue or hot glue gun

  • Sealer (optional: Mod Podge or matte varnish)

Step-by-Step Tutorial

Step 1 – Roll Out Your Clay

Start with a small ball of clay and roll it out to about ¼ inch thick. Not too thin, or it’ll crack while drying, and not too chunky, or your magnets will be too heavy.

Step 2 – Stamp and Texture

Press your chosen rubber stamp or textured object firmly into the clay. Don’t worry about perfection—slight variations give that handmade charm.

Tip: If you’re using an ink pad, you can ink the stamp before pressing to add instant color to the impression.

Step 3 – Cut Out Shapes

Use a cookie cutter, jar lid, or knife to cut neat circles (or any shape you like—hearts, squares, even freeform ovals).

Step 4 – Smooth Edges

Gently smooth the edges with damp fingers or a bit of water. This gives a polished finish.

Step 5 – Dry

Place your pieces on baking paper and allow them to dry for 24–48 hours. Flip halfway through to prevent curling.

Step 6 – Paint or Highlight

Once dry, you can leave them natural or lightly brush paint over the raised designs to highlight the texture. Metallics (gold, silver, copper) look stunning, but even soft pastels give a pretty effect.

Step 7 – Seal (Optional)

If you want extra durability, brush on a thin coat of Mod Podge or varnish.

Step 8 – Attach Magnets

Finally, glue a magnet to the back of each piece. Let the glue cure fully before sticking them on your fridge.

Variations to Try

  • Rustic farmhouse look: Use lace or burlap for stamping and paint with a whitewash effect.

  • Modern boho: Try geometric stamps and metallic paint accents.

  • Seasonal magnets: Use themed stamps (snowflakes, flowers, leaves) for year-round sets.

  • Kids’ art version: Let the kids press buttons, Lego bricks, or small toys into the clay for fun patterns.

Tips

These don’t just work as magnets—you can glue them onto gift tags, turn them into brooches, or even make them into pendants for necklaces. Once you start, you’ll be stamping everything in sight (don’t say I didn’t warn you!).

Handmade doesn’t have to be complicated or expensive. These DIY air dry clay magnets prove just that—simple materials, a little creativity, and you’ve got a set of unique, functional mini artworks. Perfect for gifting, decorating, or just adding a bit of joy to the everyday.


Categories

air dry clay animals Artist Spotlight Christmas Clay Canes Clay Charms Craft Inspirations DIY Clay Tutorials and Patterns earrings Freebies halloween Inspiration necklace Plates, Bowls & Platters Polymer Clay Polymer Clay - Techniques Polymer Clay - Tutorials Polymer Clay Community Tips/Tools valentine's day

RSS feed: More Articles More Articles

  • Free Knitted Crown Pattern for Kids and Adults: A Sweet Handmade Dress-Up Idea
  • Free Knitted Knockers Crochet Pattern: Make Soft Breast Forms to Donate
  • Hedgehog Crochet Patterns for Adorable Woodland Makes
  • DIY Thrifted Glass Christmas Platter With Vintage Santa Fabric
  • Celebrate Inventor’s Day by Learning about Inventors
  • How to Make a Stamped Fall Scarecrow Card
  • Tiny Knits in Team Colors
  • Book Review: The Ultimate Cross Stitch Christmas Collection
  • FREE Cute Ghost and Pumpkin Background
  • Sandok Cable Sweater Review: Sizing, Yarn and What to Know Before Knitting

Pick Your Blog

  • Sewing
  • Knitting
  • Quilting
  • Crochet
  • Home & Garden
  • Recycled Crafts
  • Scrapbooking
  • Card Making
  • Polymer Clay
  • Cross-Stitch
  • Edible Crafts
  • Felting
  • Glass Art
  • Indie Crafts
  • Kids Crafts
  • Jewelry Making
  • Lesson Plans
  • Needlework
  • Bath & Body
  • Party Ideas
  • Candle Making
  • DIY Weddings
  • Not Craft
  • Free Craft Projects

Copyright © 2026 · CraftGossip | Start Here | Contact Us | Link to Us | Your Editors | Privacy and affiliate policy