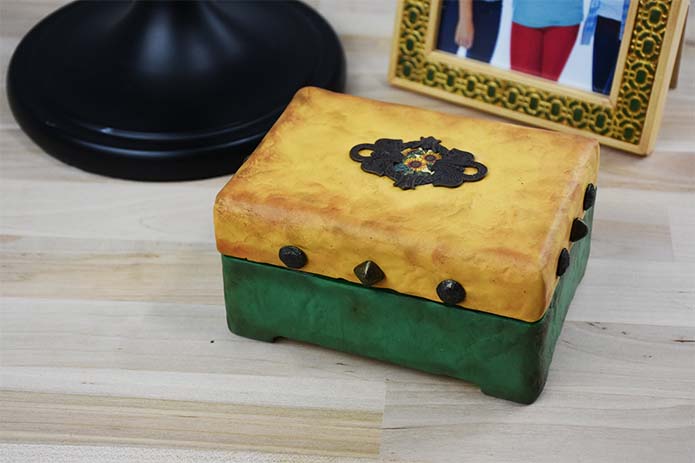
Here’s an interesting take on faux leather from syndee holt, for Sculpey. It uses Soufflé clay which has a nice, suede like texture and some pretty great colours. I’ve gotten more into it – I really like their grey and light, light brown and the colour they call turnip – and I’ve even used it for canework. This is a fun faux leather though and you could totally cover other objects than a box lid. My favourite faux leather with clay was making the covers for a notebook. I simply took apart a larger ring spiral bound sketchbook, covered the plain cardstock covers in faux leather clay sheets and stamped designs on the inside covers.
Have you read?
DIY Clay Sardine Platter
A Fisherman Aesthetic Project with Hand-Painted Glaze
The fisherman aesthetic is all about rustic coastal charm, and nothing captures it quite like sardines. From vintage tins to playful patterns, sardines are making a splash in the DIY world. This shallow clay platter project combines simple slab-building with fine hand-painting to create a functional piece that’s equal parts practical and quirky art.
Whether you’re making it as a serving tray, a decorative wall piece, or a gift for someone who loves nautical style, this sardine platter will bring seaside nostalgia straight into your home.
Materials You’ll Need
- Pottery clay (cone 04–06 earthenware or stoneware)
- Rolling pin or slab roller
- Wooden slats or rulers (to keep thickness even)
- Craft knife or fettling knife
- A ruler and a rounded corner template (or use the printable)
- Slip and scoring tool
- Sponge and water for smoothing
- Underglazes in blue, green, orange, and black
- Clear glaze (glossy or satin)
- Fine detail paint brushes (sizes 0–2 work best)
- Kiln for bisque and glaze firing
Step-by-Step Tutorial
Step 1: Roll the Clay Slab
- Roll your clay slab to about ¼ inch thick using a rolling pin and two guide slats.
- Make sure the slab is even and smooth—compress with a rib tool to reduce warping.
Step 2: Cut the Tray Shape
- Using a ruler and your template, cut out a rectangle with softly rounded corners.
- Gently lift the slab and drape it over a shallow tray mold or slump it into a form (a wooden box lid lined with fabric works in a pinch).
- Smooth the edges with a damp sponge.
Step 3: Add the Rim
- Roll a long coil of clay and flatten it into a strip.
- Attach it around the edge of your slab base, scoring and slipping to secure.
- Blend the seams smoothly for strength.
- Let the tray stiffen to leather-hard.
Step 4: Refine and Dry
- At leather-hard stage, refine the shape—smooth the surface with a damp sponge and compress the rim.
- Carve or lightly impress any border design you want, such as the crisscross pattern from the Craft Gossip template.
- Allow the piece to dry completely until bone dry.
Step 5: Bisque Firing
- Fire your tray in the kiln to bisque temperature (usually cone 04).
- This hardens the piece and prepares the surface for painting.
Step 6: Paint Sardines with Underglaze
- Using a fine paintbrush, carefully paint three sardines in the center of the tray.
- Start with a base coat of blue or grey, then add darker lines for fins and scales.
- Accent with black for eyes and details, and add orange or green banner motifs if desired.
- Keep your strokes light and fluid—this is where the fisherman aesthetic comes alive, with a hand-drawn, imperfect charm.
Step 7: Add Border Details
- Paint the crisscross border pattern around the rim using green or orange underglaze.
- Use a steady hand, but don’t worry about perfection—slight wobbles enhance the handmade look.
Step 8: Clear Glaze Coat
- Once the underglazes are dry, apply 2–3 coats of clear glaze over the entire platter.
- Allow each coat to dry before adding the next.
- Wipe the bottom clean of glaze to prevent sticking in the kiln.
Step 9: Glaze Firing
- Fire the platter to your glaze cone (usually cone 06 for earthenware, cone 6 for stoneware).
- Once cooled, your sardine platter will be glossy, durable, and ready to use.
Styling & Uses
- Use as a serving tray for bread, cheese, or olives.
- Display on a wall as coastal art.
- Pair with your sardine tin clay project for a cohesive fisherman aesthetic collection.
- Gift to a seaside-loving friend—they’ll adore the handmade touch.
Printable Templates
We’ve created free printables to help you get started:
Trace these directly onto your clay slab for easy decorating. Each template includes Craft Gossip branding so you know it’s part of our DIY series.
This platter project brings together the earthy process of hand-building with the joy of painting fine details. It’s practical, nostalgic, and absolutely perfect for anyone wanting to dip their toes into the fisherman aesthetic trend.