• Home
  • Suggest A DIY
  • DIY Newsletter

Polymer Clay

Fimo and clay tips and tutorials

  • About CraftGossip
  • Our Network
    • Bath & Body Crafts
    • Candle Making Ideas
    • Crochet Ideas
    • Cross Stitch
    • Edible Crafts
    • Felting Patterns
    • Glass Art
    • Home & Garden Ideas
    • Indie Crafts
    • Jewelry Making
    • Kids Crafts
    • Knitting Patterns
    • Lesson Plans
    • Needlework
    • Party Ideas
    • Polymer Clay
    • Quilting Ideas
    • Recycled Crafts
    • Scrapbooking
    • Sewing Patterns
    • Card Making
    • DIY Weddings
    • Not Craft Ideas
  • Giveaways
  • Roundups
  • Store
  • Search

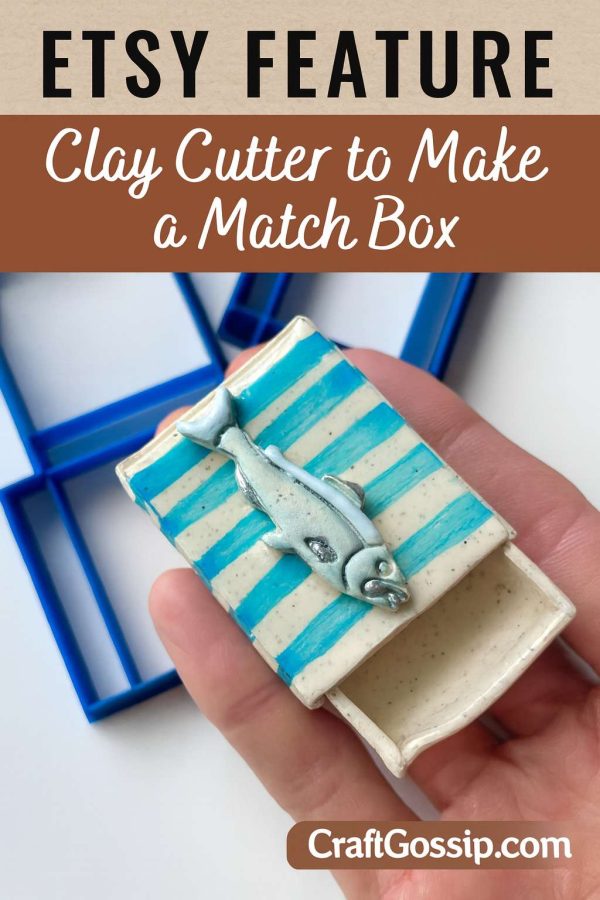
Etsy Feature – Clay Cutter to Make a Match Box

February 22, 2026 by Shellie Wilson

Every so often, I stumble across a tool on Etsy that makes me stop mid-scroll and think—“Oh, that’s clever!” This clay cutter set is one of those finds. Instead of the usual earring shapes or floral cutters we’re all used to, this one is designed to help you build an actual match box out of clay. How fun is that?

At first glance, you might think it’s just for polymer clay, but honestly, it really shines for ceramics and pottery clay too. You can use it to create functional little sliding boxes that actually work. They bake or fire into tiny treasures you can decorate, glaze, and turn into one-of-a-kind keepsakes.

Why I Love This Cutter

  • It’s precise. No more eyeballing and trimming pieces by hand. The cutter takes care of all the measuring so your box slides together neatly.

  • It’s versatile. Sure, you can use it with polymer clay for quick projects, but with ceramic clay it opens up a whole new world—think mini jewelry boxes, incense match safes, or even a quirky way to gift small items.

  • It sparks ideas. Tools like this aren’t about following a strict formula; they’re about giving you a solid base to let your creativity run wild.

Inspiration for Makers

Here’s what I immediately imagine when I see this cutter:

  • Rustic ceramic gift boxes with earthy glazes, maybe filled with dried herbs or tiny charms.

  • Playful polymer clay boxes decorated with cane slices, patterned transfers, or even a splash of metallic mica powder.

  • Functional keepsakes—a little box to keep rings safe at the sink, or a sliding drawer to tuck in a love note.

If you’re a pottery lover, you could even press textures into the clay before cutting—lace, leaves, or handmade stamps—so your finished box carries a personal touch. After firing, glaze just the inside for a glossy surprise when it opens.

Why It’s Worth Adding to Your Toolbox

I’m all for cutters that go beyond the basics. This isn’t just a shape—it’s a concept. It nudges you out of the “flat slab and earrings” mindset and into making something 3D, functional, and unexpected. And let’s face it, sometimes we need that gentle nudge to shake things up in the studio.

You can grab the cutter set for yourself right here: Clay Cutter Match Box on Etsy.
 

«
»

Have you read?

How to Make Beautiful Stamped Clay Pots with Air Dry Clay

If you’ve ever wanted to dip your toes into clay crafts without the fuss of a kiln, air dry clay is your new best friend. It’s affordable, easy to work with, and dries beautifully into something that looks much fancier than it really is. These DIY stamped clay pots are the perfect weekend project. They’re practical, pretty, and make wonderful handmade gifts. Think pen holders, plant pots, or even a little bathroom organizer for makeup brushes.

Why You’ll Love This Project

  • No kiln or oven required – just let the clay dry naturally.

  • Endless design possibilities with stamps, lace, or texture mats.

  • A chic way to organize your desk, vanity, or craft room.

  • Great gift idea (fill with treats, pens, or a little succulent).

Supplies You’ll Need

  • Air-dry clay (white or terracotta works best)

  • Rolling pin (or a smooth glass bottle)

  • Stamps, lace, or textured rolling pins for designs

  • Craft knife or clay cutter

  • Water and a small paintbrush (for smoothing seams)

  • Cylinder form (a glass, tin can, or jar to shape the pot)

  • Sandpaper (fine grit, for finishing)

  • Optional: acrylic paints or clear sealant

Step-by-Step Tutorial

Step 1: Roll Out the Clay

Sprinkle a little cornstarch on your surface so the clay doesn’t stick. Roll your clay into a flat slab about ¼ inch thick. Keep it even so your pot doesn’t dry lopsided.

Step 2: Add the Texture

Now for the fun part! Press your stamp, lace, or textured roller firmly into the clay. Don’t worry about perfection—slight variations give it that handmade charm.

Step 3: Cut Your Rectangle

Measure your cylinder (jar, can, or glass) and cut a rectangle of clay that will wrap all the way around it. Cut out a circle of clay for the base.

Step 4: Build the Pot

Wrap the clay rectangle around your form and gently press the seam together. Use a little water and a paintbrush to smooth it out. Attach the circular base with the same water “glue” method, blending the edges for strength.

Step 5: Smooth & Shape

Run damp fingers along the rim and seams to soften rough edges. This is where your pot starts looking polished.

Step 6: Drying Time

Let your pot air dry for 24–48 hours (depending on the clay brand and thickness). Don’t rush this step—if the clay dries too quickly, it can crack.

Step 7: Sand & Finish

Once dry, lightly sand any rough spots. You can leave it raw white for a chic, minimal look, or paint/seal it with acrylic paints and clear varnish for extra durability.

Creative Ideas for Stamped Clay Pots

  • Boho Vibes: Use lace doilies for a soft, romantic texture.

  • Rustic Look: Try a wooden stamp or burlap fabric pressed into the clay.

  • Modern Minimalist: Leave the pot smooth and paint it matte black or terracotta.

  • Giftable Touch: Wrap with twine and tuck in a small succulent.

Tips

  • Keep unused clay wrapped tightly in plastic so it doesn’t dry out.

  • If cracks appear, fill with a little clay slip (clay mixed with water).

  • Don’t make your pots too tall or thin—the clay is stronger in compact shapes.

These DIY air dry clay pots prove that you don’t need a pottery wheel to create beautiful handmade pieces. Whether you use them for storage, décor, or gifting, each one turns out unique—just like handmade should be.


Categories

air dry clay animals Artist Spotlight Christmas Clay Canes Clay Charms Craft Inspirations DIY Clay Tutorials and Patterns earrings Freebies halloween Inspiration necklace Plates, Bowls & Platters Polymer Clay Polymer Clay - Techniques Polymer Clay - Tutorials Polymer Clay Community Tips/Tools valentine's day

RSS More Articles

  • Backpack Cross Stitch Patterns
  • Pencil Knitting Patterns
  • 15 Cardboard Crafts For Adults: Clever Ways To Use Boxes, Tubes And Packaging
  • Red Melt The Ice Slouch Beanie Crochet Pattern Review
  • These Bakery-Style Biscoff Cupcakes Disappear in Minutes
  • 15 Lush Dupe Recipes You Can Make At Home
  • Sewing for Seniors: A Roundup of Practical Patterns for Aged Care and Dementia
  • Honey Baby Bear Applique Machine Embroidery Design – Etsy Review
  • 80’s Inspired Boombox Shaped Mini Album
  • Free Baby Star Crochet Pattern: A Cosy Hooded Cocoon for Newborns

Pick Your Blog

  • Sewing
  • Knitting
  • Quilting
  • Crochet
  • Home & Garden
  • Recycled Crafts
  • Scrapbooking
  • Card Making
  • Polymer Clay
  • Cross-Stitch
  • Edible Crafts
  • Felting
  • Glass Art
  • Indie Crafts
  • Kids Crafts
  • Jewelry Making
  • Lesson Plans
  • Needlework
  • Bath & Body
  • Party Ideas
  • Candle Making
  • DIY Weddings
  • Not Craft
  • Free Craft Projects

Copyright © 2026 · CraftGossip | Start Here | Contact Us | Link to Us | Your Editors | Privacy and affiliate policy