• Home
  • Suggest A DIY
  • DIY Newsletter

Polymer Clay

Fimo and clay tips and tutorials

  • About CraftGossip
  • Our Network
    • Bath & Body Crafts
    • Candle Making Ideas
    • Crochet Ideas
    • Cross Stitch
    • Edible Crafts
    • Felting Patterns
    • Glass Art
    • Home & Garden Ideas
    • Indie Crafts
    • Jewelry Making
    • Kids Crafts
    • Knitting Patterns
    • Lesson Plans
    • Needlework
    • Party Ideas
    • Polymer Clay
    • Quilting Ideas
    • Recycled Crafts
    • Scrapbooking
    • Sewing Patterns
    • Card Making
    • DIY Weddings
    • Not Craft Ideas
  • Giveaways
  • Roundups
  • Store
  • Search

Etsy Feature – Christmas Tree Bead Roller for Polymer Clay

December 7, 2025 by Shellie Wilson

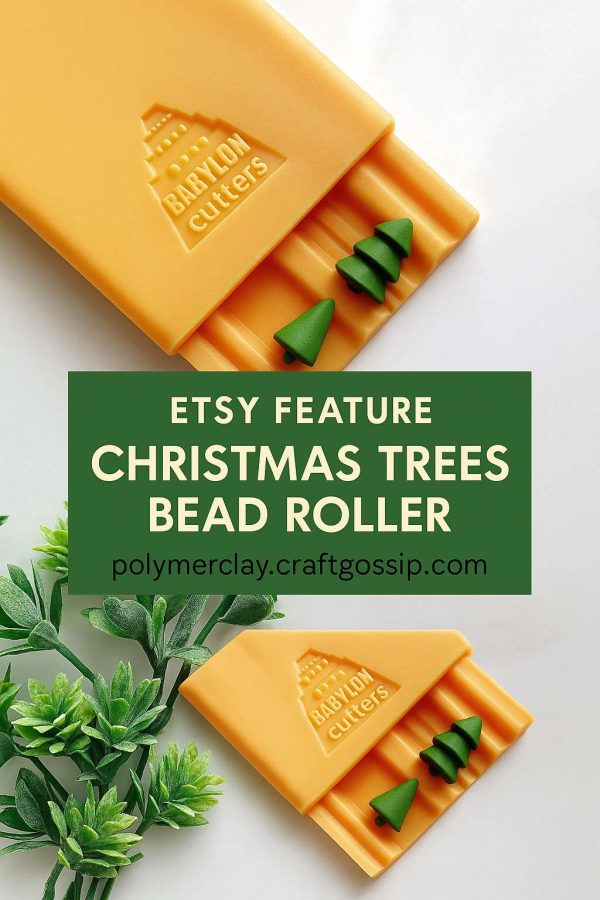
Every Christmas, I find myself reaching for projects that are equal parts fun and festive but still quick enough to fit into the chaos of the season. That’s why this Christmas tree bead roller is such a genius little tool. Instead of spending hours shaping each tree by hand, this roller helps you create perfect, uniform mini Christmas trees in minutes.

What It Is

This bead roller is a specialized tool designed for polymer clay (though it could work with other clays too). You roll a small piece of clay inside the mold and—voilà!—out comes a neat little Christmas tree bead. Think of it like a festive shortcut that still leaves plenty of room for creativity.

The finished trees can be used as:

  • Beads for holiday jewelry (bracelets, earrings, or necklaces).

  • Decorations for Christmas ornaments.

  • Cute mini toppers for handmade gifts or clay keepsakes.

  • Embellishments for larger ceramic or polymer projects.

Why It’s Brilliant for Holiday Making

  • Consistency: No more fiddling with uneven shapes—every bead comes out looking like it belongs in the same forest.

  • Time Saver: Perfect if you’re batch-making for Christmas markets or teacher gifts.

  • Kid-Friendly Crafting: Older kids will love rolling out little trees to paint and decorate.

  • Versatile: Paint, glaze, add mica powder, or even dust with glitter for a sparkly holiday finish.

Inspiration Ideas

  • Create a set of tree earrings using different greens, golds, and reds for a playful mix-and-match.

  • String multiple tree beads together for a Christmas garland necklace.

  • Add a single tree bead as a charm on a handmade clay ornament.

  • Make tiny tree favors to tie onto wrapped Christmas presents—guaranteed to make your gifts stand out.

Why Makers Will Love It

The holiday season can feel like a race against the clock, and tools like this bead roller make it easier to keep up without losing that handmade touch. It’s efficient, yes, but it also unlocks new ways to play with clay. Imagine a whole bowl of tiny Christmas trees ready to be turned into jewelry, ornaments, or market-ready stocking stuffers—it’s festive magic at your fingertips.

You can find it here: Christmas Tree Bead Roller for Polymer Clay on Etsy.

This post is part of my Etsy Feature series, where I showcase clever tools and handmade finds that make crafting easier, faster, and more inspiring. And honestly? This bead roller might just be the shortcut you need to deck your craft table (and Christmas tree) in style this year.
«
»

Have you read?

Air-Dry Clay Sunflower Trinket Dish Tutorial

There’s something about sunflowers that just makes a house feel happier. Maybe it’s the colour, maybe it’s the fact they’re never trying to be perfect, or maybe it’s just that they remind me of slower afternoons when the kids were little and craft projects actually stayed on the table instead of migrating all over the house. Either way, this air-dry clay sunflower trinket dish has become one of my favourite “gentle crafts” – the kind you make with a cup of tea nearby and no pressure to rush.

This is not a precision project. In fact, the slightly uneven petals and hand-shaped edges are what make it lovely. If you’ve ever avoided clay because you thought it had to look professional or kiln-fired to be worth making, this project might just change your mind. It’s simple, forgiving, and genuinely useful once it’s finished.

Air-Dry Clay Sunflower Trinket Dish Tutorial

This sunflower bowl works beautifully as a ring dish, bedside catch-all, or even a small decorative bowl on a hall table. It also makes a gorgeous handmade gift – especially for someone who appreciates things that look handmade rather than factory-perfect.

What You’ll Need

  • White air-dry clay

  • Rolling pin or glass jar

  • Craft knife or butter knife

  • Simple sunflower petal template (paper)

  • Small bowl (for shaping)

  • Toothpick or skewer

  • Acrylic paints (yellow, brown, a little white)

  • Small paintbrush

  • Clear matte or satin sealer (optional)

Step 1: Prepare the Clay

Start by kneading your air-dry clay until it’s soft and pliable. Roll it out on a smooth surface to around 5–6 mm thick. You want it thick enough to hold its shape, but not chunky.

Cut a rough circle for the base of your bowl. Don’t worry about perfect edges – you won’t see them once the petals are added.

Step 2: Cut the Sunflower Petals

Using your simple sunflower petal template, cut out enough petals to go around the edge of your base circle. Slight variations actually help the finished bowl look more natural, so don’t stress if they’re not identical.

Lightly smooth the edges with your fingers and gently pinch the tip of each petal to give it that sunflower shape.

Step 3: Attach the Petals

Lightly score the edge of your clay base and the bottom of each petal with a toothpick. Press the petals around the edge, overlapping them slightly. Use your fingers to blend the joins so everything feels connected.

This part is quite therapeutic – I usually lose track of time here.

Step 4: Add Texture

Using a toothpick or skewer, gently press fine lines into each petal to create natural-looking veins. Keep the pressure light and irregular.

For the centre of the sunflower, press small dots all over the middle area to mimic sunflower seeds. This texture really comes to life once painted.

Step 5: Shape the Bowl

Place the entire sunflower over an upside-down bowl to give it a gentle curve. Adjust the petals so they sit naturally and don’t fold in awkwardly.

Leave it to air-dry completely. This usually takes 24–48 hours depending on humidity. Turn it carefully halfway through drying so the base dries evenly.

Step 6: Paint the Sunflower

Once fully dry, paint the petals with yellow acrylic paint. I like to add a touch of white to the edges for highlights and a slightly darker yellow near the base of each petal.

Paint the centre brown, then dry-brush a little lighter brown or white over the top to bring out the texture.

Let the paint dry thoroughly.

Step 7: Seal (Optional)

If you want a bit of extra durability, seal your trinket dish with a matte or satin sealer. This is especially useful if it’s going to live near a sink or get daily use.

How to Use Your Sunflower Trinket Dish

  • Ring or jewellery dish by the sink

  • Bedside bowl for earrings and hairpins

  • Entryway catch-all for keys

  • Decorative piece on a shelf or coffee table

Air-dry clay isn’t food-safe, so keep it for trinkets rather than snacks.

This is one of those crafts that looks impressive but doesn’t require special tools, expensive materials, or artistic confidence. It’s approachable, calming, and genuinely satisfying to finish in an afternoon. The end result feels personal and warm – exactly the kind of craft I keep coming back to.

If you’re looking for an easy air-dry clay project that feels cheerful and handmade in the best way, this sunflower trinket dish is a lovely place to start.

Categories

air dry clay animals Artist Spotlight Christmas Clay Canes Clay Charms Craft Inspirations DIY Clay Tutorials and Patterns earrings Freebies halloween Inspiration necklace Plates, Bowls & Platters Polymer Clay Polymer Clay - Techniques Polymer Clay - Tutorials Polymer Clay Community Tips/Tools valentine's day

RSS More Articles

  • Cute Little Backpack Knitting Patterns
  • Easy Pen and Paper Games for Road Trips and Beyond
  • Handmade Pretend Play Food Ideas For Kids’ Kitchens, Classrooms And Crafty Grandparents
  • Air-Dry Clay Sunflower Trinket Dish Tutorial
  • Beginner-Friendly Crochet Scarves and Cowls
  • Satisfying Adult Snacks That Crush Cravings and Boost Energy
  • 30 Jumpsuits You Can Sew Yourself – From Effortless Weekend Wear to Showstopping Styles
  • You Won’t Believe These 20 Upcycled Bar Tables and Carts – From Trash to Tipsy
  • Young Lady in a Hammock Hand Embroidery Pattern – Etsy Review
  • Crafty Themed Mini Scrapbook Album

Pick Your Blog

  • Sewing
  • Knitting
  • Quilting
  • Crochet
  • Home & Garden
  • Recycled Crafts
  • Scrapbooking
  • Card Making
  • Polymer Clay
  • Cross-Stitch
  • Edible Crafts
  • Felting
  • Glass Art
  • Indie Crafts
  • Kids Crafts
  • Jewelry Making
  • Lesson Plans
  • Needlework
  • Bath & Body
  • Party Ideas
  • Candle Making
  • DIY Weddings
  • Not Craft
  • Free Craft Projects

Copyright © 2026 · CraftGossip | Start Here | Contact Us | Link to Us | Your Editors | Privacy and affiliate policy