• Home
  • Suggest A DIY
  • DIY Newsletter

Polymer Clay

Fimo and clay tips and tutorials

  • About CraftGossip
  • Our Network
    • Bath & Body Crafts
    • Candle Making Ideas
    • Crochet Ideas
    • Cross Stitch
    • Edible Crafts
    • Felting Patterns
    • Glass Art
    • Home & Garden Ideas
    • Indie Crafts
    • Jewelry Making
    • Kids Crafts
    • Knitting Patterns
    • Lesson Plans
    • Needlework
    • Party Ideas
    • Polymer Clay
    • Quilting Ideas
    • Recycled Crafts
    • Scrapbooking
    • Sewing Patterns
    • Card Making
    • DIY Weddings
    • Not Craft Ideas
  • Giveaways
  • Roundups
  • Store
  • Search

DIY Miniature Clay Strawberries

May 13, 2015 by Elaine Robitaille

DIYstrawberryhandful

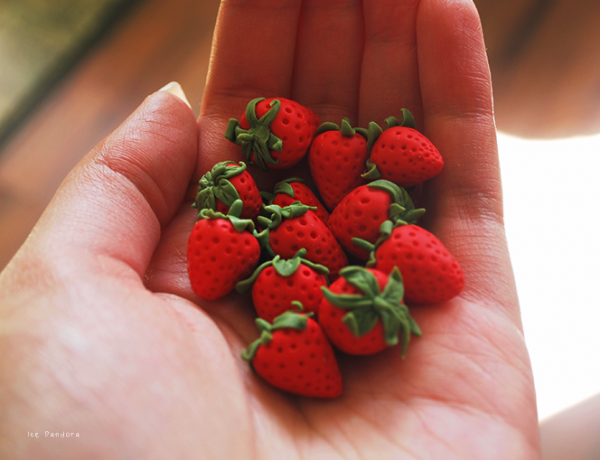
And hop, skip, and jump we go toward more summer-inspired polymer clay treats—this time with strawberries. Miniature strawberries, to be exact. The Ice Panda blog shows two styles: glossy glazed berries that look like they’ve just been dipped in sugar, and unglazed versions with a soft, matte finish. There’s even a sweet little example of them turned into post earrings, which might be one of the cutest wearable crafts I’ve seen in a while.

Now, I usually make my strawberries as part of a cane—it’s my comfort zone as a caner, because you get that lovely cross-section of seeds and flesh when you slice it. But I have to admit, there’s something utterly charming about these individually sculpted berries. With a bit of red clay, some tiny indents for seeds, and a pinch of green for the leafy tops, you’ve got yourself a whole punnet of mini strawberries. Honestly, even with my somewhat questionable sculpting skills, I’m betting I could crank out a handful of these cuties in no time.

The best part? They’re versatile. Turn them into earrings, charms for a bracelet, dangle them from a bookmark, or scatter them on a miniature cake scene. Add a coat of gloss for that freshly picked shine, or leave them matte for a more rustic, just-out-of-the-garden look. And if you’re feeling ambitious, you can even play with colors to mimic different strawberry varieties—deep burgundy for wild strawberries, or paler tones for those just-ripening ones.

It’s one of those projects that doesn’t take itself too seriously, but still gives you that satisfying “oh my gosh, that looks real” moment when you’re done.Miniature strawberries made from polymer clay.
«
»

Have you read?

How to Add Glow-in-the-Dark Pigment to Polymer Clay (Tips, Tricks and Project Ideas)

If you’ve ever wanted your polymer clay earrings or charms to literally light up the night, glow-in-the-dark pigments are the secret ingredient. Adding them to clay isn’t difficult, but there are some tricks to getting the best glow, the brightest finish, and a professional look that actually lasts.

I’ve worked with glow powders and glow clays on plenty of projects—from kids’ Halloween crafts to statement jewelry pieces—and let me tell you: not all glow pigments are created equal. Some glow for hours, others fade after a minute, and how you mix them into your clay makes a huge difference.

Let’s dive into how to use glow pigment with polymer clay, plus a few creative project ideas you’ll want to try.

Choosing the Right Glow Pigment

Not all glow powders are the same. The brightness, glow time, and even color vary depending on the pigment type.

  • Phosphorescent powders: These are the most common. They absorb UV or natural light and release it slowly, creating that glowing effect. Look for strontium aluminate–based powders (they glow longer and brighter than zinc sulfide powders).

  • Color options: Green and aqua are the brightest and longest-lasting. Pinks, purples, and oranges are fun but fade faster.

  • Particle size: Fine powders blend smoothly into clay, while larger particle pigments give a speckled, starry look.

How to Mix Glow Pigment into Polymer Clay

There are two main methods for adding glow pigment to your clay:

1. Mixing Powder into Clay

  • Condition your polymer clay until it’s soft and pliable.

  • Sprinkle a small amount of glow powder into the clay (start with about 1 part pigment to 4 parts clay).

  • Knead and fold until fully blended.

  • For extra brightness, add more pigment—but too much can make your clay crumbly.

2. Dusting or Painting Pigment on the Surface

  • Roll out your clay sheet or shape your earrings.

  • Brush pigment powder onto the surface using a dry brush.

  • For a stronger effect, mix the powder with a clear liquid clay and paint it on.

  • This creates a glowing finish rather than an all-over glow.

Baking Glow-in-the-Dark Polymer Clay

  • Bake according to your clay brand’s instructions (usually 260°F–275°F / 125°C–135°C).

  • The pigment won’t burn out—it’s heat stable.

  • For surface applications, add a thin layer of liquid clay or a sealer before baking to keep powder from rubbing off.

Sealing and Finishing

Once baked and cooled:

  • Sand and buff as usual if the glow pigment is fully mixed in.

  • If the glow pigment is brushed on the surface, apply a thin coat of clear varnish, resin, or UV resin to lock it in.

  • A glossy finish makes the glow appear brighter, while a matte finish gives a softer effect.

Project Ideas for Glow-in-the-Dark Polymer Clay

  1. Glow-in-the-Dark Earrings – Simple studs or hoop charms that charge under sunlight and glow during evening dinners.

  2. Spooky Halloween Jewelry – Bats, pumpkins, and ghosts that shine when the lights go out.

  3. Kids’ Room Stars – Cut star shapes, bake, and glue onto walls or mobiles.

  4. Garden Markers – Clay tags with glow pigment to find your plants after dark.

  5. Nighttime Keychains – Never lose your keys again with a glowing charm.

Tips for the Best Glow

  • Charge your finished pieces under bright sunlight or a UV lamp for the longest glow.

  • Store pigment powders in airtight containers; moisture can ruin them.

  • If you want a subtle effect, mix pigment with translucent clay. For bold neon-like glow, pack in more pigment.

Adding glow pigment to polymer clay is one of those small tricks that turns ordinary jewelry or crafts into conversation starters. Whether you want a subtle shimmer or a full-on “where’s the flashlight?” glow, it’s all about the right pigment, mixing method, and finish.

So go ahead—make your earrings, pendants, or charms shine, literally!


Categories

air dry clay animals Artist Spotlight Christmas Clay Canes Clay Charms Craft Inspirations DIY Clay Tutorials and Patterns earrings Freebies halloween Inspiration necklace Plates, Bowls & Platters Polymer Clay Polymer Clay - Techniques Polymer Clay - Tutorials Polymer Clay Community Tips/Tools valentine's day

RSS More Articles

  • 10 DIY Halloween Jewellery Ideas That Are Cute, Not Creepy
  • Ghost Craft Ideas for Kids
  • How to Add Glow-in-the-Dark Pigment to Polymer Clay (Tips, Tricks and Project Ideas)
  • Dollar Tree Halloween Tiered Stand
  • DIY Sea Glass Planter: A Coastal Terracotta Pot Makeover
  • 15 Spider Web Crochet Patterns for Halloween – Free & Paid Patterns
  • Cross Stitch Forum Asks for Proof Stitches Aren’t AI
  • Embroidery Keychain Laser Cut Pattern
  • 6 FREE Pumpkin and Sunflower Fall Printables
  • Book Review: Best Dressed Crab and Friends – Knitted Sea Creatures With an Ocean of Outfits

Pick Your Blog

  • Sewing
  • Knitting
  • Quilting
  • Crochet
  • Home & Garden
  • Recycled Crafts
  • Scrapbooking
  • Card Making
  • Polymer Clay
  • Cross-Stitch
  • Edible Crafts
  • Felting
  • Glass Art
  • Indie Crafts
  • Kids Crafts
  • Jewelry Making
  • Lesson Plans
  • Needlework
  • Bath & Body
  • Party Ideas
  • Candle Making
  • DIY Weddings
  • Not Craft
  • Free Craft Projects

Copyright © 2026 · CraftGossip | Start Here | Contact Us | Link to Us | Your Editors | Privacy and affiliate policy