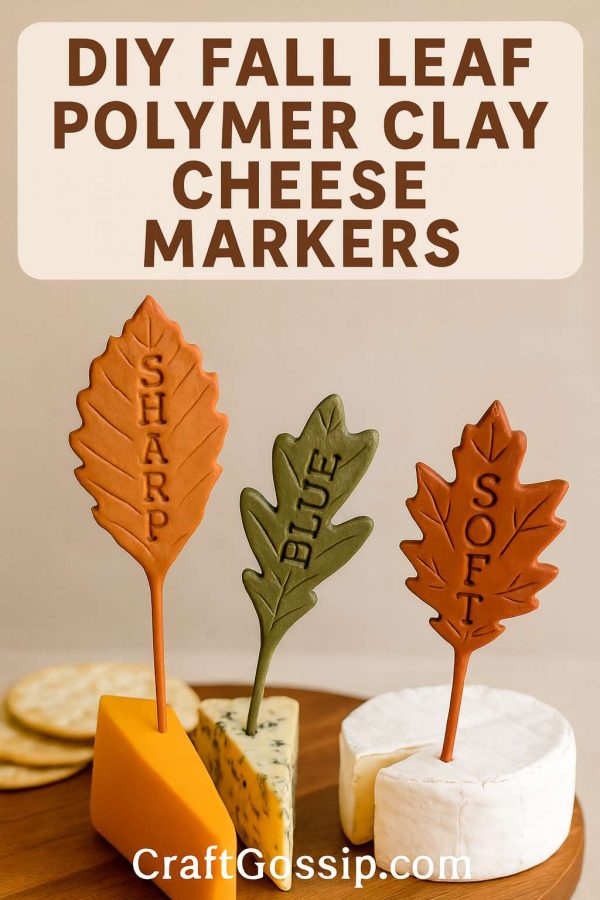
If you’re setting out a fall charcuterie board, nothing says cozy and stylish like handmade polymer clay cheese markers shaped like autumn leaves. These little beauties are not just practical — they’re also the kind of detail that gets your guests saying, “Oh my gosh, where did you get those?”
Unlike air-dry clay, polymer clay is oven-baked, which means your cheese markers will be sturdier, water-resistant, and ready to last for many fall gatherings to come. You can customize them with names of cheeses, fun sayings, or even guests’ names for a dual-purpose place card.
Supplies You’ll Need
- Polymer clay in fall colors (burnt orange, mustard, olive green, terracotta, ivory)
- Clay roller or acrylic rolling pin
- Leaf-shaped cookie cutters (or real leaves as templates)
- Clay knife or craft blade
- Alphabet stamp set (for pressing words like “Sharp,” “Gouda,” or “Brie”)
- Skewer sticks, toothpicks, or thin metal cheese picks
- Non-stick work surface (tile, glass, or parchment paper)
- Oven (follow polymer clay package instructions)
- Metallic acrylic paint or mica powders (optional for accents)
- Clear gloss sealer (optional, for shine and extra protection)
Step-by-Step Instructions
1. Condition Your Clay
Polymer clay needs to be softened before use. Knead it until pliable and roll into a ball. If you’re blending colors for marbling, twist and fold different shades together.
2. Roll Out the Clay
Use your rolling pin to flatten the clay to about 1/8” thick. For a more organic look, don’t stress about perfectly even thickness — slight variations give them a handmade, rustic vibe.
3. Cut Out the Leaves
Press your leaf cookie cutters into the clay, or trace around real leaves with a craft knife for a more natural effect.
4. Add Veins & Texture
Use a toothpick, clay tool, or even press a real leaf gently into the clay to imprint the veins. This step gives depth and makes the colors pop once painted.
5. Stamp the Words
Take your alphabet stamps and press the names of cheeses (like “Cheddar,” “Brie,” “Sharp,” or “Gouda”) into the clay leaves. Press firmly but not too deeply.
6. Insert the Picks
Before baking, press the end of a skewer stick or metal pick into the bottom of the leaf. Gently smooth clay around it so it’s secure.
7. Bake Your Creations
Place your clay leaves on a parchment-lined baking sheet. Bake according to the polymer clay package (usually 265°F–275°F for 15–30 minutes, depending on thickness). Let cool completely before handling.
8. Paint & Finish (Optional)
For a realistic fall finish, dry-brush metallic gold or bronze onto the raised veins. You can also rub mica powder into the clay before baking for a subtle shimmer. If desired, seal with a gloss varnish to give them a polished, Anthropologie-style shine.
Tips & Variations
- Personalized Place Cards: Instead of cheese names, stamp your guests’ names — the markers double as seating assignments.
- Rustic Look: Mix white clay with a bit of brown or terracotta for a marbled stone-like texture.
- Year-Round Use: Swap leaf cutters for stars (Christmas), hearts (Valentine’s Day), or flowers (spring brunch).
Why Polymer Clay Beats Air-Dry Clay for Cheese Markers
- Durability: Polymer clay is less fragile and won’t crumble when damp.
- Reusable: Simply wipe clean after use.
- Custom Colors: Blend clay shades for that perfect fall palette.
- Professional Finish: You’ll get a sleeker, more Anthropologie-inspired look.
These DIY fall leaf polymer clay cheese markers are the perfect finishing touch for your Thanksgiving table, fall wine night, or harvest party. They’re sturdy, reusable, and just the right mix of rustic and elegant. Best of all, they cost only a few dollars to make compared to pricey Anthropologie sets.
Trust me — your cheese board will never be the same again.


