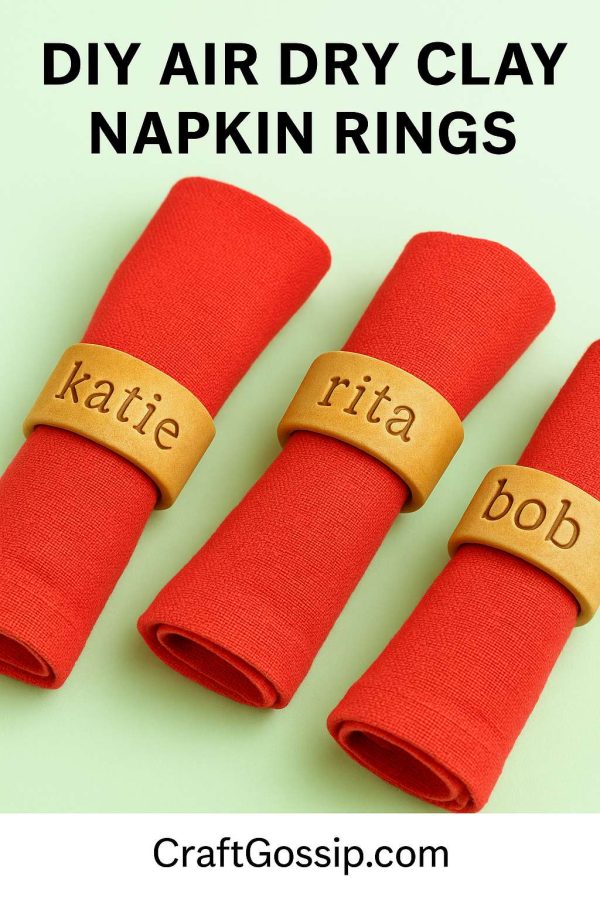
There’s something so special about setting a table with handmade touches. These DIY air dry clay napkin rings are the perfect mix of rustic charm and modern minimalism. Whether you’re hosting a cozy family dinner, setting the table for a holiday gathering, or looking for an easy handmade gift idea, these napkin rings tick all the boxes. Plus, they’re surprisingly simple to make, even if you’ve never worked with clay before.
The best part? You can personalize each one with names, initials, or even seasonal motifs. Imagine a Thanksgiving table where every guest has their own custom napkin ring—or wedding favors that double as keepsakes.
Supplies You’ll Need
- Air dry clay (white or natural works best)
- Rolling pin
- Craft knife or sharp blade
- Round cutter (or a glass/jar)
- Small alphabet stamps or textured stamps (optional for personalization)
- Sandpaper (fine grit)
- Water and small brush
- Napkins for sizing
Step-by-Step Tutorial
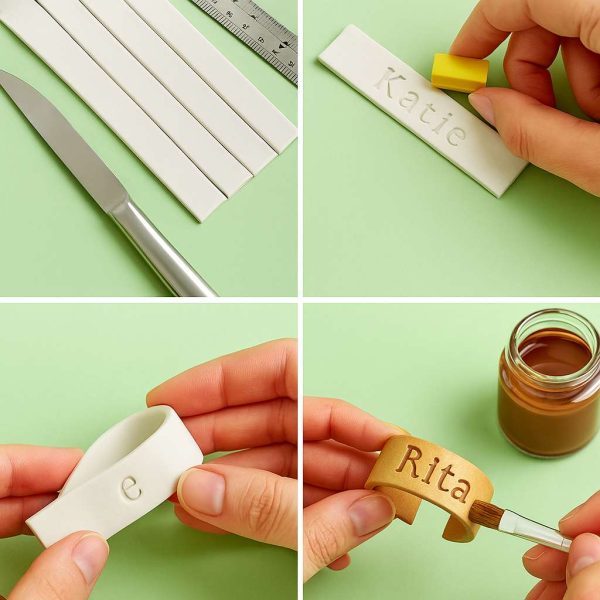
Step 1 – Roll Out the Clay
Take a chunk of air dry clay and roll it out on a flat surface to about ¼-inch thickness. You don’t want it too thin or it might crack, but too thick will look bulky. A rolling pin works best, but you can improvise with a glass bottle.
Step 2 – Cut Your Strips
Use a craft knife to cut long strips about 1 to 1.5 inches wide. These will form the band of your napkin rings.
Step 3 – Shape Into Rings
Gently bend the strip into a circle, overlapping the ends slightly. Smooth the seam with a wet finger or small brush dipped in water until it blends. This will keep the napkin ring sturdy once it dries.
Step 4 – Personalize (Optional but Fun!)
Press alphabet stamps into the clay to spell out names or words like joy, love, or thankful. You could also press in small leaves, lace, or fabric textures for a more rustic look.
Step 5 – Let Them Dry
Set your rings aside to air dry completely—usually 24–48 hours depending on your clay brand and humidity. Make sure they’re on a flat surface so they don’t warp.
Step 6 – Smooth the Edges
Once dry, lightly sand the edges and seams with fine-grit sandpaper. This gives them a polished, professional finish.
Step 7 – Style Your Table
Slip your napkins through the rings and admire your handmade table decor. These look gorgeous on linen napkins, but they’ll elevate even the simplest paper napkins.
Creative Variations
- Painted Rings: After drying, paint with metallic acrylics or chalk paint for a pop of color.
- Rustic Wash: Water down brown or gray paint and brush lightly for a weathered farmhouse look.
- Holiday Twist: Stamp snowflakes, stars, or holly leaves for seasonal decor.
- Gift Idea: Wrap a set of 4 in twine and give them as a hostess gift.
Why You’ll Love This Project
- Budget-friendly (a block of clay goes a long way!)
- Perfect for beginners—no kiln or fancy tools needed
- Customizable for any occasion
- Adds a thoughtful, handmade touch to your table
Handmade doesn’t have to be complicated. With a little clay and creativity, you can whip up a set of personalized DIY air dry clay napkin rings in an afternoon. They’re simple, stylish, and full of meaning—just the kind of project I love sharing with you here on CraftGossip.
So, next time you’re hosting dinner, give your table a touch of handmade elegance. Your guests will notice, and you’ll get that warm glow of knowing you made them yourself.


