• Home
  • Suggest A DIY
  • DIY Newsletter

Polymer Clay

Fimo and clay tips and tutorials

  • About CraftGossip
  • Our Network
    • Bath & Body Crafts
    • Candle Making Ideas
    • Crochet Ideas
    • Cross Stitch
    • Edible Crafts
    • Felting Patterns
    • Glass Art
    • Home & Garden Ideas
    • Indie Crafts
    • Jewelry Making
    • Kids Crafts
    • Knitting Patterns
    • Lesson Plans
    • Needlework
    • Party Ideas
    • Polymer Clay
    • Quilting Ideas
    • Recycled Crafts
    • Scrapbooking
    • Sewing Patterns
    • Card Making
    • DIY Weddings
    • Not Craft Ideas
  • Giveaways
  • Roundups
  • Store
  • Search

Clay Studio Series – YouTube Video Review: Making a Large Textured Platter

April 30, 2026 by Shellie Wilson

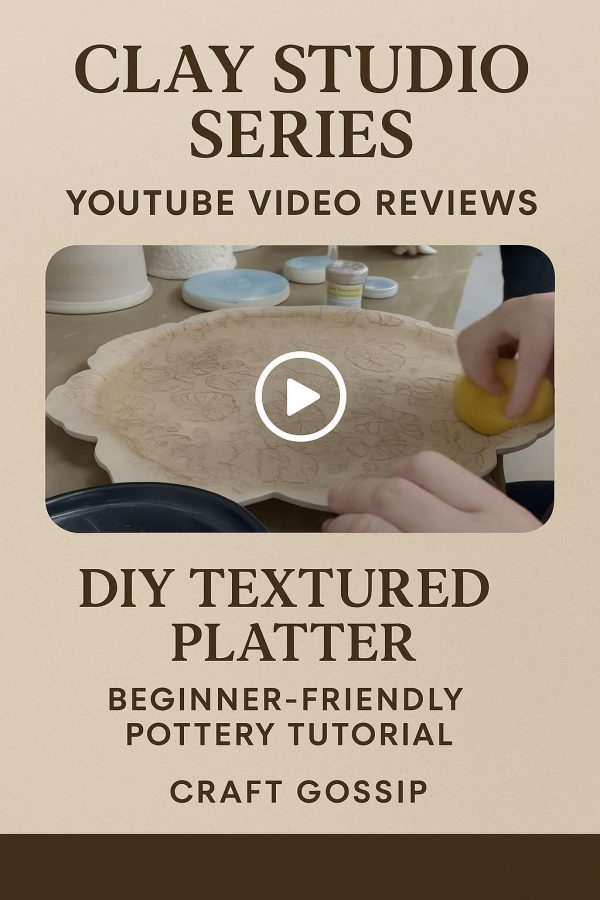
In this inspiring video, the maker shares how they created a large, textured platter for the very first time. Using a dual drape form, a rim template, and an anemone-patterned textured rolling pin from Sharon Hoppe Designs, they demonstrate how to take a simple slab of clay and transform it into a stunning, functional centerpiece.

What the Video Covers

The process walks through rolling and shaping the slab, transferring texture evenly across the surface, and using a rim template for a neat, scalloped edge. The platter is then bisque fired to cone 04 and glaze fired to cone 6 in an electric kiln, resulting in a professional, food-safe finish.

Why We Love It

  • First-Time Friendly: The maker shares their experience as a beginner, making it relatable and encouraging. 
  • Beautiful Texture: The floral anemone design adds elegance without being overly complicated. 
  • Functional & Decorative: The platter is perfect for serving or simply displaying as a statement piece. 
  • Tools Highlighted: Demonstrates how forms, templates, and textured rollers can expand creative options. 

Materials Used

  • White stoneware (no grog) 
  • Dual drape form & rim template 
  • textured rolling pin 
  • Electric kiln (bisque to cone 04, glaze to cone 6) 

Craft Gossip’s Take

This is a fantastic watch for potters who want to try their hand at larger slab-built projects. It shows how using simple forms and tools can produce a piece that looks like it came straight out of a gallery. The fact that it’s the maker’s first attempt makes it even more inspiring for beginners who may be nervous to try something big.

If you’ve been looking for a clay project that’s both ambitious and achievable, this platter tutorial is the perfect place to start.

Next Polymer Clay Idea:

  • DIY Clay Sardine Platter
«
»

Have you read?

Clay Too Sticky? Too Crumbly? Try These Fool-Proof Polymer Clay Fixes

If you’ve ever cracked open a fresh block of Fimo or Sculpey, only to have it glue itself to your hands—or worse, crumble apart when you try to roll it—you know how frustrating polymer clay can be. The good news? These problems are normal and super easy to fix once you know the tricks.

I’ve been making polymer clay jewelry and little trinkets for years, and trust me—sticky clay and crumbly clay are just part of the learning curve. Let’s dive into why it happens and how to get your clay back to that perfect, workable consistency.

Why Is My Polymer Clay Too Sticky?

Polymer clay gets sticky when:

  • It’s too warm – Your hands or the room temperature can soften clay fast.

  • It’s over-conditioned – Kneading for too long breaks the clay down.

  • It’s a soft brand or fresh batch – Some formulas, like Fimo Soft or Sculpey III, naturally feel tackier than others.

Fool-Proof Fixes for Sticky Polymer Clay

  1. Chill it: Pop your clay in the fridge for 10–15 minutes. A quick cool-down makes it firmer and easier to handle.

  2. Work on glass, ceramic, or tile: These stay cooler than wood or plastic surfaces, helping clay keep its shape.

  3. Use parchment or wax paper: Sandwich clay between sheets when rolling to prevent sticking.

  4. Powder trick: Dust your hands or tools with a tiny bit of cornstarch. Wipe excess off before baking.

  5. Take breaks: If your hands heat the clay too much, set it aside for a few minutes.

Why Is My Polymer Clay Too Crumbly?

Crumbly clay is usually dried out or under-conditioned. It can happen with older clay, clay that’s been stored badly, or some firmer brands like Fimo Professional.

Fool-Proof Fixes for Crumbly Polymer Clay

  1. Condition properly: Run clay through a pasta machine or roll/knead until it starts to warm and smooth out.

  2. Add softener: Use a drop of clay softener (like Sculpey Clay Softener or Fimo Mix Quick) and knead it in.

  3. Mix with softer clay: Blend a crumbly block with a softer polymer clay to balance the texture.

  4. Warm it up: Place clay in a zip bag and tuck it in your pocket for a few minutes before conditioning.

  5. Avoid water: Unlike air dry clay, polymer clay should never be “rehydrated” with water—it weakens the formula.

Preventing Polymer Clay Problems

Keeping your clay at the right consistency means less fixing and more creating. Here’s how to prevent issues in the first place:

  • Store clay in airtight containers away from direct sunlight and heat.

  • Wrap leftovers tightly in plastic wrap before storing in the original package.

  • Keep a pasta machine handy for quick, even conditioning.

  • Try clay storage by brand – separate Fimo Soft, Premo, and Sculpey to keep textures predictable.

  • Test your clay before a big project so you can soften or chill it as needed.

Polymer clay can be fussy, but it’s never a lost cause. If your clay is sticky, cool it down and keep your work surface non-stick. If it’s crumbly, condition it properly and add a little softener. These fixes take just a few minutes and can save you from tossing out perfectly good clay.

I always keep a little stash of “rescue tools”: cornstarch, clay softener, and some glass tiles to work on. With those on hand, I can take any block of polymer clay—whether it’s Fimo, Premo, or Sculpey—and make it project-ready in no time.

So the next time your polymer clay feels like a disaster, remember: sticky or crumbly, it’s fixable!

Categories

air dry clay animals Artist Spotlight Christmas Clay Canes Clay Charms Craft Inspirations DIY Clay Tutorials and Patterns earrings Freebies halloween Inspiration necklace Plates, Bowls & Platters Polymer Clay Polymer Clay - Techniques Polymer Clay - Tutorials Polymer Clay Community Tips/Tools valentine's day

RSS More Articles

  • Knit a Swirly Square in Any Size You Like
  • Free Crochet Oreo Cookie Blanket Pattern
  • Book Review: Crochet in a Day by Angie Bivins – Quick Crochet Patterns For Gifts, Blankets And Cozy Make
  • How to Travel with Cross Stitch
  • AITA for Copying a Sewing Trend I Saw on Pinterest (But Making It Myself)?
  • 12 Rosé Ninja Slushies That Will Make You Forget Every Other Summer Drink Ever
  • Teach the Teacher Printable Worksheets: A Fun End-of-Year Student Lesson Activity
  • Zero Cost Indoor Garden for Beginners Review: Grow Herbs and Vegetables at Home Without Spending a Fortune
  • Make Your Own Nourishing Stretch Mark Oil
  • FREE Die Cut Hummingbird Shaker Card

Pick Your Blog

  • Sewing
  • Knitting
  • Quilting
  • Crochet
  • Home & Garden
  • Recycled Crafts
  • Scrapbooking
  • Card Making
  • Polymer Clay
  • Cross-Stitch
  • Edible Crafts
  • Felting
  • Glass Art
  • Indie Crafts
  • Kids Crafts
  • Jewelry Making
  • Lesson Plans
  • Needlework
  • Bath & Body
  • Party Ideas
  • Candle Making
  • DIY Weddings
  • Not Craft
  • Free Craft Projects

Copyright © 2026 · CraftGossip | Start Here | Contact Us | Link to Us | Your Editors | Privacy and affiliate policy