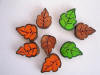
As the weather starts to turn cooler, why not make some fall leaf buttons? Or if leaves are not your thing, make some of the other lovely buttons featured in this how to by syndee holt on the Polyform website.
Click Here to go to the tutorials.

Fimo and clay tips and tutorials
As the weather starts to turn cooler, why not make some fall leaf buttons? Or if leaves are not your thing, make some of the other lovely buttons featured in this how to by syndee holt on the Polyform website.
Click Here to go to the tutorials.

If you’ve ever wanted your polymer clay earrings or charms to literally light up the night, glow-in-the-dark pigments are the secret ingredient. Adding them to clay isn’t difficult, but there are some tricks to getting the best glow, the brightest finish, and a professional look that actually lasts.
I’ve worked with glow powders and glow clays on plenty of projects—from kids’ Halloween crafts to statement jewelry pieces—and let me tell you: not all glow pigments are created equal. Some glow for hours, others fade after a minute, and how you mix them into your clay makes a huge difference.
Let’s dive into how to use glow pigment with polymer clay, plus a few creative project ideas you’ll want to try.
Not all glow powders are the same. The brightness, glow time, and even color vary depending on the pigment type.
There are two main methods for adding glow pigment to your clay:
Once baked and cooled:
Adding glow pigment to polymer clay is one of those small tricks that turns ordinary jewelry or crafts into conversation starters. Whether you want a subtle shimmer or a full-on “where’s the flashlight?” glow, it’s all about the right pigment, mixing method, and finish.
So go ahead—make your earrings, pendants, or charms shine, literally!
Thank you for sharing your button tutorial. They all look fun to make. I will be making some buttons for knitted pieces and these will be perfect.