 Janice Abarbanel’s mosaic beads are making a splash in the world of polymer clay. Her work was recently recognized in the Bead Dreams 2007 competition. Janice was kind enough to answer a few questions about her creative process and journey with polymer clay.
What was your first polymer clay project?
I’ve been asked several times lately, what was the first piece I ever made in polymer clay? I had to really think about that for a while. When I remembered the piece, I had to laugh. I had tried my hand at a number of ways to add color to my metalwork . . . epoxy inlay, stone setting, and enameling, to name a few. One day I thought I would try polymer clay. I purchased a few bars of clay and went to work. I had an idea in my head what the design should look like – a bunch of different colored circles enclosed in black. I wanted to bring metallic pigments into it so I mixed resin with “antique copper” and the background to the circles was born. Oh – did I mention how I accomplished this? I made a “log” of each color I wanted. I then cured the clay. While warm, each circle was cut to the depth of the pendant, glued into place and then set with the colored epoxy. OK. First of all, I later learned these circles were called canes. So – I was new – what did I know? Then I found out how I could have made a sheet of clay canes in a fraction of the time. You can’t imagine the hours involved with my method. I cut and glued every cane into the pendant frame. Then I further set it in place with the colored epoxy. After removing the bubbles, I let the epoxy set. Once it was set, I began to sand the surface down to make it smooth. For those of you that have never had the pleasure of sanding epoxy, I hope you never do. It is grueling! Especially the amount of epoxy I had to take off!
Besides a pasta machine, what polymer clay tool can’t you live without?
Besides my flexible razor, I use a 6″ x 6″ piece of acrylic for my bead making. I had some acrylic sheets in my studio, so I cut this down to size. I use it daily and would be lost without it.  My work surface is a 12″ x 12″ ceramic tile that I had in my basement. The great thing about polymer is, lots of stuff you might have in your home that you can improvise and use for polymer.
What inspires your polymer clay creations?
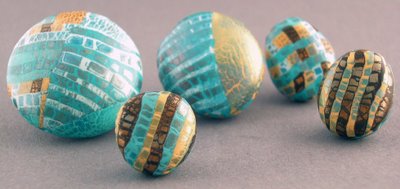
Something happened that I blogged about on 7/11/07. Polymer Clay Notesdid a blog entry regarding 17,500 species of butterflies (6/21/07 post). She linked to a blog on Colourlovers.com (it was their June 1st entry). They took pictures ofbutterflies (17 of them) and showed the color palettes of each. I took the Butterfly Winter Palette, mixed up those colors, made some beads and posted the pictures on my blog. Currently, I’m going through butterfly photos, printing off their colors, and mixing the palettes. I plan on using this as a marketing tool so people can see where that particular inspiration came from. To be honest, everything is right in front of us. All you have to do is notice. And sometimes it’s SO clearly in front of us, (PCN) that all you have to do is go mix the darn colors cause you know the combination already works!
Would you share a color recipe with us?
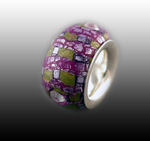
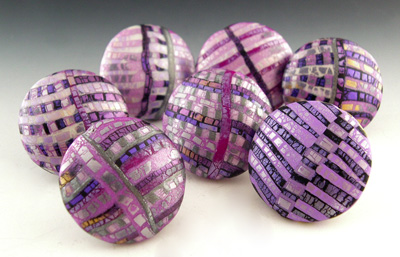
My favorite color combination is purple and green. Any shade of purple will do! But I use this lime recipe from Sculpey.com, very simple. . . 4 parts gold, 1 part green pearl.
To view more of Janice’s work visit her website and blog.
[tags]polymer clay, bead artists, beads, Bead Dreams 2007, Janice Abarbanel, mosaic beads[/tags]


Janice, I just saw your beads in Polymer Cafe and I just love them . Good Work!!!