• Home
  • Suggest A Craft
  • DIY Newsletter

Polymer Clay

Fimo and clay tips and tutorials

  • About CraftGossip
  • Our Network
    • Bath & Body Crafts
    • Candle Making Ideas
    • Crochet Ideas
    • Cross Stitch
    • Edible Crafts
    • Felting Patterns
    • Glass Art
    • Home & Garden Ideas
    • Indie Crafts
    • Jewelry Making
    • Kids Crafts
    • Knitting Patterns
    • Lesson Plans
    • Needlework
    • Party Ideas
    • Polymer Clay
    • Quilting Ideas
    • Recycled Crafts
    • Scrapbooking
    • Sewing Patterns
    • Card Making
    • DIY Weddings
    • Not Craft Ideas
  • Giveaways
  • Roundups
  • Store
  • Search

April Issue of Polymer Cafe!

March 7, 2009 by Julie Leir-VanSickle

What shall I try first?

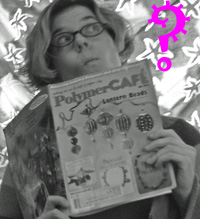
After a hectic week, it was a nice treat to open up my mailbox and see the April issue of “Polymer Cafe.”  My first reaction upon perusing the cover was “cool!”

The Lantern Beads by Sophia Lenz are bold, colorful, and definitely have that  “WOW!” factor.  I read through the instructions, and feel confident that while it may take some practice to make them as sharp and stunning as Sophia’s beads, the article was clear and would lead to a successful project.

Sharon “Harry” Solly shares a painted mica technique originated by her guild mate Mary Lee Forsythe.  This is one of those sweet and simple techniques that can be adjusted for a whole variety of looks.  (And it’s shiny and sparkly, which are two of my favorite adjectives in conjuction with polymer clay!)  I especially enjoyed the examples of this technique from the Blue Ridge Polymer Clay Guild in Asheville, North Carolina shown in the Reader’s Gallery.  (The “home guild” of the author)

This issue also features lots of cool work submitted for the Mixed Media Challenge, a charming story about “nudging” your creativity by Christie Friesen,  profiles about the President and Executive Director of the IPCA (International Polymer Clay Association,)  and a touching and inspiring farewell from the former editor of “Polymer Cafe,” Connie Donaldson.

This issue seemed to be a bit heavy on jewelry projects, although techniques can always be used in other ways.  With jewelry remaining a very popular item to make with polymer clay, there may be a lack of non-jewelry project submissions.

[tags]polymer cafe review, polymer clay magazine, april issue[/tags]

Next Polymer Clay Idea:

  • DIY Metal Clay: How to Make Your Own Silver and…
«
»

Comments

  1. Jean says

    March 8, 2009 at 5:21 am

    I’m one of those proud people who did Christi’s Nudge Story critters. I’m thrilled to be in PC Cafe! Thanks for the mention in Craft Gossip. I feel all glowy. luvjean from holland

Have you read?

What is Silver Art Clay or Precious Metal Clay (PMC) and How Do You Work With It (and Fire It!)

If you’ve ever dreamed of making real silver jewelry at home—without the need for a silversmith’s workshop—silver art clay or precious metal clay (PMC)  might just be your new best friend. It looks like clay, feels like clay, and shapes like clay, but when you fire it, the binder burns away and what’s left is pure, solid silver. Magical, right?

This material has completely changed the way hobby jewelers and crafters approach metalwork. Instead of melting silver with a torch and hammering it into submission, you can roll, stamp, carve, and mold it just like pottery clay. Let’s walk through exactly what it is, how to use it, and the different ways you can fire it.

What is Silver Art Clay?

Silver art clay (also called precious metal clay or PMC) is a soft, moldable clay made of three parts:

  • Fine particles of pure silver 
  • A non-toxic organic binder 
  • A bit of water 

That mix gives you a squishy clay you can roll, cut, and sculpt into jewelry pieces, charms, pendants, or even small keepsakes. Once it’s dried and fired, you’re left with a piece that’s typically 99.9% pure fine silver—sometimes called “fine silver” or .999 silver.

Tools and Materials You’ll Need

Working with silver clay is much simpler than traditional silversmithing, but a few basic tools make it easier:

  • Clay roller (or a simple acrylic rolling pin) 
  • Textured stamps or mats for impressions 
  • Craft knife or clay cutters 
  • Sandpaper or files (for cleaning up edges) 
  • Water and small brush (to smooth cracks) 
  • Work surface like a Teflon or silicone mat 
  • Firing method (kiln, torch, or stovetop burner depending on the clay brand) 

How to Work with Silver Art Clay

  1. Condition the clay – Silver clay dries out fast, so keep it wrapped or sealed until you’re ready. If it feels stiff, a touch of water and kneading will soften it. 
  2. Shape and design – Roll it flat for pendants, cut out shapes with cutters, or press stamps into it for texture. You can even sculpt tiny figures or mold it around objects. 
  3. Dry it thoroughly – Before firing, your piece must be bone-dry. Air-dry it for at least 24 hours, or speed things up with a hair dryer or a special dehydrator. 
  4. Refine – Once dry, sand edges smooth, carve details, or patch cracks with a clay slip (a watery mix of clay). 

How to Fire Silver Art Clay

Here’s where the “magic” happens—turning clay into solid silver. There are three main ways to do it:

1. Kiln Firing

  • Best for larger or thicker pieces. 
  • Heats evenly and ensures maximum strength. 
  • Fire at around 1650°F (900°C) for 30–60 minutes depending on clay brand. 

2. Torch Firing

  • Perfect for small pendants, charms, or earrings. 
  • Place your piece on a fireproof brick and use a butane torch. 
  • Heat until it glows a peachy orange for 2–5 minutes. Once the binder burns off, you’re left with silver. 

3. Gas Stove Firing (for certain low-fire clays)

  • Place on a mesh screen over a gas hob. 
  • Heat until the binder burns away, usually 5–10 minutes. 
  • Not as strong as kiln firing but works for hobby pieces. 

After Firing: Polishing and Finishing

Once fired, your piece will look white and matte. That’s the silver particles fused together. From here, you can:

  • Brush with a brass or steel brush for a soft shine. 
  • Tumble-polish for a mirror finish. 
  • Patina with liver of sulfur for depth and contrast. 
  • Drill holes, attach jump rings, or add beads and stones. 

Tips for Beginners

  • Work in small sessions—silver clay dries quickly! 
  • Keep a little water pot handy to rehydrate edges. 
  • Practice on small charms before tackling a big statement pendant. 
  • Save scraps! You can rehydrate dried clay with a drop of water. 

Why Crafters Love It

Silver art clay lets you create heirloom-quality jewelry right at your kitchen table. It’s forgiving enough for beginners but versatile enough for serious jewelry makers. From textured pendants to dainty rings, the possibilities are endless—and every piece you fire feels like uncovering treasure.

RSS More Articles

  • Cross Stitch the National Parks in Tiny Form
  • DMC Punch Needle Wall Hanging – A Bold and Modern Statement Stitch
  • Turtle Memory Game – Crochet Pattern
  • How to Make a Fall Squirrel Birthday Card
  • Create a Giant Halloween Decoration That Will Leave Everyone Spooked – DIY Big Guy Tutorial
  • Combine Knit and Crochet with this Cute Checkers Set
  • Rosh Hashanah Coloring Sheets and Other Activities for Kids
  • Cassette Tape Shaped Mini Album
  • Free Crochet Pattern – Chunky Rib Tunisian Hat and Cowl
  • What is Silver Art Clay or Precious Metal Clay (PMC) and How Do You Work With It (and Fire It!)

Pick Your Blog

  • Sewing
  • Knitting
  • Quilting
  • Crochet
  • Home & Garden
  • Recycled Crafts
  • Scrapbooking
  • Card Making
  • Polymer Clay
  • Cross-Stitch
  • Edible Crafts
  • Felting
  • Glass Art
  • Indie Crafts
  • Kids Crafts
  • Jewelry Making
  • Lesson Plans
  • Needlework
  • Bath & Body
  • Party Ideas
  • Candle Making
  • DIY Weddings
  • Not Craft
  • Free Craft Projects

Copyright © 2025 · CraftGossip | Start Here | Contact Us | Link to Us | Your Editors | Privacy and affiliate policy