• Home
  • Suggest A DIY
  • DIY Newsletter

Polymer Clay

Fimo and clay tips and tutorials

  • About CraftGossip
  • Our Network
    • Bath & Body Crafts
    • Candle Making Ideas
    • Crochet Ideas
    • Cross Stitch
    • Edible Crafts
    • Felting Patterns
    • Glass Art
    • Home & Garden Ideas
    • Indie Crafts
    • Jewelry Making
    • Kids Crafts
    • Knitting Patterns
    • Lesson Plans
    • Needlework
    • Party Ideas
    • Polymer Clay
    • Quilting Ideas
    • Recycled Crafts
    • Scrapbooking
    • Sewing Patterns
    • Card Making
    • DIY Weddings
    • Not Craft Ideas
  • Giveaways
  • Roundups
  • Store
  • Search

Polymer Clay – An easy image transfer method

March 10, 2009 by Julie Leir-VanSickle

Memory Brooches

Memory Brooches by Linda C. Moseley

We’ve had several letters and comments, requesting an easy way to do image transfers.  Well, we opened up the mailbag, and found a glowing recommendation to share with our readers!  Here’s the letter:

“Julie, I read your article on image transfers yesterday at CraftGossip and just had to share the easiest transfer method by far for polymer clay:  Magic Transfer Paper.

My friends and fellow PCAGOE (Polymer Clay Artists Guild Of Etsy) members, Ilysa Bierer and Kira Slye sell it at their website at www.polymerclayproductions.com and it is the easiest way to transfer images to polymer clay ever!

The paper is for use with laser printers only.  You print your image from a laser printer, burnish it to the raw, conditioned clay and then soak in water for a couple of minutes.  The paper dissolves, leaving the image in all its glorious color on the clay.   Or, you can burnish and bake the paper right on the clay and then run it under water.  The paper still dissolves, leaving your image intact.

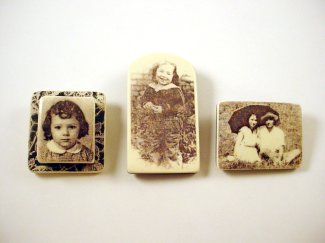
Here are a few examples of what I’ve done with the MTP.   Ilysa and Kira will send you a sample to try if you contact them.   I buy it by the 20 page pack about once a month.  I will never go back to agonizing over messy, goopy liquid clay, decal type, or filmy residues again!

Thanks!
Lynda C. Moseley”
www.scdiva.etsy.com
www.scdiva.blogspot.com
[tags]image transfer method, magic transfer paper, polymer clay productions, scdiva, polymer clay[/tags]

Next Polymer Clay Idea:

  • How To Make An Air Dry Clay Paint Palette With…
«
»

Comments

  1. Linda Riopel says

    March 10, 2009 at 2:35 pm

    Gorgeous work, absolutely love the antiqued look. Beautiful!

  2. Cindy Lietz, Polymer Clay Tutor says

    March 11, 2009 at 10:15 am

    If you would like to add another super easy image transfer technique to your list, Valarie Aharoni came up with a great way to print on parchment baking paper using either a laser printer or an inkjet printer.

    The cool thing about it, is that you can just get the paper at Costco, it is dirt cheap for miles of it and you just lay it on the clay and peel it back off to get a great transfer!

    There has been a lot of excitement over the technique. My name is linked to a post about Valerie and her technique with a bunch of discussion and ideas for how to do it if you want more info.

  3. Judi Osborne says

    October 27, 2009 at 11:08 am

    I am in the dark about transfers, but I want to learn. If I have a black and white photo…tell me in baby steps the next steps…I know nothing about laser jet printers….HELP!!!!!

  4. Celia Tyszko says

    February 25, 2011 at 8:26 am

    I was just wondering did I miss the type of paper you should use? I’m sorry, what does burnish mean. I really new at using the polymer clay.

  5. Elaine says

    February 25, 2011 at 10:40 pm

    Hi Celia! I didn’t write or post that review – a predecessor did – but they still sell the product, which is a wash away transfer paper they call Magic Transfer Paper. It’s great stuff and I can vouch for it and a similar (identical?) product by Judikins available at http://www.stampstampstamp.com call Tranzit laser paper. They’re both the absolute simplest method I’ve ever used to do transfers on polymer clay.

Have you read?

How To Make A Milk Mache Molding Compound

There are some craft projects that feel like they belong on a rainy afternoon kitchen table, and this Milk Mache Molding Compound is exactly one of them. It is part craft, part science experiment, and part “wait… did we just turn milk into something solid?”

This clever little project from CraftBits shows you how to make a simple homemade molding compound using just milk and vinegar. The idea is wonderfully old-school: when the vinegar reacts with the milk, it separates into curds and liquid, leaving you with a soft mixture that can be pressed, shaped, and dried into a hard, stone-like material.

It’s a lovely one to try with kids, especially if you enjoy hands-on STEM-style crafts that do not require a trolley full of supplies. You can use the finished compound to make small charms, beads, ornaments, rustic tags, or simple molded shapes. Just keep the pieces small and thin, as this is not really the sort of compound you would use for large sculptures or anything that needs to be perfectly smooth.

What I like most about this project is how accessible it is. Most of us already have milk, vinegar, a bowl, and paper towel in the kitchen, which makes it a brilliant last-minute craft activity. It also has that slightly magical quality children love — one minute it is liquid, the next it is turning into a moldable material.

A couple of tips before you try it: use whole milk if you can, as it tends to give a better result than skim or semi-skimmed milk. White vinegar is also the best choice, as darker vinegars may affect the colour and texture. And don’t rush the draining stage. If the mixture is too wet, it will be soggy and hard to shape; if it is too dry, it may crumble.

This would be a fun companion activity for our other kids craft ideas, especially if you are looking for something simple, inexpensive, and a little bit educational. It also fits nicely with home crafts and handmade gift embellishments if you want to turn your dried shapes into tags or decorations.

Would I call this a polished, professional clay substitute? No. Would I call it a wonderfully curious, messy, memorable craft experiment? Absolutely.

If you enjoy homemade craft supplies, kitchen-table experiments, or easy projects that make children ask “how did that happen?”, this Milk Mache Molding Compound is well worth a try.

You can find the full project instructions here: Milk Mache Molding Compound

Categories

air dry clay animals Artist Spotlight Christmas Clay Canes Clay Charms Craft Inspirations DIY Clay Tutorials and Patterns earrings Freebies halloween Inspiration necklace Plates, Bowls & Platters Polymer Clay Polymer Clay - Techniques Polymer Clay - Tutorials Polymer Clay Community Tips/Tools valentine's day

RSS More Articles

  • The 5 Outlet Placement Mistakes You Don’t Want to Make
  • Celebrate the Spirit of the Southwest with These Stunning Indian Navajo Tribal Quilt Patterns
  • Pricing Handmade Sewing Items Without Undervaluing Yourself
  • Tips for Teaching the Alphabet to Kids
  • Yarn Sardines T-Shirt Review – A Whimsical Gift For Yarn Lovers
  • Cropped Chunky Granny Stitch Cardigan Crochet Pattern
  • Free Butterfly Digital Stamps for Card Making, Coloring and Paper Crafts
  • 14 Masculine Card Ideas for Guys
  • Juneteenth Cross Stitch Patterns
  • Ties to Knit for Father’s Day

Pick Your Blog

  • Sewing
  • Knitting
  • Quilting
  • Crochet
  • Home & Garden
  • Recycled Crafts
  • Scrapbooking
  • Card Making
  • Polymer Clay
  • Cross-Stitch
  • Edible Crafts
  • Felting
  • Glass Art
  • Indie Crafts
  • Kids Crafts
  • Jewelry Making
  • Lesson Plans
  • Needlework
  • Bath & Body
  • Party Ideas
  • Candle Making
  • DIY Weddings
  • Not Craft
  • Free Craft Projects

Copyright © 2026 · CraftGossip | Start Here | Contact Us | Link to Us | Your Editors | Privacy and affiliate policy