• Home
  • Suggest A DIY
  • DIY Newsletter

Polymer Clay

Fimo and clay tips and tutorials

  • About CraftGossip
  • Our Network
    • Bath & Body Crafts
    • Candle Making Ideas
    • Crochet Ideas
    • Cross Stitch
    • Edible Crafts
    • Felting Patterns
    • Glass Art
    • Home & Garden Ideas
    • Indie Crafts
    • Jewelry Making
    • Kids Crafts
    • Knitting Patterns
    • Lesson Plans
    • Needlework
    • Party Ideas
    • Polymer Clay
    • Quilting Ideas
    • Recycled Crafts
    • Scrapbooking
    • Sewing Patterns
    • Card Making
    • DIY Weddings
    • Not Craft Ideas
  • Giveaways
  • Roundups
  • Store
  • Search

8 Christmas Ornaments Made From Polymer Clay

November 9, 2014 by Larissa Coleman

christmas

If you are having a hard time finding the perfect ornaments for your Christmas tree, then maybe try making your own.  These 8 polymer clay tutorials will give you some great inspiration for making your own custom ornaments to fit into your own holiday décor or to use as a nice homemade gift for someone on your list.  Get a start now, and have them done in plenty of time to enjoy the Christmas season. I am loving all of these Christmas clay tutorials and I hope you do too.

Are you looking for a creative and unique way to spruce up your Christmas tree this year? polymer clay Christmas ornaments are a great option!  Not only are they easy to make and customize, but they look beautiful and elegant, too.

Plus, they’re much more affordable than traditional glass or plastic ornaments. All you need is some  clay, a rolling pin, and a few cookie cutters to get started. You can roll out the clay, cut out shapes with the cookie cutters, and let them air dry overnight or try your hand at these more detailed projects.

And when you’re done, you can hang them on your tree for years to come. So if you’re looking for a unique and beautiful way to decorate your tree this year, look no further than clay Christmas ornaments.


angel

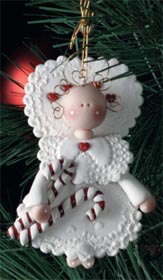
1- Angel Ornament from Fave Crafts

clay

2- Clay Ornaments from Pine Feather

tree

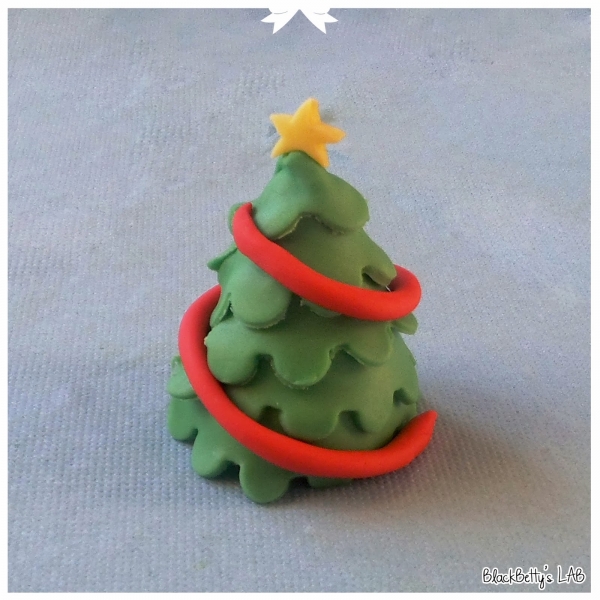
3- Christmas Tree from Black Betty’s Lab

santa

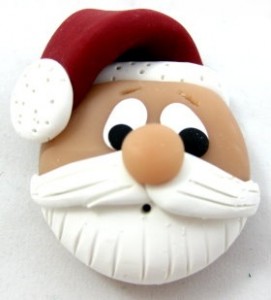
4- Santa Head from Craft Bits

candycane

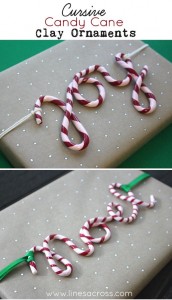
5- Cursive Candy Cane Ornaments from Lines Across

letitsnow

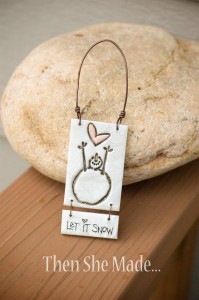
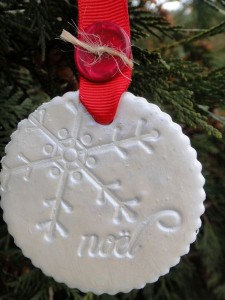
6- Let It Snow Ornament from Then She Made

sweettreats

7- Sweet Treats Ornaments from Sculpey

bulbs

8- Bulb Ornaments from Kater’s Acres


One of the great things about making your own Christmas ornaments with clay is that you can personalize them to your liking. You can choose your own colors, shapes, and designs to create ornaments that are unique to you and your family. This makes them perfect for keepsakes, as they can be treasured for years to come.

Not only do handmade ornaments add a personal touch to your holiday decorations, but they can also make thoughtful gifts for friends and loved ones. Imagine the delight of receiving an ornament that has been handmade just for you!

There are so many different things you can do with polymer clay to create ornaments. You can use cookie cutters to create simple shapes, or use clay sculpting tools to create more detailed designs. You can even use stamps or other texturing tools to add texture and pattern to the clay. The possibilities are endless!

I hope you have fun creating your own personalized Christmas ornaments with polymer clay. Happy crafting!


Next Polymer Clay Idea:

  • 25 Essential Air Dry Clay Tips & Tricks Every…
«
»

Comments

  1. mis avery says

    October 29, 2019 at 7:38 pm

    what do you use to coat the ornaments once done

Have you read?

DIY Pottery Clay Doily Platter with Pink Speckled Glaze

There’s something special about combining old traditions with modern design. I’ve always adored the stack of vintage doilies handed down from my grandmother, but since lace doesn’t exactly suit my home aesthetic, I started experimenting with ways to repurpose their beautiful patterns in clay. That’s how I ended up creating this doily pottery platter—a simple slab of clay transformed into a textured serving dish with the help of lace, white clay, and a soft pink speckled glaze.

The result is a handmade ceramic platter that looks both timeless and contemporary, perfect for styling on a coffee table, serving treats, or simply displaying as a piece of art.

Materials You’ll Need

  • White pottery clay (stoneware or porcelain recommended)

  • Rolling pin

  • Crochet doily (cotton lace works best)

  • Sharp knife or clay cutter

  • Oval or rectangular template (a cutting board, tray, or paper template works well)

  • Sponge and water

  • Plastic wrap

  • Kiln access (or a local pottery studio firing service)

  • White glaze

  • Pink speckled glaze (or white glaze with pink oxide/pigment speckles)

Step-by-Step Tutorial

Step 1: Roll Out the Clay

Roll your clay slab to about 1/4 inch thick. Keep it even and wide enough to cut an oval platter shape.

Step 2: Press the Doily

Lay your crochet doily flat across the clay. Use the rolling pin to firmly press the pattern into the surface. Lift it carefully to reveal the intricate lace design imprinted into the clay.

Tip: Dust the doily lightly with cornstarch if it tends to stick.

Step 3: Cut the Platter Shape

Using your knife and a template, cut around the clay to form an oval platter shape. Smooth the edges with your fingers or a damp sponge.

Step 4: Lift and Shape the Platter

For a slightly raised platter, drape the clay gently over a shallow mold (like a plate or tray lined with plastic wrap). If you prefer a flat serving dish, leave it as-is on your board.

Step 5: Let It Dry

Allow the platter to dry until leather-hard. Refine the edges with a sponge, smoothing away any rough spots. Once it reaches bone dry, it’s ready for bisque firing.

Step 6: Glaze and Fire

After the first firing, apply a coat of white glaze over the entire platter. Then lightly layer on a pink speckled glaze (you can also achieve this by flicking pink oxide pigment into a clear glaze). The pink speckles add a playful, modern twist while still allowing the lace pattern to shine through. Fire again according to your glaze instructions.

Styling Your Finished Platter

This platter is both practical and beautiful. You can:

  • Use it as a serving dish for cakes, cookies, or fruit.

  • Style it on a coffee table with candles or trinkets.

  • Display it as wall art by adding a plate hanger.

  • Gift it as a keepsake—perfect for Mother’s Day, weddings, or housewarmings.

Every platter I make carries the memory of my grandmother’s doilies, but in a form that feels modern and at home with my style. The pink speckled glaze gives it a playful softness, while the lace impression keeps that touch of handmade tradition alive. It’s proof that old textiles can inspire something completely fresh when reimagined in clay.


Categories

air dry clay animals Artist Spotlight Christmas Clay Canes Clay Charms Craft Inspirations DIY Clay Tutorials and Patterns earrings Freebies halloween Inspiration necklace Plates, Bowls & Platters Polymer Clay Polymer Clay - Techniques Polymer Clay - Tutorials Polymer Clay Community Tips/Tools valentine's day

RSS More Articles

  • Cross Stitch Ice Cream and Frozen Treats
  • 15 Charity Sewing Projects That Let You Sew Something Useful For A Good Cause
  • Sunflower Ribbon Embroidery Tutorials and Kits to Brighten Your Hoop
  • Decorating Mistakes That Make Your Living Room Feel Cluttered
  • Remembering Jill Smokler, Founder Of Scary Mommy
  • In the Garden Layer Cake – A Bloom-Filled Fabric Collection for Spring Sewing
  • How To Do Kitchener Stitch: A Beginner-Friendly Guide To Grafting Knitting Seamlessly
  • Pattern Review: Georgie Granny Square Bucket Hat Crochet Pattern
  • 12 Handmade Patriotic 4th of July Card Ideas
  • Shark Week Learning for Kids

Pick Your Blog

  • Sewing
  • Knitting
  • Quilting
  • Crochet
  • Home & Garden
  • Recycled Crafts
  • Scrapbooking
  • Card Making
  • Polymer Clay
  • Cross-Stitch
  • Edible Crafts
  • Felting
  • Glass Art
  • Indie Crafts
  • Kids Crafts
  • Jewelry Making
  • Lesson Plans
  • Needlework
  • Bath & Body
  • Party Ideas
  • Candle Making
  • DIY Weddings
  • Not Craft
  • Free Craft Projects

Copyright © 2026 · CraftGossip | Start Here | Contact Us | Link to Us | Your Editors | Privacy and affiliate policy