• Home
  • Suggest A Craft
  • DIY Newsletter

Polymer Clay

Fimo and clay tips and tutorials

  • About CraftGossip
  • Our Network
    • Bath & Body Crafts
    • Candle Making Ideas
    • Crochet Ideas
    • Cross Stitch
    • Edible Crafts
    • Felting Patterns
    • Glass Art
    • Home & Garden Ideas
    • Indie Crafts
    • Jewelry Making
    • Kids Crafts
    • Knitting Patterns
    • Lesson Plans
    • Needlework
    • Party Ideas
    • Polymer Clay
    • Quilting Ideas
    • Recycled Crafts
    • Scrapbooking
    • Sewing Patterns
    • Card Making
    • DIY Weddings
    • Not Craft Ideas
  • Giveaways
  • Roundups
  • Store
  • Search

DIY Penguin Cake Toppers

April 22, 2015 by Elaine Robitaille

penguincaketoppers

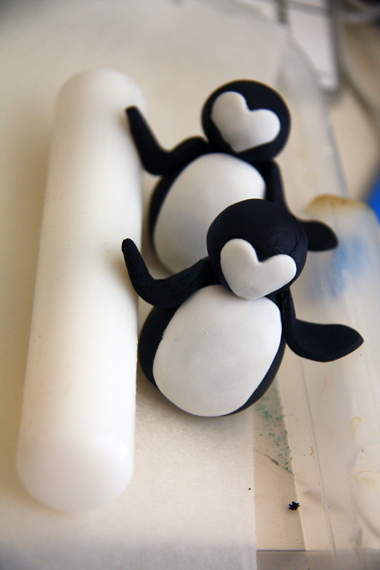
Cake decorating tutorials – in particular the fondant sculpting – seem to be perfect for polymer clay work. And, I have to say, of the very few cake toppers I’ve done I’ve done penguins TWICE. And they would have benefited from this tutorial. If you’re using oven bake polymer clay, follow the brands directions for bake time. If your topper is more than an inch thick at any point, consider using tightly wadded foil for the innards to cut down on curing time and weight.

Want to make this into a wedding cake topper? Or even the topper for your wedding related event? Add the relevant accessories: a pair of glasses, someones favourite book, a tie or tattoo. I’ve done gag cake toppers for many of the people I made sculpted cake toppers for and they were more fun because the pressure was gone. You could add personality, favourite accessories and keep it simple and fun.

Next Polymer Clay Idea:

  • DIY Metal Clay: How to Make Your Own Silver and…
«
»

Have you read?

Pottery Clay – DIY Divided Tapas Serving Platter with Illustrated Sections

Every good hostess knows a serving platter is the secret weapon at a party. It corrals snacks, makes everything look intentional, and saves you from running back and forth with little bowls. This DIY divided platter takes that idea one step further: each section is labeled with hand-drawn illustrations, making it both useful and irresistibly charming.

The original inspiration came from these  tapas-style platters, but we’re creating an English version featuring everyday snacks and nibbles. It’s fun, it’s functional, and it makes even store-bought crackers look Pinterest-worthy.

Materials You’ll Need

  • White ceramic clay (or air-dry clay if you don’t have access to a kiln) 
  • Rolling pin or slab roller 
  • Oval platter base template (downloadable below) 
  • Divider templates (downloadable below) 
  • Scoring tool + slip for joining clay 
  • Sponge and rib tool for smoothing 
  • Cobalt blue underglaze pencil OR blue underglaze with a fine brush 
  • Kiln + clear glaze (for ceramic clay) OR a food-safe sealant (for air-dry clay) 

Step-by-Step Tutorial

Step 1: Shape the Base

Roll a slab of clay about ½ inch thick. Place the oval platter template on top and cut out your base. Smooth edges with a damp sponge.

Step 2: Add Dividers

Use the divider templates to cut strips of clay. Attach them to the base by scoring and slipping. Smooth joins and curve the edges slightly for a handmade look.

Step 3: Refine

Let the platter dry until it’s leather-hard. At this stage, you can tidy the walls, soften corners, and make sure the surface is smooth.

Step 4: Draw Your Illustrations

Here’s where the personality shines. Using an underglaze pencil or fine brush, sketch quick doodles into each section. Keep them loose and playful, not perfect. Our platter has:

  • Cheese – wedges with holey details 
  • Ham – loose stack of wavy slices 
  • Anchovies – three slim fish outlines 
  • Sardines – larger, striped fish drawings 
  • Salami – one log plus a few round slices with dotted speckles 
  • Olives – oval shapes with pits, some sliced open 
  • Tomatoes – little cluster of round tomatoes tied together 

Note: Drawings are slightly altered from the original for a fresh, unique design.

Step 5: Fire and Finish

  • For ceramic clay: bisque fire, add clear glaze, and glaze fire. 
  • For air-dry clay: allow to dry fully, then paint with a clear food-safe sealant if you’ll use it for food. Otherwise, it makes a perfect decorative tray. 


RSS More Articles

  • Meet Mr. Boo – The Ultimate Halloween Decoration That Will Steal the Show
  • Book Review: Cross Stitch Alphabet and Number Patterns
  • Knit a Jacket Inspired by an Iconic Coco Chanel Look
  • Learning about Côte D’ivoire for Kids
  • 12 Autumn Botanical Scrapbook Layout Ideas
  • Green Gifting: Sustainable Gift Wrap Ideas Using What You Already Have
  • Midnight Skulls Halloween Scarf – Free Crochet Pattern
  • Book Review: The Green Witch: Your Complete Guide to the Natural Magic of Herbs, Flowers, Essential Oils, and More
  • Pottery Clay – DIY Divided Tapas Serving Platter with Illustrated Sections
  • Rosh Hashanah Cross Stitch Patterns

Pick Your Blog

  • Sewing
  • Knitting
  • Quilting
  • Crochet
  • Home & Garden
  • Recycled Crafts
  • Scrapbooking
  • Card Making
  • Polymer Clay
  • Cross-Stitch
  • Edible Crafts
  • Felting
  • Glass Art
  • Indie Crafts
  • Kids Crafts
  • Jewelry Making
  • Lesson Plans
  • Needlework
  • Bath & Body
  • Party Ideas
  • Candle Making
  • DIY Weddings
  • Not Craft
  • Free Craft Projects

Copyright © 2025 · CraftGossip | Start Here | Contact Us | Link to Us | Your Editors | Privacy and affiliate policy