• Home
  • Suggest A DIY
  • DIY Newsletter

Polymer Clay

Fimo and clay tips and tutorials

  • About CraftGossip
  • Our Network
    • Bath & Body Crafts
    • Candle Making Ideas
    • Crochet Ideas
    • Cross Stitch
    • Edible Crafts
    • Felting Patterns
    • Glass Art
    • Home & Garden Ideas
    • Indie Crafts
    • Jewelry Making
    • Kids Crafts
    • Knitting Patterns
    • Lesson Plans
    • Needlework
    • Party Ideas
    • Polymer Clay
    • Quilting Ideas
    • Recycled Crafts
    • Scrapbooking
    • Sewing Patterns
    • Card Making
    • DIY Weddings
    • Not Craft Ideas
  • Giveaways
  • Roundups
  • Store
  • Search

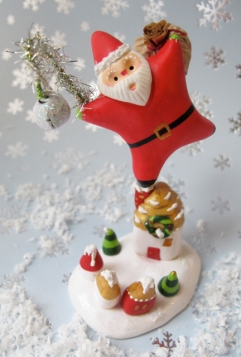
Tutorial: Saint Nick Decoration

December 5, 2013 by Elaine Robitaille

swirly-xmas

Here’s another offering from Sculpey.com written by Lianne and Paul Stoddard. This Saint Nick decoration is cheery, perfect to perk up your mantel this holiday season.
«
»

Have you read?

Everything You Need to Know About Moldable Plastic: How to Use Thermoplastic Pellets Safely

Moldable plastic is one of those craft supplies that looks spectacularly unexciting in the packet.

A handful of little white plastic pellets? Thrilling.

Then you put them into hot water, they turn clear, stick together and suddenly you have a lump of plastic you can squash, stretch, roll, press into molds, wrap around handles and shape almost like very firm modelling clay.

Better still, when you mess it up, and you probably will on the first attempt, you can usually heat it again and start over.

That is what makes reusable moldable plastic, also sold as mouldable plastic, thermoplastic beads, thermoplastic pellets, Polymorph, polycaprolactone or PCL, such an interesting material for crafters, DIYers, miniature makers, cosplayers and anyone who enjoys fixing things rather than throwing them away.

But there are a few things you really do need to know before tipping a packet into the nearest saucepan.

What Is Moldable Plastic?

The type of moldable plastic we are talking about here is generally polycaprolactone, or PCL, a low-temperature thermoplastic.

Unlike polymer clay, which needs to be baked to permanently cure, PCL simply softens when it gets hot and becomes hard again as it cools.

Most PCL moldable plastics become workable at around 60°C or 140°F. When heated, white pellets usually become translucent or clear and join into a flexible mass. As the plastic cools, it turns opaque again and becomes firm.

And here is the really useful bit.

You can reheat it.

That means scraps, failed projects and wonky first attempts can usually go straight back into the hot water for another try.

Moldable Plastic, Sugru, Worbla and Polymer Clay Are Not the Same Thing

These materials often get lumped together online, but they behave very differently.

PCL moldable plastic: Softens in hot water and can be reheated and reshaped repeatedly.

Sugru: A moldable silicone-based repair material that cures permanently at room temperature. Once cured, you cannot simply melt it and start again. If you want to see the sort of practical jobs Sugru is good for, take a look at these DIY Sugru cable holders.

Worbla: A sheet thermoplastic commonly used for cosplay armour and costume construction. It is generally worked as sheets rather than loose pellets.

Polymer clay: Shaped cold and baked to cure. It does not become reusable moldable plastic when heated in water.

That distinction is worth knowing before you buy anything because searching for “moldable plastic” can bring up all four.

What You Need to Work With Moldable Plastic

You do not need much equipment.

I would keep a small set of tools specifically for thermoplastic crafting rather than borrowing the good kitchen gear every time inspiration strikes.

You will need:

  • Moldable thermoplastic pellets
  • Heat-resistant bowl or container
  • Hot water
  • Kitchen thermometer if you want better temperature control
  • Metal tongs, slotted spoon or similar lifting tool
  • Silicone craft mat or other heat-resistant work surface
  • Scissors for trimming thin warm plastic
  • Craft knife for cooled pieces
  • Rolling pin or smooth jar if making flat sheets
  • Optional pigment pellets, inks or suitable paints
  • Optional bowl of cool water for speeding up the final set

Keep these tools for crafting rather than food preparation.

If you are starting from scratch, Amazon has plenty of moldable thermoplastic pellets, silicone mats and inexpensive digital thermometers. I would start with a smaller packet until you know how much you are likely to use.

How to Use Moldable Plastic Pellets

1. Heat the water

For most PCL thermoplastics, a useful starting temperature is around 60°C to 65°C.

Always check the instructions supplied with your particular brand because formulations can vary.

You will see tutorials using boiling water, but hotter is not automatically better. Excessively hot water creates a much greater scalding risk and can make the plastic unpleasantly hot and sticky to handle.

2. Add the pellets

Drop in only as much plastic as you think you need.

You can always add more.

After a minute or two, the pellets will usually begin changing from white to clear and sticking together.

3. Remove it with a tool

Do not reach into hot water to grab the plastic.

Lift it out using tongs, a slotted spoon or another heat-safe tool.

Let excess hot water drain away.

4. Wait before handling it

This bit gets skipped in far too many videos.

Just because thermoplastic is described as “hand moldable” does not mean you should immediately squeeze a freshly heated lump.

Allow it to cool until it is genuinely comfortable to touch.

5. Shape it

Now treat it rather like a very firm modelling material.

You can:

  • Roll it
  • Flatten it
  • Pinch it
  • Stretch it
  • Press texture into it
  • Wrap it around an object
  • Press it into a mold
  • Join warmed pieces together

If it becomes too stiff before you finish, simply reheat it.

6. Let it cool completely

As it cools it will become firmer and generally return to its opaque colour.

You can allow it to cool naturally or place the finished piece into cool water once you are happy with the shape.

Is Moldable Plastic Safe?

This is where the wording matters.

Some PCL products are described as non-toxic, and safety data for products such as Mouldphorm indicates that the material is not considered harmful when handled according to the manufacturer’s guidelines.

That does not mean every imaginable use is automatically safe.

The biggest everyday risk is heat

The water and freshly heated plastic can burn you.

Use tongs, control your water temperature and allow the plastic to cool before handling it.

If children are using moldable plastic, an adult should handle the heating and removal from the water.

Do not assume it is food safe

“Non-toxic” and “food safe” mean different things.

Unless your particular product is specifically certified for food contact, I would not use it for:

  • Drinking vessels
  • Cutlery
  • Cake decorations
  • Cookie cutters that contact food
  • Food storage
  • Ice molds
  • Anything intended to go into your mouth

We have discussed a similar issue with other craft plastics in our guide to whether polymer clay is suitable for food bowls and platters. With craft materials, decorative use and food-contact use are two entirely different questions.

Keep loose pellets away from small children and pets

Those tiny pellets look rather bead-like.

They are not beads, sweets or sensory play materials.

Loose thermoplastic pellets can present a choking hazard, so keep the packet somewhere children and pets cannot reach it.

Do not use craft thermoplastic for DIY dentistry

Yes, the internet has gone there.

Don’t.

A craft thermoplastic being moldable does not make it a dental material, medical device or material approved for prolonged internal body contact.

I would also avoid molding hot plastic tightly around fingers, wrists or other body parts. Once it hardens, removing a tightly fitted piece could become much more complicated than the craft project deserves.

Do not overheat it

There is absolutely no craft benefit in deliberately getting thermoplastic extremely hot.

For beginners, hot water is far easier to control than open flames or aggressive heat guns.

Never put the material directly into a flame.

If you use a heat gun for more advanced shaping, work in a ventilated area, keep the heat source moving and follow the manufacturer’s instructions for your particular product.

Can You Microwave Moldable Plastic?

The easiest beginner approach is to heat the water, then place the thermoplastic into the hot water.

I would not put dry thermoplastic pellets directly into a microwave unless the manufacturer of your particular product specifically says you can.

Heating the water separately also gives you much better temperature control and reduces the likelihood of hot spots.

Does Moldable Plastic Stick to Things?

Oh yes.

Sometimes rather enthusiastically.

Warm thermoplastic can stick to some plastics and smooth materials, including acrylic, PVC and other thermoplastics.

If you are pressing it over something you would prefer not to permanently decorate with a blob of white plastic, test a small area first.

A silicone craft mat is handy for protecting your work surface.

For mold-making projects, you may need an appropriate release agent or barrier.

If you need a more flexible permanent craft mold rather than a rigid thermoplastic impression, our DIY silicone craft mold tutorial using gap filler and cornflour is another option.

How to Clean Up Moldable Plastic

Cleanup is thankfully easier than resin or plaster, provided you deal with it sensibly.

Loose dry pellets

Sweep or vacuum them up.

Do not wash handfuls of pellets down the sink.

Keep loose pieces out of drains and waterways.

Leftover softened plastic

Let it cool.

Once solid, put it back with your supplies and use it again.

This is one material where the “scrap pile” can actually be useful.

Plastic stuck to your bowl or tools

First let it cool and see whether it will flex or peel away.

If the tool or surface is heat-resistant, gently warming the plastic again can soften it enough to lift away.

Avoid heating delicate plastics, painted surfaces or anything that could be damaged by hot water.

Tiny pieces in your work water

Strain them out before disposing of the water.

I keep thinking of yarn scraps disappearing under the sewing table. Somehow craft supplies always manage to migrate considerably further than physics should allow.

These pellets are small enough to do exactly the same thing.

Do you need solvents?

Usually, no.

One of the advantages of PCL thermoplastic is that mechanical removal and reheating are normally enough.

I would not immediately reach for acetone or other strong solvents, particularly when you do not know how they will react with either the thermoplastic or the surface beneath it.

How to Store Moldable Plastic

Keep unused pellets:

  • Dry
  • Cool
  • Away from direct sunlight
  • In a tightly closed labelled container
  • Away from food
  • Away from children and pets

Also think about where you leave the finished project.

A thermoplastic designed to soften at approximately 60°C is obviously not a brilliant choice beside a heater, inside a very hot car or attached to something that becomes hot during use.

Can You Colour Moldable Plastic?

Yes.

Depending on the brand, you may be able to use:

  • Thermoplastic pigment pellets
  • Alcohol inks
  • Suitable powdered pigments
  • Paint after cooling

Some manufacturers sell dedicated colour pellets that can be kneaded into the softened white thermoplastic.

Whatever colouring method you choose, experiment with a small amount first. Anything added to the plastic has the potential to change the way it behaves.

Can You Paint Moldable Plastic?

Yes, although paint adhesion to smooth plastic can be a little temperamental.

For a longer-lasting finish:

  1. Allow the thermoplastic to cool completely.
  2. Lightly prepare the surface if appropriate.
  3. Use a primer intended for plastic.
  4. Apply your decorative paint.
  5. Seal it if the project needs extra protection.

Acrylic paint can work well for decorative projects, particularly when the plastic has been lightly prepared and primed first.

Can You Cut, Drill or Sand Moldable Plastic?

Yes, once it is cool.

You can trim thin warm material with scissors, and cooled pieces can be cut, drilled, carved or sanded depending on their thickness.

Just remember that friction creates heat.

If you enthusiastically sand or drill the same spot, you may warm the thermoplastic enough that it begins softening again.

Go slowly.

20 Practical Ways to Use Moldable Plastic

This is where the material gets interesting.

1. Make Custom Crochet Hook Grips

Build up a thicker ergonomic handle around a plain crochet hook.

This could be particularly helpful if you find narrow hooks uncomfortable to hold.

Just make sure you do not cover information you might want later, such as the hook size.

2. Create Comfortable Tool Handles

Add a custom grip to small craft tools, files, styluses, sculpting tools or handles that are uncomfortable to hold.

3. Replace a Missing Knob

Drawer knob disappeared years ago?

Fashion a replacement.

It may not match your grandmother’s antique dresser hardware perfectly, but neither does the random screw currently sticking out of it.

4. Make Custom Cable Holders

Create small clips or channels for charging cords, sewing machine leads and craft-room cables.

For another approach to this idea, have a look at these Sugru cable holders on CraftGossip.

5. Create Buttons

You can make oversized decorative buttons, costume buttons or embellishments and add your own holes while the plastic is still workable.

There is also a fun InstaMorph button tutorial on Instructables showing how the material can be turned into decorative eye-style buttons.

6. Make Miniature Furniture Pieces

Moldable plastic is handy for dollhouse furniture, miniature accessories and mixed-media scenes.

7. Create Jewellery Components

Try making pendants, chunky beads, brooch bases or statement shapes.

Keep these decorative rather than using craft thermoplastic for anything inserted into a piercing.

8. Make Stamps and Texture Tools

Press textures into the plastic while warm to create reusable craft impressions.

You could also press objects into a flattened piece and create custom texture plates for clay and mixed-media work.

9. Make Temporary Molds

Press warmed thermoplastic around suitable objects to capture simple shapes.

For highly detailed or flexible casting molds, silicone will usually be the better choice.

10. Make Knitting Needle Point Protectors

Shape small removable caps for transporting knitting needles.

Make sure they are large enough that they do not become a choking hazard.

11. Replace Broken Plastic Tabs

Small catches, clips, spacers and brackets are where this material can be surprisingly useful.

If you have ever kept an appliance or craft tool for years because one stupid little plastic tab broke off, this is exactly the sort of repair worth experimenting with.

12. Make Custom Phone or Camera Adapters

Thermoplastic can be used to create or modify brackets and holders.

One clever Instructables thermoplastic phone tripod tutorial shows how an existing holder can be modified to fit another phone.

13. Create Costume Pieces

Masks, horns, decorative armour pieces and costume embellishments can all be shaped from thermoplastic.

It is particularly useful when you need something lightweight and rigid but still want to be able to alter the shape during construction.

14. Sculpt Small Figures

Animals, miniature decorations, fantasy pieces, charms and ornaments are all possible.

15. Make Project Stands

Create custom supports for ornaments, miniatures, jewellery displays or little sculptural pieces.

16. Create Custom Spacers

Need something exactly 7 mm thick to stop a project wobbling?

Make it.

This sort of boring little fix is often where moldable plastic becomes ridiculously handy.

17. Make Drawer Dividers and Stops

Small custom brackets can help stop craft-room drawer dividers moving around.

18. Create Handles for Handmade Stamps

Instead of struggling with a tiny stamp block, add a comfortable molded grip.

19. Make Flat Thermoplastic Sheets

Thermoplastic pellets can be rolled into sheets while warm.

This Instructables flat InstaMorph sheet tutorial shows a clever method using spacers and a rolling pin to create a reasonably even thickness.

Once you have a flat sheet, you can cut shapes from it for costume pieces, embellishments and lightweight construction projects.

20. Use It for Prototypes

Before committing to wood, resin, clay or another permanent material, moldable plastic is brilliant for testing the size and shape of an idea.

And if version one is terrible?

Back into the hot water it goes.

Possibly my favourite thing about the entire material.

A Moldable Plastic Video Worth Watching

If you want to see how the material behaves before buying a packet, The Crafsman SteadyCraftin has a useful video demonstration called MORPH it, MOLD it, MAKE it, re-MELT it: InstaMorph Thermoplastic.

Seeing someone actually stretch and manipulate the warm material makes the whole process much easier to understand than staring at a bag of pellets.

Where to Buy Moldable Plastic

There are lots of generic versions available now.

Useful search terms include:

  • PCL thermoplastic pellets
  • Reusable moldable plastic
  • Polymorph plastic
  • Moldable thermoplastic beads
  • InstaMorph
  • Polly Plastics

You can browse moldable thermoplastic pellets on Amazon to compare packet sizes, colours and brands.

When buying generic products, check the listing carefully for the actual material, working temperature, safety information and intended use.

A packet simply labelled “plastic beads” could be something entirely different.


What I Would Buy as a Beginner

Start small.

You do not need a giant tub until you know you enjoy working with the stuff.

A modest packet of white reusable PCL pellets, a thermometer and a silicone mat are enough to learn the basics.

White is useful because you can easily see when the pellets change from opaque to translucent as they soften and when the finished piece has cooled again.

Once you know what you are doing, coloured pellets and pigments become much more tempting.

Craft cupboards are very good at turning one experimental packet into twelve colours, three specialist tools and an entire storage drawer. I believe this is a recognised law of crafting.

Moldable Plastic FAQ

Can Moldable Plastic Be Reused?

Most PCL thermoplastic can be reheated and remolded many times.

Keep your scraps rather than throwing them away.

What Temperature Does Moldable Plastic Soften?

PCL products commonly soften at approximately 60°C or 140°F, although you should always follow the instructions supplied with your particular brand.

Is Moldable Plastic Toxic?

Some PCL products are described as non-toxic or low hazard when used as directed.

That does not mean they are approved for every possible application.

Always check the safety information for the exact product you buy.

Is Moldable Plastic Food Safe?

Do not assume so.

A craft material can be described as non-toxic without being tested or certified for food contact.

Unless your specific product is certified as food safe, keep it away from food preparation and serving.

Can Moldable Plastic Go in the Dishwasher?

Generally, no.

If a thermoplastic starts softening around 60°C, a hot dishwasher could deform your finished project.

Wash suitable items gently in cool or lukewarm water instead.

Can Children Use Moldable Plastic?

It depends on the child’s age and the particular product.

The hot-water stage requires careful adult supervision, and loose pellets can present a choking hazard.

Can I Use Boiling Water?

You may see tutorials recommending boiling water, but PCL typically becomes workable at substantially lower temperatures.

Controlled hot water around the temperature recommended by the manufacturer gives you plenty of working time without adding unnecessary scalding risk.

What Happens If I Make a Mistake?

Reheat it and have another go.

Possibly the best feature of the entire material.

Is Moldable Plastic Worth Adding to Your Craft Cupboard?

For most crafters, moldable plastic probably will not replace clay, resin, silicone or traditional hardware.

That isn’t really its job.

Where it shines is those irritating little projects where you think, “I just need a tiny plastic piece that is exactly this shape.”

A replacement knob. A thicker crochet hook handle. A little bracket. A costume detail. A stand. A clip. A prototype.

Being able to make that part, decide you hate it, put it back into hot water and make another one is wonderfully forgiving.

Just remember that reusable does not mean indestructible, non-toxic does not automatically mean food-safe, and “hand moldable” definitely does not mean “grab it straight out of boiling water.”

Treat the heat with respect and this strange little bag of pellets can become one of the most useful supplies hiding in your craft room.

Categories

air dry clay animals Artist Spotlight Christmas Clay Canes Clay Charms Craft Inspirations DIY Clay Tutorials and Patterns earrings Freebies halloween Inspiration necklace Plates, Bowls & Platters Polymer Clay Polymer Clay - Techniques Polymer Clay - Tutorials Polymer Clay Community Tips/Tools valentine's day

RSS feed: More Articles More Articles

  • Learn about Vikings for Leif Erikson Day
  • This One Felting Trick Will Make Your Projects Look Instantly More Professional
  • How To Fix A Broken Beaded Necklace At Home
  • Everything You Need to Know About Moldable Plastic: How to Use Thermoplastic Pellets Safely
  • Hidden Storage Fake Books – Why You Need Them
  • 25 Crochet Halloween Cardigan Patterns and Spooky Sweater Ideas
  • Witch’s Cauldron Halloween Soap Recipe
  • 13 Halloween Ghost Handmade Card Ideas
  • Discover 10 Must-Read Books That Will Inspire Your Love for Sewing
  • Fun Halloween Cowls to Knit

Pick Your Blog

  • Sewing
  • Knitting
  • Quilting
  • Crochet
  • Home & Garden
  • Recycled Crafts
  • Scrapbooking
  • Card Making
  • Polymer Clay
  • Cross-Stitch
  • Edible Crafts
  • Felting
  • Glass Art
  • Indie Crafts
  • Kids Crafts
  • Jewelry Making
  • Lesson Plans
  • Needlework
  • Bath & Body
  • Party Ideas
  • Candle Making
  • DIY Weddings
  • Not Craft
  • Free Craft Projects

Copyright © 2026 · CraftGossip | Start Here | Contact Us | Link to Us | Your Editors | Privacy and affiliate policy