If you’ve had the chance to find a few opals in real life you know they’re a little bit magical with the layers of different shine, flash and colour. Faux opals are one of those polymer clay projects that’s such a treat when it turns out. Meridian Handicraft shares a tutorial (English version here) on how to achieve an opal effect with a mokume gane variant.
What is Mokume Gane in Polymer Clay?
Mokume gane in polymer clay is a layering technique that mimics the look of wood grain, marble, or gemstones (like faux opals). Instead of stacking sheets of precious metals, you layer different colors of clay, add texture, and then shave off thin slices to reveal magical patterns hiding inside.
It’s one of those techniques where you feel like a kid again, because the “big reveal” happens when you slice into your clay stack—every cut is different, and no two patterns are alike.
How to Do Mokume Gane with Polymer Clay
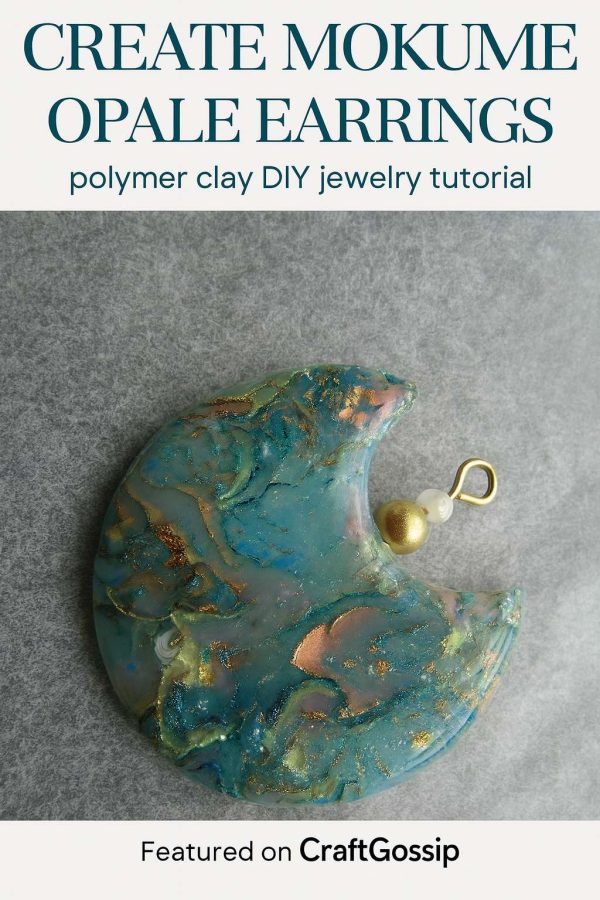
Few things are as mesmerizing as the shimmering depths of opal, and with polymer clay you can capture that same magic right at your craft table. This tutorial will walk you through creating Mokume Opale earrings—a technique that layers translucent clay, metallic powders, and mica for a finish that looks like liquid stone.
Whether you’re brand new to polymer clay or you’ve been conditioning blocks since the 90s, this project is a delightful way to practice mokume gane techniques and create one-of-a-kind jewelry.
What You’ll Need
- Polymer clay (translucent and white or pearl)
- Pearl-ex or mica powders (blue, green, gold, pink)
- Gold leaf or metallic foil
- Pasta machine or clay roller
- Plastic wrap or florist film
- Round and flower-shaped cutters
- Awl or skewer for piercing holes
- Jewelry findings (headpins, beads, earring hooks)
- Strong jewelry glue
- Gloss varnish
Step-by-Step Instructions
1. Prepare the Base Layer
Condition translucent polymer clay and run it through the pasta machine. Dust the surface with pearl-ex in soft blue-green tones. Fold the sheet, roll again, and repeat until you achieve a dreamy, opal-like tint.
2. Build the Mokume Layer
Scrape tiny slices from a mokume stack (clay layered with gold leaf and pearl powders) and scatter them across both sides of your base clay sheet. Cover with a piece of florist film and smooth gently with your fingertip until the surface looks seamless.
3. Cut Your Shapes
While the film is still in place, press a round cutter into the clay. Use a flower-shaped cutter to nibble away at one side of the circle, creating a soft petal or crescent effect.
4. Add the Hole
With an awl, pierce a small hole at the base of the shape for your earring finding.
5. Bake
Bake according to your clay brand’s instructions (generally 40 minutes at 110–130°C / 230–265°F).
6. Finish with Shine
Insert a pin into the hole to keep it open during varnishing. Apply six thin coats of gloss varnish, letting each dry completely. This layering gives the clay that wet, gem-like glow reminiscent of opal.
7. Assemble Your Jewelry
Slide a metallic bead and a white seed bead onto a headpin. Thread it through your clay shape, secure with glue, and attach your earring hook.
Crafty Tip
Play with different powders—shimmering pinks, deep purples, or teal blues—to create unique “opal” looks. Each earring will turn out different, and that’s half the charm.
Why You’ll Love This Project
- Beginner-friendly introduction to mokume gane with polymer clay
- Creates jewelry with a natural gemstone look
- Perfect for gifting or selling at craft markets
This DIY Mokume Opale tutorial brings a touch of gemstone magic into your craft studio—without the gemstone price tag!


