• Home
  • Suggest A DIY
  • DIY Newsletter

Polymer Clay

Fimo and clay tips and tutorials

  • About CraftGossip
  • Our Network
    • Bath & Body Crafts
    • Candle Making Ideas
    • Crochet Ideas
    • Cross Stitch
    • Edible Crafts
    • Felting Patterns
    • Glass Art
    • Home & Garden Ideas
    • Indie Crafts
    • Jewelry Making
    • Kids Crafts
    • Knitting Patterns
    • Lesson Plans
    • Needlework
    • Party Ideas
    • Polymer Clay
    • Quilting Ideas
    • Recycled Crafts
    • Scrapbooking
    • Sewing Patterns
    • Card Making
    • DIY Weddings
    • Not Craft Ideas
  • Giveaways
  • Roundups
  • Store
  • Search

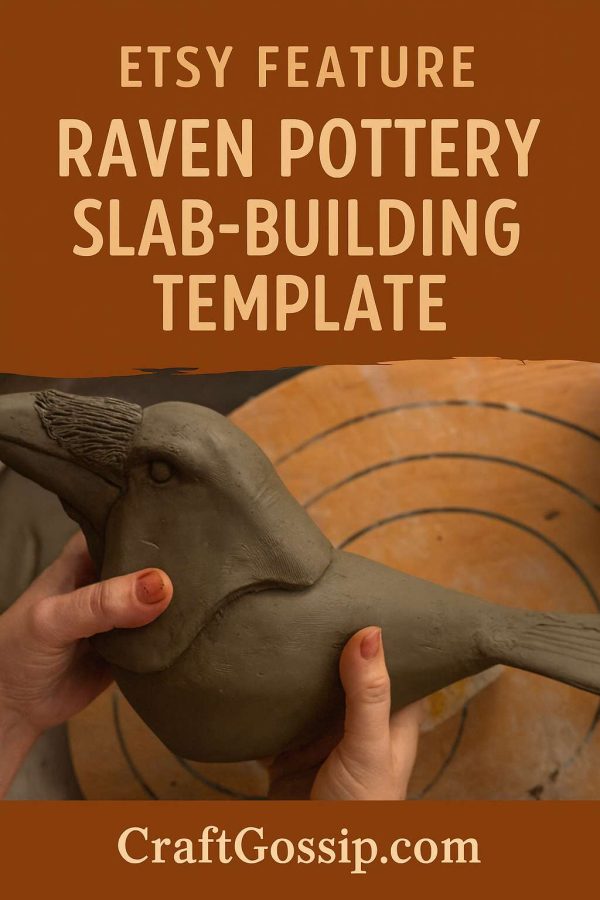
Etsy Feature – Raven Pottery Slab-Building Template

October 4, 2026 by Shellie Wilson Leave a Comment

Ravens have always carried a sense of mystery and symbolism—wisdom, transformation, and even a touch of magic. So when I saw this Raven Clay Template for slab building, I knew it was one of those tools that could bring incredible personality to pottery projects. Whether you’re into rustic farmhouse vibes or something a little more mystical, this template opens the door to endless creative possibilities.

This listing provides a printable pottery template designed to help you create a striking raven form out of clay slabs. With its bold silhouette and curved detailing, the template makes it simple to cut, shape, and assemble a piece that feels sculptural, even if you’re relatively new to clay work.

Why It’s Special

  • Symbolic Subject: Ravens bring depth and meaning, making your piece more than just decorative.

  • Beginner-Friendly: Templates save you from freehand drawing and ensure consistent proportions.

  • Statement Piece: The finished raven works beautifully as wall art, a garden feature, or a standalone sculpture.

  • Flexible Use: Perfect for ceramics, air-dry clay, or even paper craft if you want to experiment.

Ideas for Makers

  • Glaze in deep blacks and metallics for a dramatic, gothic-style raven.

  • Use matte, natural tones for a more organic, rustic effect.

  • Add surface texture—like feathers, symbols, or carved details—for extra personality.

  • Create a series of ravens in different sizes for a striking wall display.

Why Makers Will Love It

Templates like this are a fantastic way to stretch your creativity without feeling overwhelmed. You get the framework of a powerful, symbolic shape, but how you finish it is entirely up to you. Whether your style leans toward folklore, fantasy, or farmhouse, this raven will find a place in your clay story.

You can grab it here: Raven Pottery Slab-Building Template on Etsy.

This post is part of my Etsy Feature series, where I spotlight creative clay tools and templates that make hand-building both approachable and inspiring. And this raven template? It’s one that’s sure to take center stage in any collection.
 

«

Have you read?

DIY Sushi Bowls and Ceramic Chopsticks with Koi Wave Pottery Transfer Paper

If you’ve ever wanted to bring a touch of Japanese artistry to your tableware, this project is the perfect place to start. Using koi wave pottery transfer paper, you can transform plain clay pieces into elegant sushi bowls and matching ceramic chopsticks—handmade, functional, and beautiful.

This beginner-friendly guide will show you how to apply ceramic transfer sheets to create a set that looks store-bought but carries the warmth of handmade craftsmanship.

Materials You’ll Need

  • White stoneware or porcelain clay (cone 5–6 recommended) 
  • Koi wave ceramic pottery transfer paper (as shown above) 
  • Rolling pin or slab roller 
  • Bowl molds (small curved molds or slump molds for sushi bowls) 
  • Wooden chopstick dowels or ceramic chopstick molds 
  • Scissors 
  • Sponge or damp cloth 
  • Rib tool or rubber kidney 
  • Clear glaze 
  • Kiln

Step 1: Prepare Your Clay

  1. For the bowls – Roll out clay slabs about ¼ inch thick. Drape over a bowl mold or press into a slump mold to create your sushi bowl shape. Smooth edges with a damp sponge. 
  2. For the chopsticks – Roll clay into long, even strips (or press into chopstick molds if you have them). Aim for a slim, uniform thickness so they feel comfortable to hold. 

Let all pieces firm up to leather-hard stage—firm but still damp enough to accept transfers.

Step 2: Cut Out the Transfer Designs

Trim sections of the koi wave transfer paper to fit your pieces. For bowls, you can cut circular panels or strips depending on whether you want the design inside, outside, or both. For chopsticks, cut narrow strips of transfer paper that can wrap around each stick.

Tip: Think about placement—the flowing wave design looks especially striking when it wraps around curved surfaces.

Step 3: Apply the Transfer Paper

  1. Place the transfer sheet design-side down on the leather-hard clay. 
  2. Lightly dampen the back of the paper with a sponge until it darkens and sticks. 
  3. Smooth gently with a rib tool to ensure full contact. 
  4. Carefully peel back the paper to reveal the koi wave design. 

Repeat until all bowls and chopsticks are decorated.

Step 4: Dry and Bisque Fire

Allow all pieces to dry completely. Bisque fire according to your clay’s temperature guidelines (usually cone 04 for bisque). This firing will lock in the koi wave design.

Step 5: Glaze and Final Fire

Brush or dip in a clear glaze to seal the transfers, bringing out the rich blue detail while keeping the white clay background crisp. Fire to your glaze cone temperature (typically cone 5–6).

The Finished Set

You’ll have a handmade sushi set featuring:

  • Mini sushi bowls – perfect for soy sauce, dipping, or small side dishes. 
  • Matching ceramic chopsticks – elegant and reusable, finished with koi wave patterns. 

Tips

  • Keep chopsticks uniform in thickness so they balance well in use. 
  • Test the transfer on a scrap piece first to gauge how much water is needed. 
  • Try mixing placement—inside bowl only vs. outside vs. full wrap—for variety. 
  • Consider making a full set: 4 bowls + 4 pairs of chopsticks for a complete handmade sushi dining experience. 

This koi wave pattern brings both serenity and elegance to your handmade ceramics. The deep blue waves paired with koi fish designs make each piece feel timeless—perfect for special meals, gifting, or even selling as artisan tableware.

Creating your own sushi set allows you to blend functionality with artistry—every bite of sushi becomes part of a beautiful, handmade ritual.


Leave a Reply

Your email address will not be published. Required fields are marked *

Categories

air dry clay animals Artist Spotlight Christmas Clay Canes Clay Charms Craft Inspirations DIY Clay Tutorials and Patterns earrings Freebies halloween Inspiration necklace Plates, Bowls & Platters Polymer Clay Polymer Clay - Techniques Polymer Clay - Tutorials Polymer Clay Community Tips/Tools valentine's day

RSS feed: More Articles More Articles

  • DIY Milk Jug Halloween Skulls – Recycled Porch Decor
  • Make One Christmas Gift for Everyone: How to Save Money With Bulk Craft Supplies
  • Crocheting Christmas Gifts? Make This Supply Checklist Before You Buy More Yarn
  • DIY Faux Candy Apples: Easy Glossy Fall Decorations
  • 12 Fall Decorations You Can Make from Thrift Store Finds
  • DIY Witchy Chopping Board Decor With a Free Vintage Spirit Board Printable
  • How to Make a Cozy Coffee Gift Card Holder
  • Free Animal Person Embroidery Design Review
  • DIY Halloween Sock Pumpkins: Easy Fuzzy Pumpkins With Ghosts, Stripes and Witch Hats
  • Free Felting Tutorial Friday: Felt Into Autumn with Heidi Feathers

Pick Your Blog

  • Sewing
  • Knitting
  • Quilting
  • Crochet
  • Home & Garden
  • Recycled Crafts
  • Scrapbooking
  • Card Making
  • Polymer Clay
  • Cross-Stitch
  • Edible Crafts
  • Felting
  • Glass Art
  • Indie Crafts
  • Kids Crafts
  • Jewelry Making
  • Lesson Plans
  • Needlework
  • Bath & Body
  • Party Ideas
  • Candle Making
  • DIY Weddings
  • Not Craft
  • Free Craft Projects

Copyright © 2026 · CraftGossip | Start Here | Contact Us | Link to Us | Your Editors | Privacy and affiliate policy