• Home
  • Suggest A Craft
  • DIY Newsletter

Polymer Clay

Fimo and clay tips and tutorials

  • About CraftGossip
  • Our Network
    • Bath & Body Crafts
    • Candle Making Ideas
    • Crochet Ideas
    • Cross Stitch
    • Edible Crafts
    • Felting Patterns
    • Glass Art
    • Home & Garden Ideas
    • Indie Crafts
    • Jewelry Making
    • Kids Crafts
    • Knitting Patterns
    • Lesson Plans
    • Needlework
    • Party Ideas
    • Polymer Clay
    • Quilting Ideas
    • Recycled Crafts
    • Scrapbooking
    • Sewing Patterns
    • Card Making
    • DIY Weddings
    • Not Craft Ideas
  • Giveaways
  • Roundups
  • Store
  • Search

Polymer Clay Macarons

February 17, 2012 by Elaine Robitaille

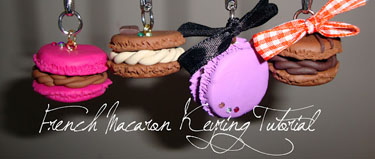
Here’s a fun one from TheGlueGunGirl: a tutorial for little clay French style macarons. She makes these into keychains but really they’d work wherever you’d like a macaron bead.

One thing I’d note is if you’re going to use a mix of clays, cure at the higher temp, for the full time. You may darken your lighter colour but if you are making a keychain, you need the extra stability a correct time and temperature provides.

«
»

Have you read?

DIY Air Dry Clay Magnets – Easy Stamped Clay Craft

There’s something wonderfully nostalgic about clay crafts, isn’t there? The cool, smooth texture in your hands, the way it slowly transforms with just a little pressure and imagination—it’s both soothing and creative. Today, we’re making DIY air dry clay magnets that are stamped, painted, and perfect for adding a handmade touch to your fridge or craft room.

This project is simple, relaxing, and looks far more “designer” than it really is. Think of it as pottery without the kiln—no fancy equipment needed!


Supplies You’ll Need

  • Air dry clay (white works best for stamping)

  • Rubber stamps or textured items (lace, doilies, leaves, even buttons!)

  • Acrylic paint or ink pads

  • Rolling pin (or just grab a glass bottle)

  • Circle cookie cutter (or jar lid)

  • Magnets (strong flat-backed ones work best)

  • Strong craft glue or hot glue gun

  • Sealer (optional: Mod Podge or matte varnish)

Step-by-Step Tutorial

Step 1 – Roll Out Your Clay

Start with a small ball of clay and roll it out to about ¼ inch thick. Not too thin, or it’ll crack while drying, and not too chunky, or your magnets will be too heavy.

Step 2 – Stamp and Texture

Press your chosen rubber stamp or textured object firmly into the clay. Don’t worry about perfection—slight variations give that handmade charm.

Tip: If you’re using an ink pad, you can ink the stamp before pressing to add instant color to the impression.

Step 3 – Cut Out Shapes

Use a cookie cutter, jar lid, or knife to cut neat circles (or any shape you like—hearts, squares, even freeform ovals).

Step 4 – Smooth Edges

Gently smooth the edges with damp fingers or a bit of water. This gives a polished finish.

Step 5 – Dry

Place your pieces on baking paper and allow them to dry for 24–48 hours. Flip halfway through to prevent curling.

Step 6 – Paint or Highlight

Once dry, you can leave them natural or lightly brush paint over the raised designs to highlight the texture. Metallics (gold, silver, copper) look stunning, but even soft pastels give a pretty effect.

Step 7 – Seal (Optional)

If you want extra durability, brush on a thin coat of Mod Podge or varnish.

Step 8 – Attach Magnets

Finally, glue a magnet to the back of each piece. Let the glue cure fully before sticking them on your fridge.

Variations to Try

  • Rustic farmhouse look: Use lace or burlap for stamping and paint with a whitewash effect.

  • Modern boho: Try geometric stamps and metallic paint accents.

  • Seasonal magnets: Use themed stamps (snowflakes, flowers, leaves) for year-round sets.

  • Kids’ art version: Let the kids press buttons, Lego bricks, or small toys into the clay for fun patterns.

These don’t just work as magnets—you can glue them onto gift tags, turn them into brooches, or even make them into pendants for necklaces. Once you start, you’ll be stamping everything in sight (don’t say I didn’t warn you!).

Handmade doesn’t have to be complicated or expensive. These DIY air dry clay magnets prove just that—simple materials, a little creativity, and you’ve got a set of unique, functional mini artworks. Perfect for gifting, decorating, or just adding a bit of joy to the everyday.


RSS More Articles

  • Magical Winter Crafts for Kids: Easy Indoor Activities
  • DIY Air Dry Clay Magnets – Easy Stamped Clay Craft
  • Etsy Spotlight – The Quilted Jacket You’ll Want to Make and Wear All Year
  • 6 FREE Disney Villains Silhouettes Die Cuts
  • Transforming an IKEA Shelf into a Rustic Farmhouse Beauty
  • Enchanted Coast Wrap – Crochet Pattern
  • On Point Pincushion Tutorial
  • Pantry Makeover- The power of Billy Bookcases and Stenciled Floors
  • Leaf Learning Activities for Kids
  • 2 Hour Crochet Sippers Pattern – Fast Rectangle Crochet Slippers – Cozy Feet in a Flash

Pick Your Blog

  • Sewing
  • Knitting
  • Quilting
  • Crochet
  • Home & Garden
  • Recycled Crafts
  • Scrapbooking
  • Card Making
  • Polymer Clay
  • Cross-Stitch
  • Edible Crafts
  • Felting
  • Glass Art
  • Indie Crafts
  • Kids Crafts
  • Jewelry Making
  • Lesson Plans
  • Needlework
  • Bath & Body
  • Party Ideas
  • Candle Making
  • DIY Weddings
  • Not Craft
  • Free Craft Projects

Copyright © 2025 · CraftGossip | Start Here | Contact Us | Link to Us | Your Editors | Privacy and affiliate policy